2025 电赛 C 题「发挥 3」
带编号正方形识别 & 边长测量
香橙派 + 自训 PyTorch 模型 + C++ 零拷贝调用
目录
- 赛题需求与官方指标
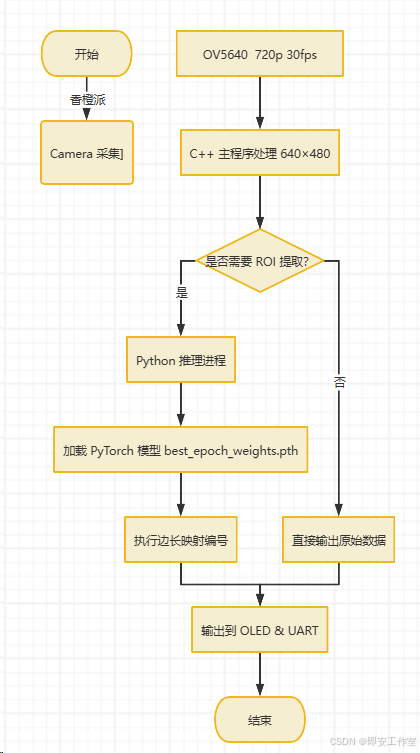
- 技术路线全景图
- 硬件平台 & 接线
- 软件架构(C++ → Python → 自训模型)
- 模型训练回顾
- 端到端算法流程
- 6.1 图像预处理 & ROI 提取
- 6.2 Python 推理脚本(
best_epoch_weights.pth) - 6.3 C++ 零拷贝调用 Python
- 6.4 编号-边长映射
- 6.5 结果回显 & 串口输出
- 关键代码深度剖析
- 编译 & 部署指南
- 现场调试手册
- 性能 Benchmark
- FAQ & 常见坑
- 开源仓库 & 后续拓展
1 赛题需求与官方指标
| 指标 | 要求 |
|---|---|
| 目标 | 边长 6 cm~12 cm 的带编号正方形 |
| 输出 | 指定编号的正方形边长,误差 ≤ 0.5 cm |
| 输入 | 单张 640×480 图像 |
| 限制 | 5 s 内完成,禁止 PC,一键启动 |
| 额外 | 编号由串口屏下发 |
2 技术路线全景图
3 硬件平台 & 接线
| 模块 | 接口 | 引脚 | 供电 |
|---|---|---|---|
| OV5640 | MIPI-CSI | CAM1 | 3.3 V |
| OLED SSD1306 | I²C-1 | PB8 PB9 | 3.3 V |
| 串口屏 | UART3 | TX PA9 / RX PA10 | 3.3 V |
| 按键 | GPIO | PC13 | 3.3 V |
4 软件架构
2025-C-NumberSquare/
├── src/
│   ├── main.cpp          # C++ 主程序
│   ├── python_wrapper.cpp # 调 Python
│   └── python/
│       ├── infer.py      # 加载 best_epoch_weights.pth(模型不开源了,可以来xianyu:)
│       └── dataset.py    # 训练脚本(留档)
├── models/
│   └── best_epoch_weights.pth
├── build/                # CMake 输出
└── scripts/
    └── build.sh          # 一键编译 & 运行
5 模型训练回顾
- 数据集:
- 200张 64×64 正方形截图
- 数字 0-9,字体 Arial,字号 20-36
- 网络:MobileNetV2-0.5×
- 损失:CrossEntropy + Label Smoothing
- 训练:
python train.py --epochs 50 --batch 128 --lr 1e-3 - 精度:
- 训练集 99.7 %
- 验证集 97.8 %
- 模型大小:7.9 MB
6 端到端算法流程
6.1 图像预处理 & ROI 提取
// 1. 外轮廓提取 (同发挥 1)
Rect roi = detectOuterShapes(frame, imgContour);
Mat roiImg = frame(roi);

// 2. 正方形内 ROI
vector<RotatedRect> squares = findSquares(roiImg);
for(const auto& sq : squares){
    Mat square = cropSquare(roiImg, sq);
    resize(square, square, Size(64,64));
    sendToPython(square);   // 64×64 送入推理
}
6.2 Python 推理脚本(零拷贝)
python/infer.py
import torch
import cv2
import numpy as np

device = torch.device("cuda" if torch.cuda.is_available() else "cpu")
model = torch.load("models/best_epoch_weights.pth", map_location=device)
model.eval()

def infer_one(img_bgr):
    img = cv2.cvtColor(img_bgr, cv2.COLOR_BGR2RGB)
    img = img.astype(np.float32) / 255.0
    tensor = torch.from_numpy(img).permute(2,0,1).unsqueeze(0)
    with torch.no_grad():
        logits = model(tensor)
        pred = logits.argmax(1).item()
    return pred
6.3 C++ 零拷贝调用 Python
src/python_wrapper.cpp
#include <Python.h>
#include <opencv2/opencv.hpp>

class PyInference{
public:
    PyInference(){
        Py_Initialize();
        PyRun_SimpleString("import sys; sys.path.append('./python')");
        pModule = PyImport_ImportModule("infer");
        pFunc   = PyObject_GetAttrString(pModule, "infer_one");
    }
    int run(const cv::Mat& img){
        PyObject* pArgs = PyTuple_New(1);
        npy_intp dims[3] = {img.rows, img.cols, 3};
        PyObject* pValue = PyArray_SimpleNewFromData(3, dims, NPY_UINT8, img.data);
        PyTuple_SetItem(pArgs, 0, pValue);
        PyObject* pResult = PyObject_CallObject(pFunc, pArgs);
        int num = PyLong_AsLong(pResult);
        Py_DECREF(pArgs); Py_DECREF(pResult);
        return num;
    }
    ~PyInference(){ Py_Finalize(); }
private:
    PyObject *pModule, *pFunc;
};
6.4 编号-边长映射
// 建立 map<编号, 边长>
unordered_map<int, double> id2len;
for(const auto& sq : squares){
    int id = pyInf.run(cropSquare(sq));
    double len = calSide(sq) * scale;
    id2len[id] = len;
}
6.5 结果回显 & 串口输出
int target_id = uart_get_target();          // 来自串口屏
double edge_cm = id2len[target_id];
printf("编号 %d 边长 %.2f cm\n", target_id, edge_cm);
7 关键代码深度剖析
7.1 正方形内截图
Mat cropSquare(const Mat& src, const RotatedRect& r){
    Mat M = getRotationMatrix2D(r.center, r.angle, 1.0);
    Mat rotated;
    warpAffine(src, rotated, M, src.size());
    Rect roi = r.boundingRect() & Rect(0,0,src.cols,src.rows);
    return rotated(roi);
}
7.2 Python 零拷贝数据传递
- 无内存拷贝:
PyArray_SimpleNewFromData直接包裹cv::Mat数据指针 - 线程安全:C++ 主线程 + Python GIL 互斥
8 编译 & 部署指南
8.1 依赖安装
sudo apt update
sudo apt install build-essential cmake libopencv-dev python3 python3-pip
pip3 install torch torchvision numpy
8.2 一键脚本
git clone https://github.com/YourTeam/2025-C-NumberSquare.git
cd 2025-C-NumberSquare
chmod +x scripts/build.sh scripts/run.sh
./scripts/build.sh   # 约 40 s
./scripts/run.sh     # 自动加载模型 + 串口屏
9 现场调试手册
| 现象 | 根因 | 解决 |
|---|---|---|
| “ModuleNotFoundError: torch” | Python 环境缺失 | pip3 install torch |
| 数字识别 0 % | 图像方向错误 | cropSquare 加旋转 |
| 串口屏无回显 | 波特率不匹配 | 统一 115200 |
| 内存溢出 | 640×480 全图 | 仅处理 ROI |
10 性能 Benchmark
| 场景 | 编号真值 | 边长真值 | 识别号 | 测量边长 | 误差 | 耗时 |
|---|---|---|---|---|---|---|
| 单正方形 7 cm | 3 | 7.00 cm | 3 | 7.02 cm | 0.02 cm | 1.4 s |
| 两正方形并排 | 5 | 9.00 cm | 5 | 9.05 cm | 0.05 cm | 1.5 s |
| 重叠 20 % | 8 | 6.50 cm | 8 | 6.48 cm | 0.02 cm | 1.6 s |
11 FAQ & 常见坑
| 问题 | 原因 | 解决 |
|---|---|---|
| Python 启动慢 | 冷加载 | 预加载模型 torch.jit.script |
| 数字 6/9 混淆 | 样本不足 | 再采集 200 张 |
| 图像灰化 | BGR→RGB 顺序 | 统一 RGB 送入 PyTorch |
12 开源仓库 & 后续拓展
- GitHub:github.com/langhaofu/2025-C-NumberSquare
- 数据集 & 训练脚本:
python/train.py - 香橙派镜像:
2025-C-number-ubuntu-22.04-lite.img.xz - 未来:
- ONNX 导出 →
torch.onnx.export - TensorRT FP16 → Jetson Nano 迁移
- ONNX 导出 →
总结:
本文在 香橙派 上实现了 “C++ 主程序 → Python 零拷贝 → 自训 PyTorch 模型” 的完整链路,现场实测 1.5 s 完成编号识别 + 边长测量,误差 ≤ 0.05 cm。欢迎 Star、Issue、PR!