一、官方文档:
1、wx.getUserInfo(uni.getUserInfo):基础库版本低于2.27.1可用
① 文档链接:
- https://developers.weixin.qq.com/miniprogram/dev/api/open-api/user-info/wx.getUserInfo.html
- https://uniapp.dcloud.net.cn/api/plugins/login.html#getuserinfo
② 官方说明:
③ 替代方案 - 已经废弃:
<button open-type="getUserInfo" @getuserinfo="handleGetUserInfo">获取用户信息</button>
2、wx.getUserProfile(uni.getUserProfile):基础库版本2.9.5~2.27.1可用
① 文档链接:
- https://developers.weixin.qq.com/miniprogram/dev/api/open-api/user-info/wx.getUserProfile.html#%E7%A4%BA%E4%BE%8B%E4%BB%A3%E7%A0%81
- https://uniapp.dcloud.net.cn/api/plugins/login.html#getuserprofile
② 官方说明:
③ 替代方案 - 已经废弃:
<button @click="getUserProfile">获取用户信息</button>
3、非静默获取用户头像和昵称:
① 文档链接:
https://developers.weixin.qq.com/miniprogram/dev/framework/open-ability/userProfile.html
② 完整代码:
<template>
<view class="myIndex" :style="{ paddingTop: navbarHeight + 'px' }">
<view class="custom-navbar" :style="{ paddingTop: statusBarHeight + 'px' }">
<view class="navbar-title">{{title}}</view>
</view>
<view class="content">
<!-- 头像 -->
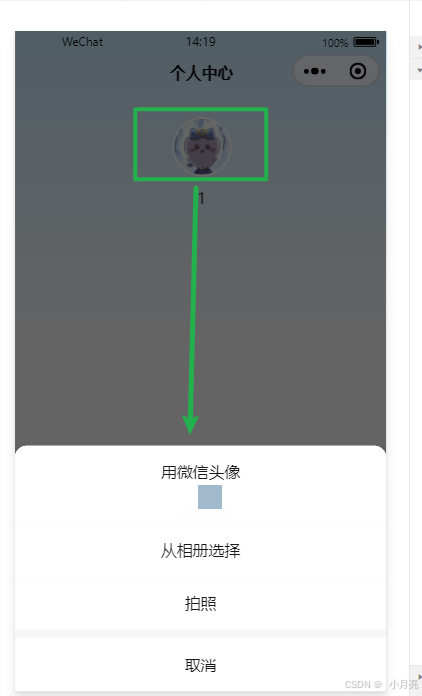
<button open-type="chooseAvatar" @chooseavatar="onChooseAvatar" class="avatar-button">
<image :src="avatar" mode="aspectFill" class="img" />
</button>
<!-- 昵称 -->
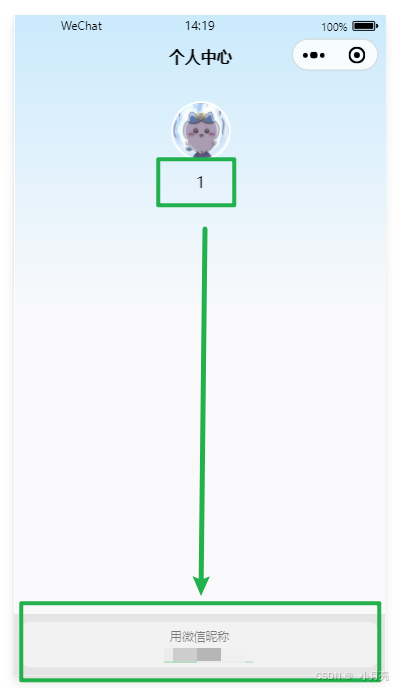
<input type="nickname" placeholder="请输入昵称" v-model="nickName" @input="onKeyInput"/>
</view>
</view>
</template>
<script>
export default {
data() {
return {
title: '个人中心',
navbarHeight: 0, // 导航栏高度
statusBarHeight: 0,
avatar: 'https://img0.baidu.com/it/u=3824830576,2699714066&fm=253&app=138&f=JPEG?w=800&h=804', // 默认的头像
nickName: '默认的昵称', // 默认的昵称
}
},
onLoad() {
// 获取系统信息计算导航栏高度
const systemInfo = uni.getSystemInfoSync();
this.statusBarHeight = systemInfo.statusBarHeight;
this.navbarHeight = this.statusBarHeight + 44; // 44是导航栏标准高度
},
methods: {
// 点击进行头像选择
onChooseAvatar(e) {
const that = this
const {
avatarUrl
} = e.detail
uni.showLoading({ title: '上传中...' });
// 构造请求的参数
let params = {}
uni.uploadFile({
url: _uploadUrl, // 后端接口地址
filePath: avatarUrl, // 临时文件路径
name: 'imageFile', // 后端接收文件的参数名(必须与后端一致)
formData: params,
header: {
// 请求头信息
},
success: (res) => {
uni.hideLoading();
// 根据后端返回的准确地址进行存储与渲染
if (res.code === 200) {
console.log('线上的新头像地址为', res.url)
uni.showToast({ title: '头像更新成功', icon: 'success' });
} else {
uni.showToast({ title: result.msg || '上传失败', icon: 'none' });
}
},
fail: (err) => {
uni.hideLoading();
console.error('上传失败:', err);
uni.showToast({ title: '网络错误,请重试', icon: 'none' });
}
});
},
// 输入框输入内容
onKeyInput() {
// 在这里调用后端的接口,存储昵称
console.log('这个是输入的数据', this.nickName)
}
}
}
</script>
<style scoped>
.myIndex {
width: 100vw;
height: 100vh;
background-color: #F9F9FB;
}
.myIndex .custom-navbar {
position: fixed;
top: 0;
left: 0;
right: 0;
z-index: 999;
display: flex;
align-items: center;
}
.myIndex .navbar-title {
flex: 1;
height: 88rpx;
line-height: 88rpx;
text-align: center;
overflow: hidden;
text-overflow: ellipsis;
white-space: nowrap;
font-weight: 600;
font-size: 32rpx;
color: #000000;
}
.myIndex .content {
position: absolute;
top: 0;
left: 0;
width: 100vw;
height: 420rpx;
background: linear-gradient(180deg, #C6EBFD 0%, #F9F9FB 100%);
padding-top: calc(var(--status-bar-height) + 88rpx + 36rpx);
text-align: center;
}
.myIndex .avatar-button {
z-index: 1;
position: relative;
width: 120rpx;
height: 120rpx;
border-radius: 100rpx;
padding: 0;
margin: 0 16rpx 0 0;
}
.myIndex .content-top .img {
z-index: 10;
position: relative;
box-sizing: border-box;
width: 120rpx;
height: 120rpx;
border-radius: 100rpx;
border: 6rpx solid #fff;
object-fit: cover;
}
</style>
③ 效果显示:
4、用户信息社区公告:
https://developers.weixin.qq.com/community/develop/doc/00022c683e8a80b29bed2142b56c01