本系列可作为前端学习系列的笔记,代码的运行环境是在VS code中,小编会将代码复制下来,大家复制下来就可以练习了,方便大家学习。
HTML、CSS、JavaScript系列文章 已经收录在前端专栏,有需要的宝宝们可以点击前端专栏查看!
点赞关注不迷路!您的点赞、关注和收藏是对小编最大的支持和鼓励!
温馨提示:全文内容较长,可先收藏再食用!文章可作为学习AJAX的笔记,框架和主要内容来源于B站UP主-黑马程序员的视频:黑马程序员前端AJAX入门到实战全套教程,包含学前端框架必会的(ajax+node.js+webpack+git),一套全覆盖小编进行了整理并对一些内容进行了补充和注释,非商用,如有侵权,必删改!
系列文章目录
AJAX入门-常用请求方法和数据提交、HTTP协议-报文、接口文档、案例实战
目录
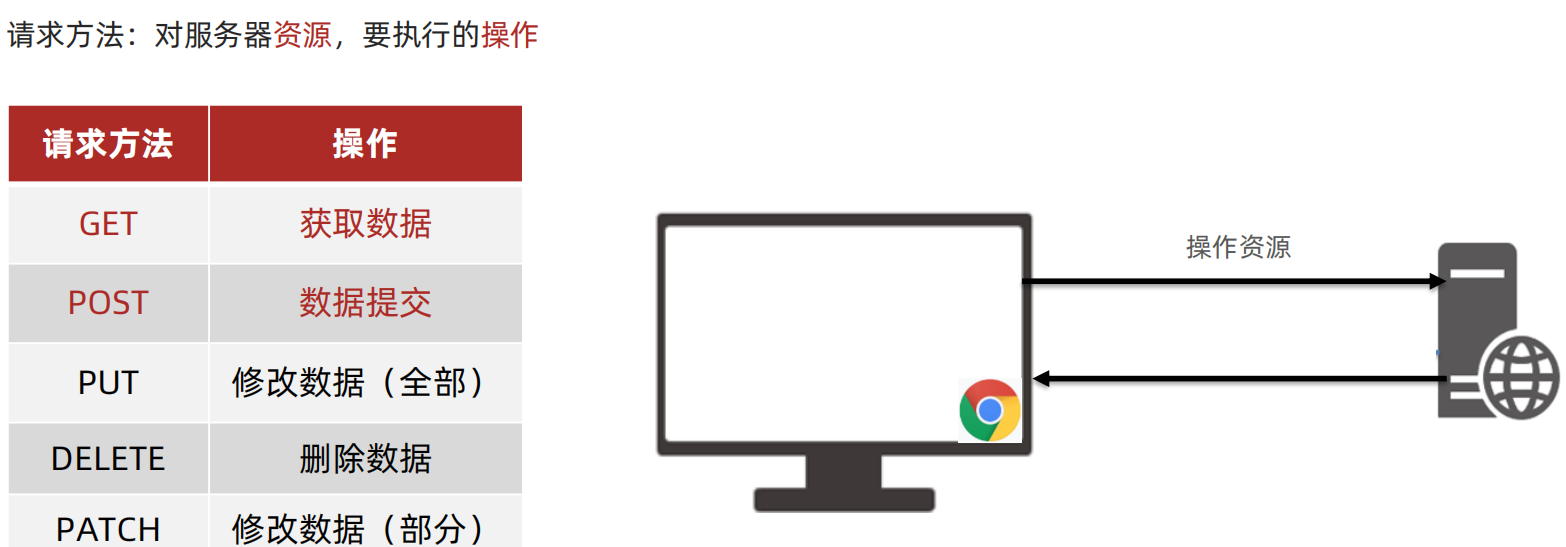
一、常用请求方法和数据提交
1、常用请求方法
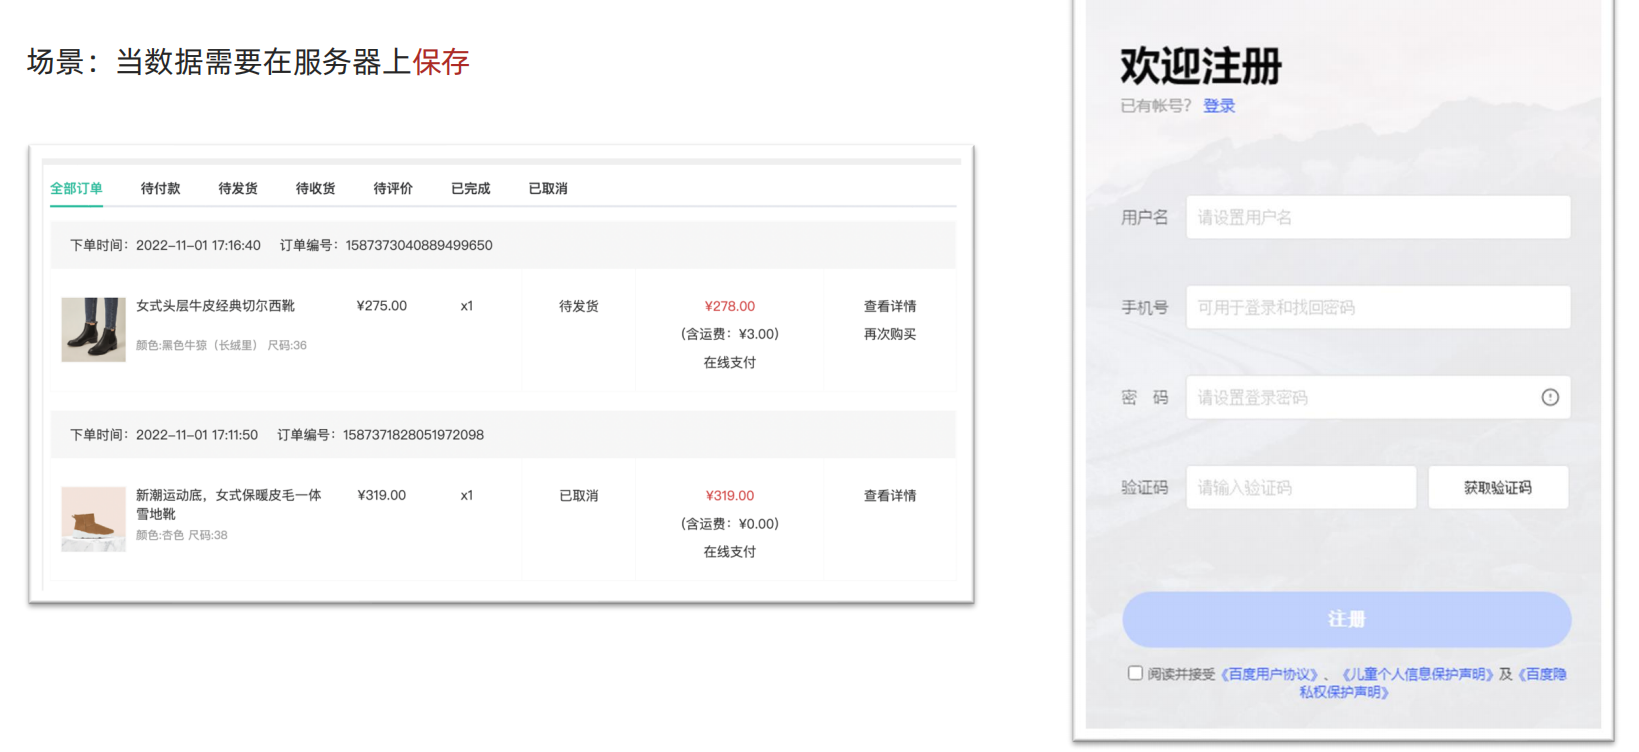
2、数据提交
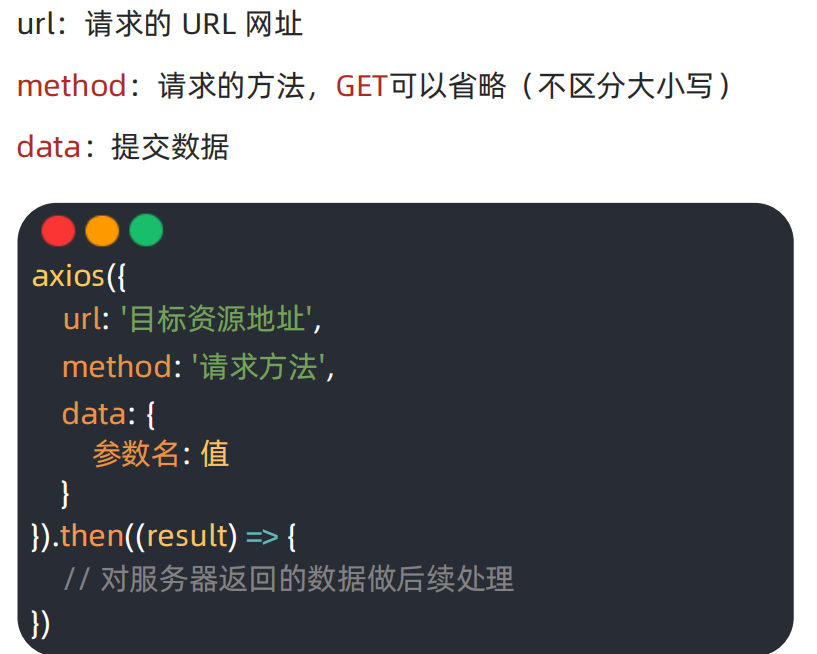
3、axios 请求配置
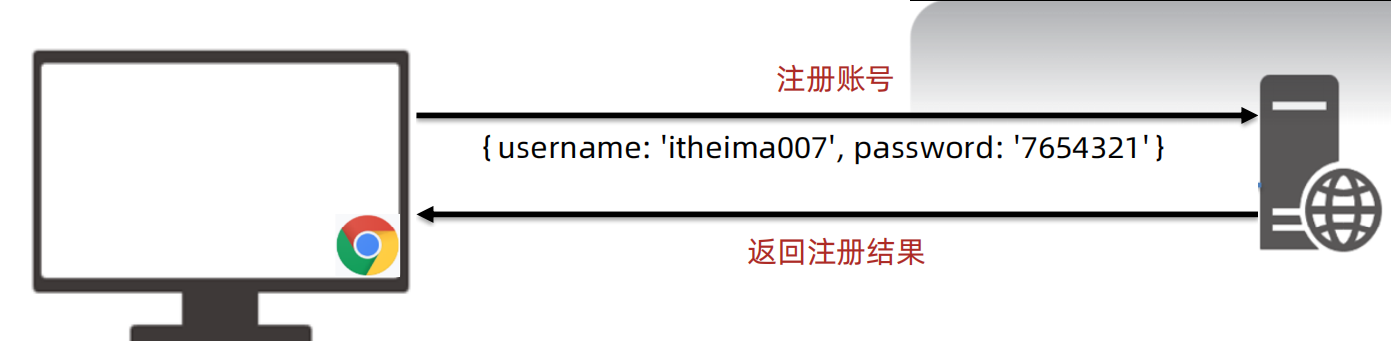
4、案例:数据提交-注册账号
需求:通过 axios 提交用户名和密码,完成注册功能
注册用户 URL 地址:http://hmajax.itheima.net/api/register
请求方法:POST
参数名:
username 用户名(中英文和数字组成,最少 8 位)
password 密码(最少 6 位)
<!DOCTYPE html>
<html>
  <head>
    <meta charset="utf-8">
    <meta http-equiv="X-UA-Compatible" content="IE=edge">
    <meta name="viewport" content="width=device-width, initial-scale=1.0">
    <title>05.常用请求方法和数据提交</title>
  </head>
  <body>

    <button class="btn">注册用户</button>
    <script src="https://cdn.jsdelivr.net/npm/axios/dist/axios.min.js">
    </script>
    <script>
      // <!-- 注册用户:http://hmajax.itheima.net/api/register
      //   请求方法:POST
      //   参数名:
      //   username:用户名(中英文和数字组成,最少八位)
      //   passward:密码(最少6位)
      //   目标:点击按钮,通过axios提交用户和密码,完成注册-->
      document.querySelector('.btn').addEventListener('click',()=>{
        axios({
          url:'http://hmajax.itheima.net/api/register',
          //指定请求方法
          method:'post',
          //提交数据
          data:{
            username:'yvvone',
            password:'654321'
          }
        }).then(result=>{
          console.log(result)
        })
      })

    </script>

  </body>
</html>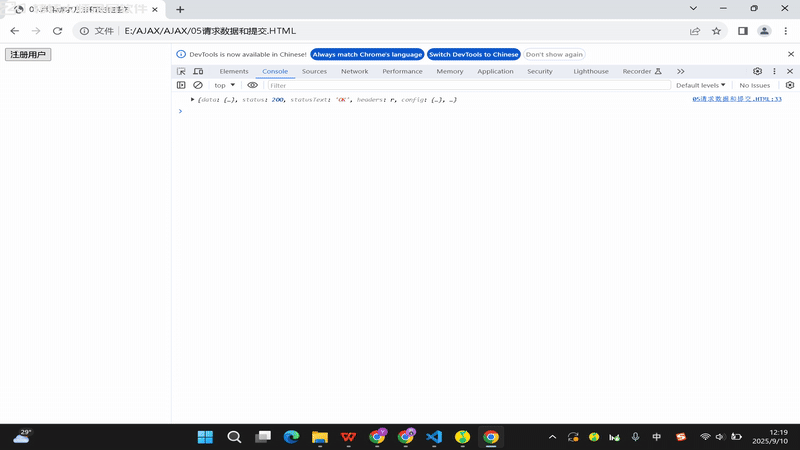
5、axios 错误处理
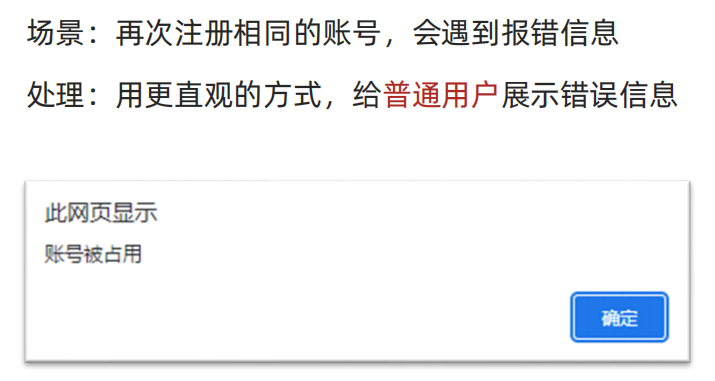
上面的代码添加异常处理机制之后:
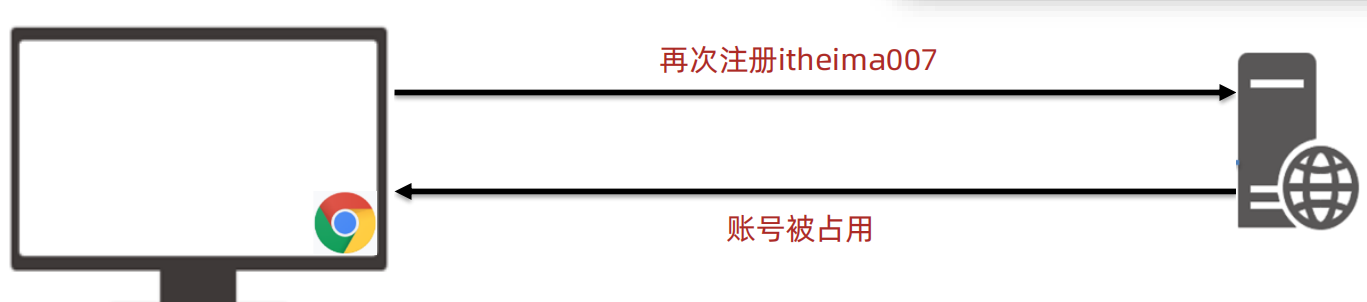
遇到已经被注册过的账号,会有弹窗提示
<!DOCTYPE html>
<html>
<head>
<meta charset="utf-8">
<meta http-equiv="X-UA-Compatible" content="IE=edge">
<meta name="viewport" content="width=device-width, initial-scale=1.0">
<title>05.常用请求方法和数据提交</title>
</head>
<body>
<button class="btn">注册用户</button>
<script src="https://cdn.jsdelivr.net/npm/axios/dist/axios.min.js">
</script>
<script>
// <!-- 注册用户:http://hmajax.itheima.net/api/register
// 请求方法:POST
// 参数名:
// username:用户名(中英文和数字组成,最少八位)
// passward:密码(最少6位)
// 目标:点击按钮,通过axios提交用户和密码,完成注册
// 需求:使用axios错误处理语法,拿到报错信息,弹窗反馈给用户-->
document.querySelector('.btn').addEventListener('click',()=>{
axios({
url:'http://hmajax.itheima.net/api/register',
//指定请求方法
method:'post',
//提交数据
data:{
username:'itheima007',
password:'6123456'
}
}).then(result=>{
console.log(result)
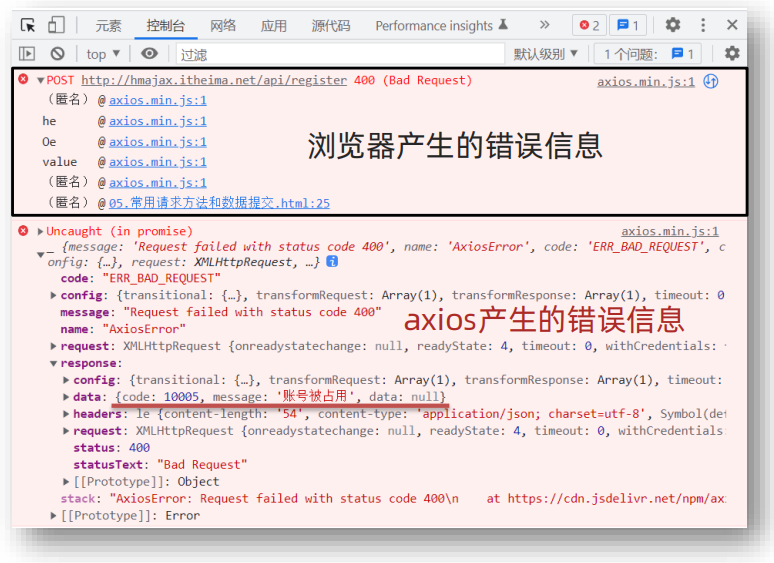
}).catch(error=>{
//处理错误信息
console.log(error)
console.log(error.response.data.message)
alert(error.response.data.message)
})
})
</script>
</body>
</html>
二、HTTP协议-报文
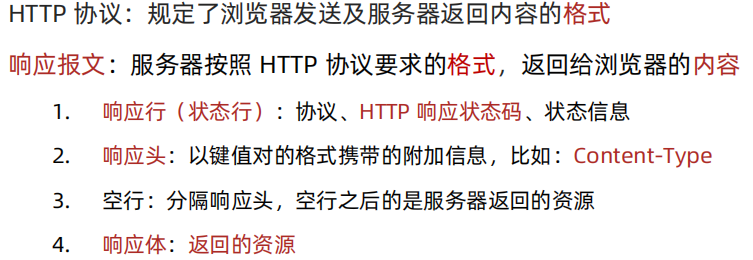
1.HTTP协议
HTTP 协议:规定了浏览器发送及服务器返回内容的 格式
请求报文 :浏览器按照 HTTP 协议要求的 格式 ,发送给服务器的 内容

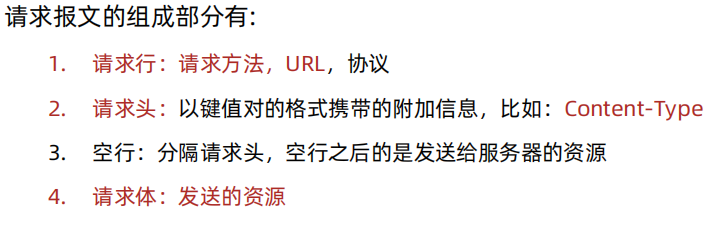
2.请求报文的格式
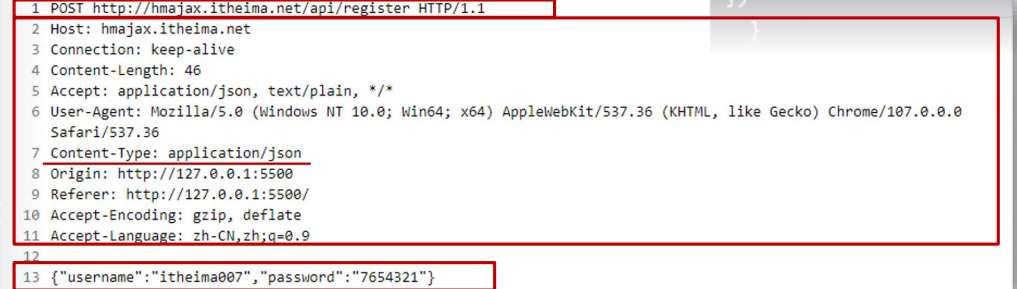
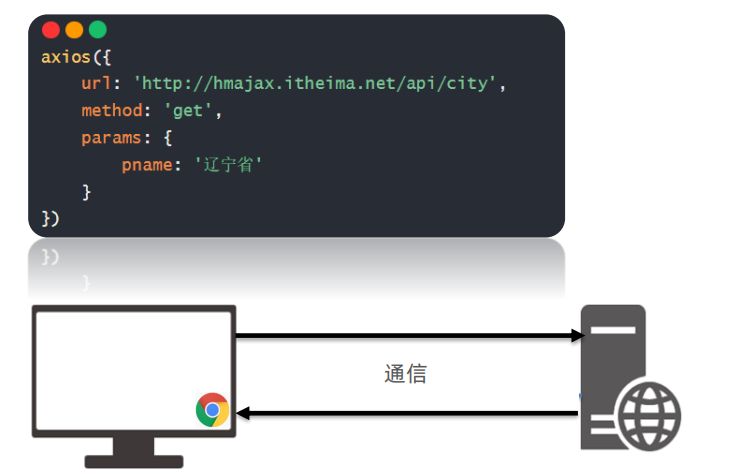
3.通过 Chrome 的网络面板查看请求报文
<!DOCTYPE html>
<html lang="en">
<head>
<meta charset="UTF-8">
<meta http-equiv="X-UA-Compatible" content="IE=edge">
<meta name="viewport" content="width=device-width, initial-scale=1.0">
<title>HTTP协议_请求报文</title>
</head>
<body>
<button class="btn">注册用户</button>
<script src="https://cdn.jsdelivr.net/npm/axios/dist/axios.min.js"></script>
<script>
/*
注册用户:http://hmajax.itheima.net/api/register
请求方法:POST
参数名:
username:用户名(中英文和数字组成, 最少8位)
password:密码(最少6位)
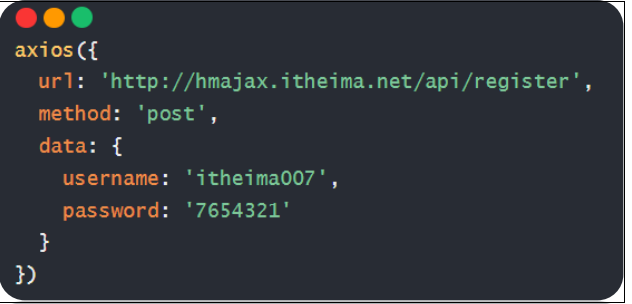
目标:运行后,查看请求报文
*/
document.querySelector('.btn').addEventListener('click', () => {
axios({
url: 'http://hmajax.itheima.net/api/register',
method: 'post',
data: {
username: 'itheima007',
password: '7654321'
}
}).then(result => {
// 成功
console.log(result)
}).catch(error => {
// 失败
// 处理错误信息
console.log(error)
console.log(error.response.data.message)
alert(error.response.data.message)
})
})
</script>
</body>
</html>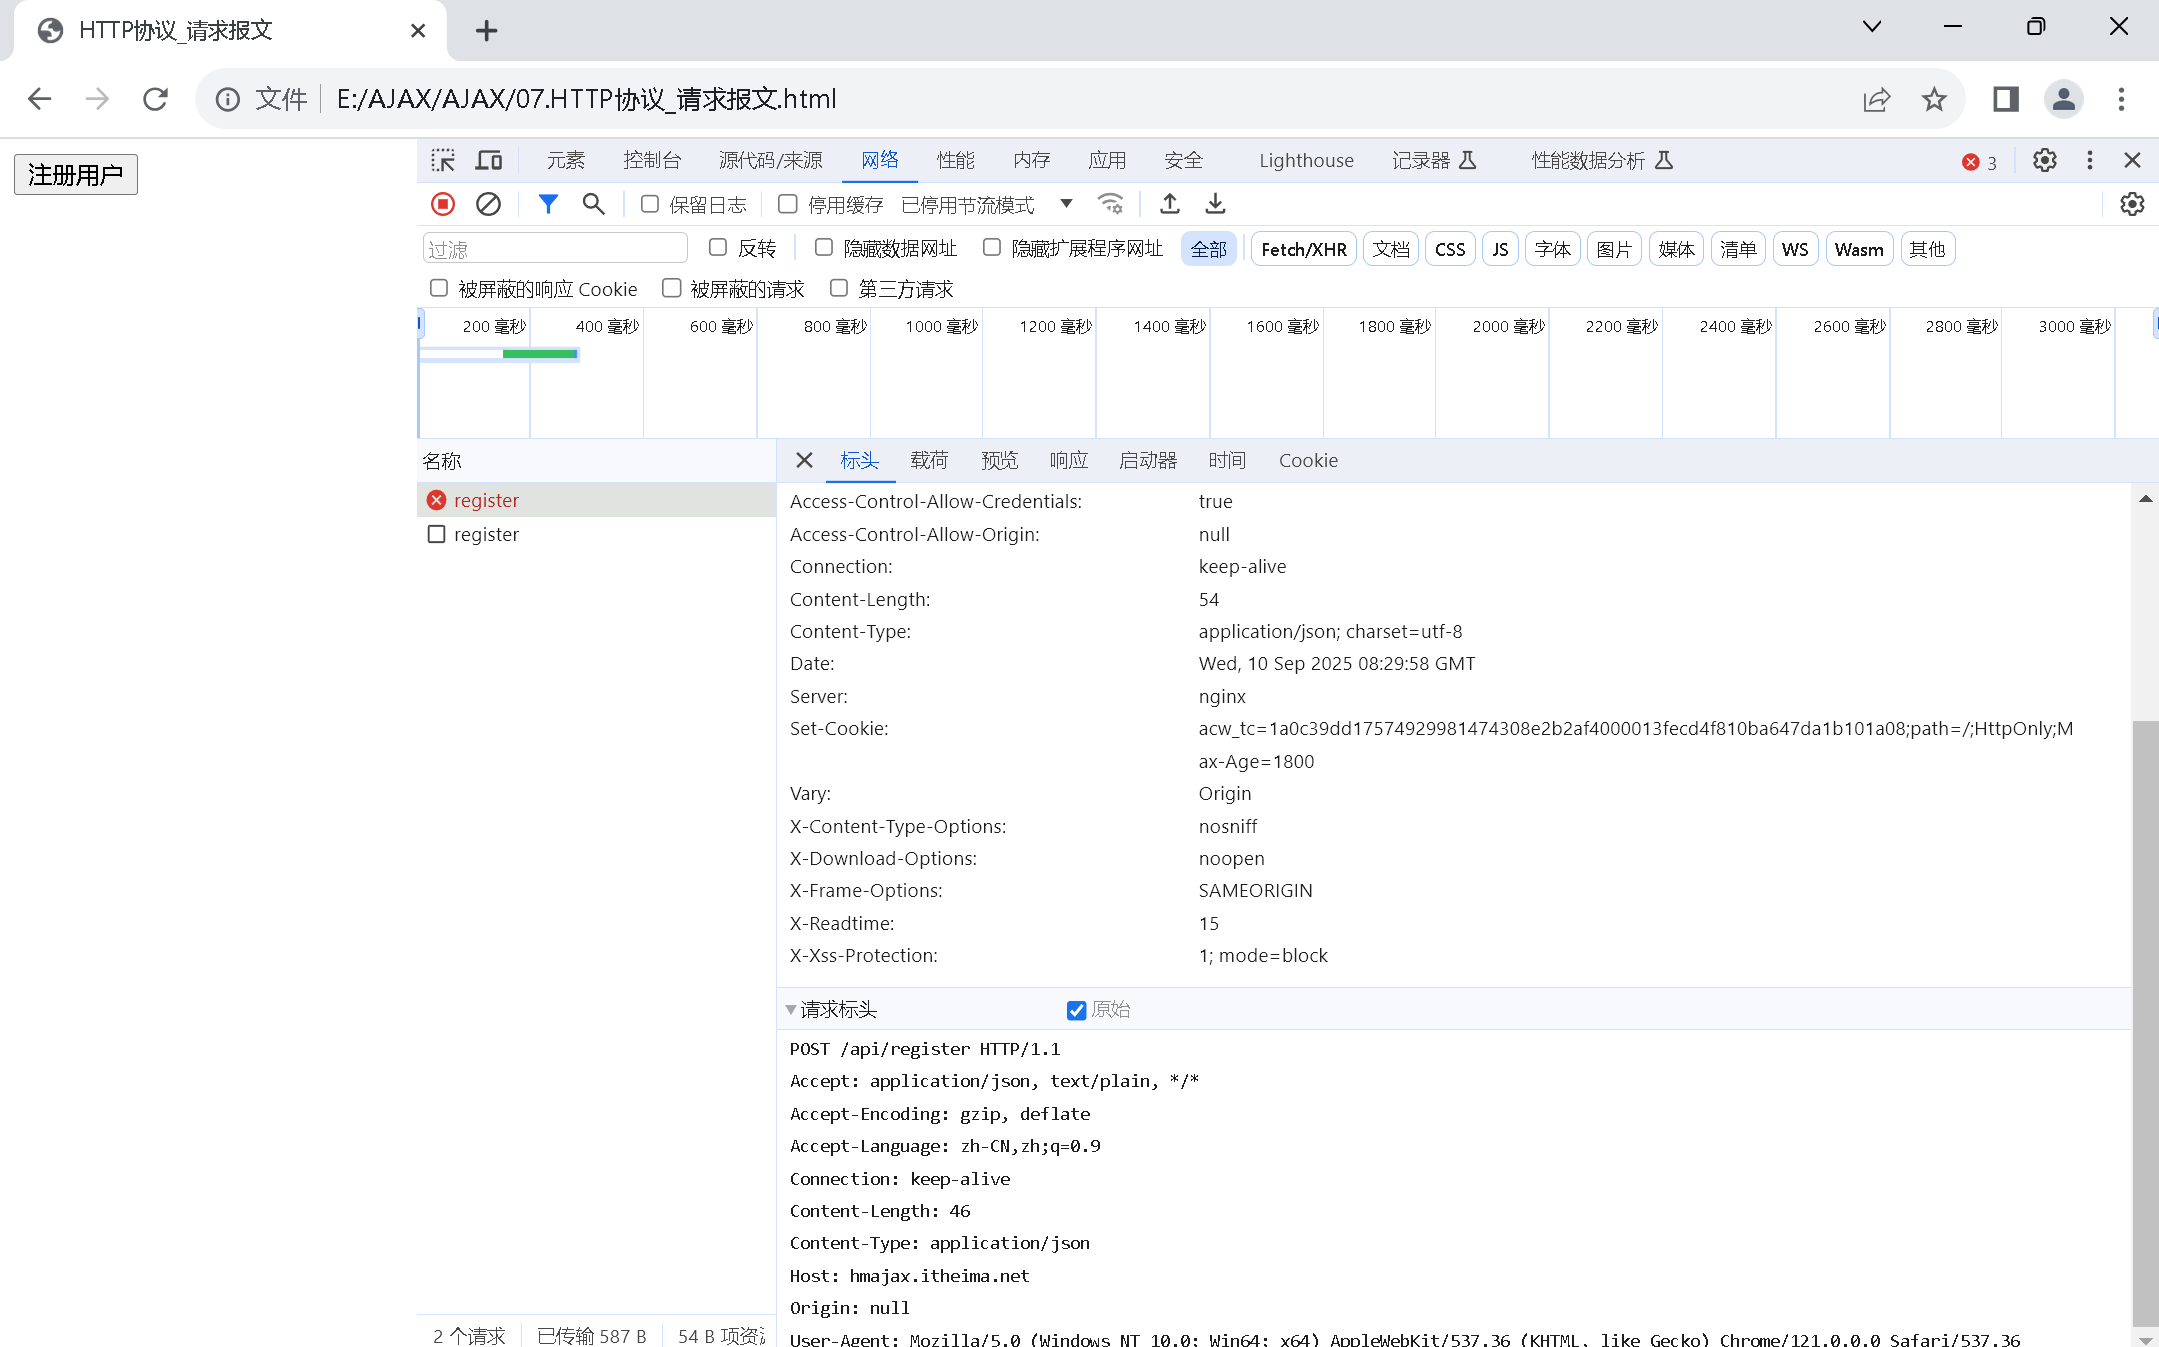
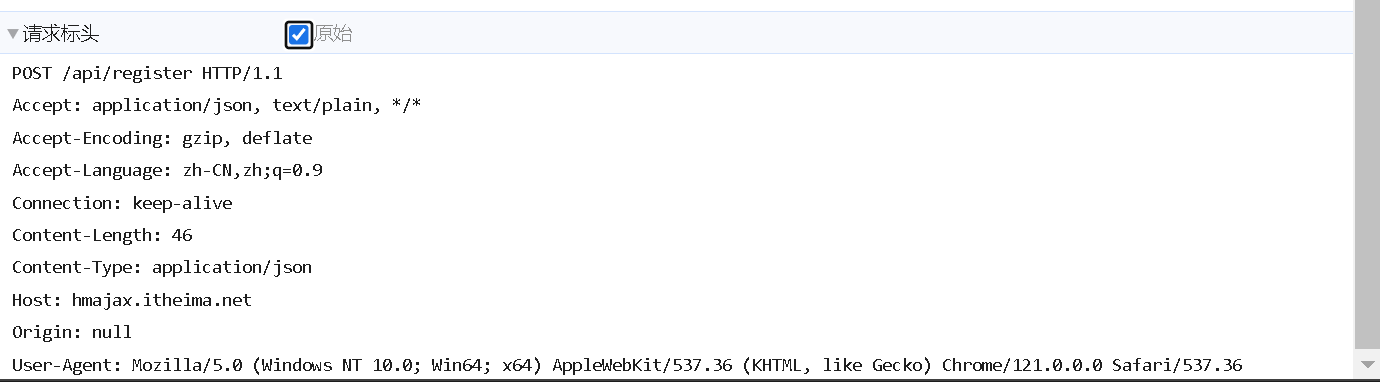
4.错误排查
需求:通过请求报文排查错误原因,并修复
输入 正确 的用户名和密码无法登录
• 用户名: itheima007
• 密码: 7654321
需求:通过请求报文排查错误原因,并修复
输入 正确 的用户名和密码无法登录
• 用户名: itheima007
• 密码: 7654321
<!DOCTYPE html>
<html lang="en">

<head>
  <meta charset="UTF-8">
  <meta http-equiv="X-UA-Compatible" content="IE=edge">
  <meta name="viewport" content="width=device-width, initial-scale=1.0">
  <title>请求报文_辅助调试</title>
  <!-- 引入bootstrap.css -->
  <link rel="stylesheet" href="https://cdn.jsdelivr.net/npm/bootstrap@5.2.2/dist/css/bootstrap.min.css">
  <!-- 公共 -->
  <style>
    html,
    body {
      background-color: #EDF0F5;
      width: 100%;
      height: 100%;
      display: flex;
      justify-content: center;
      align-items: center;
    }

    .container {
      width: 520px;
      height: 540px;
      background-color: #fff;
      padding: 60px;
      box-sizing: border-box;
    }

    .container h3 {
      font-weight: 900;
    }
  </style>
  <!-- 表单容器和内容 -->
  <style>
    .form_wrap {
      color: #8B929D !important;
    }

    .form-text {
      color: #8B929D !important;
    }
  </style>
  <!-- 提示框样式 -->
  <style>
    .alert {
      transition: .5s;
      opacity: 0;
    }

    .alert.show {
      opacity: 1;
    }
  </style>
</head>

<body>
  <div class="container">
    <h3>欢迎-登录</h3>
    <!-- 登录结果-提示框 -->
    <div class="alert alert-success" role="alert">
      JS中会动态插入提示文字
    </div>
    <!-- 表单 -->
    <div class="form_wrap">
      <form>
        <div class="mb-3">
          <label for="username" class="form-label">账号名</label>
          <input type="text" class="form-control username" name="username" aria-describedby="usernameHelp">
        </div>
        <div class="mb-3">
          <label for="password" class="form-label">密码</label>
          <input type="password" class="form-control password" name="password">
        </div>
        <button type="button" class="btn btn-primary btn-login"> 登 录 </button>
      </form>
    </div>
  </div>
  <script src="https://cdn.jsdelivr.net/npm/axios/dist/axios.min.js"></script>
  <script>
    // 1.获取 alert
    const alertCom = document.querySelector('.alert')

    // 2.抽取提示框的方法
    function showAlert(msg, classname) {
      alertCom.innerText = msg
      alertCom.classList.add(classname)
      alertCom.classList.add('show')
      setTimeout(() => {
        // 延迟隐藏
        alertCom.classList.remove('show')
        alertCom.classList.remove(classname)
      }, 2000);
    }

    // 3.给登录按钮绑定点击事件,提交输入的用户信息到服务器
    document.querySelector('.btn-login').addEventListener('click', function () {
      // 3.1 获取输入的用户名和密码
      const username = document.querySelector('.username').value
      const password = document.querySelector('.password').value

      // 3.2用户名 密码 长度判断
      if (username.trim().length < 8) {
        showAlert('用户名长度需要大于等于8', 'alert-danger')
        return
      }
      if (password.trim().length < 6) {
        showAlert('密码长度需要大于等于6', 'alert-danger')
        return
      }

      // 3.3 通过axios提交到服务器 并 提示用户 成功 / 失败
      axios({
        url: 'http://hmajax.itheima.net/api/login',
        method: 'post',
        data: {
          username,
          password
        }
      }).then(res => {
        // 显示提示框
        showAlert(res.data.message, 'alert-success')
      }).catch(err => {
        // 显示警示框
        showAlert(err.response.data.message, 'alert-danger')
      })
    })
  </script>
</body>

</html>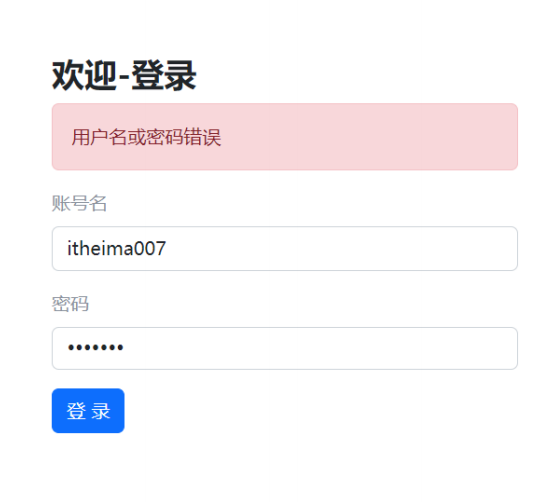
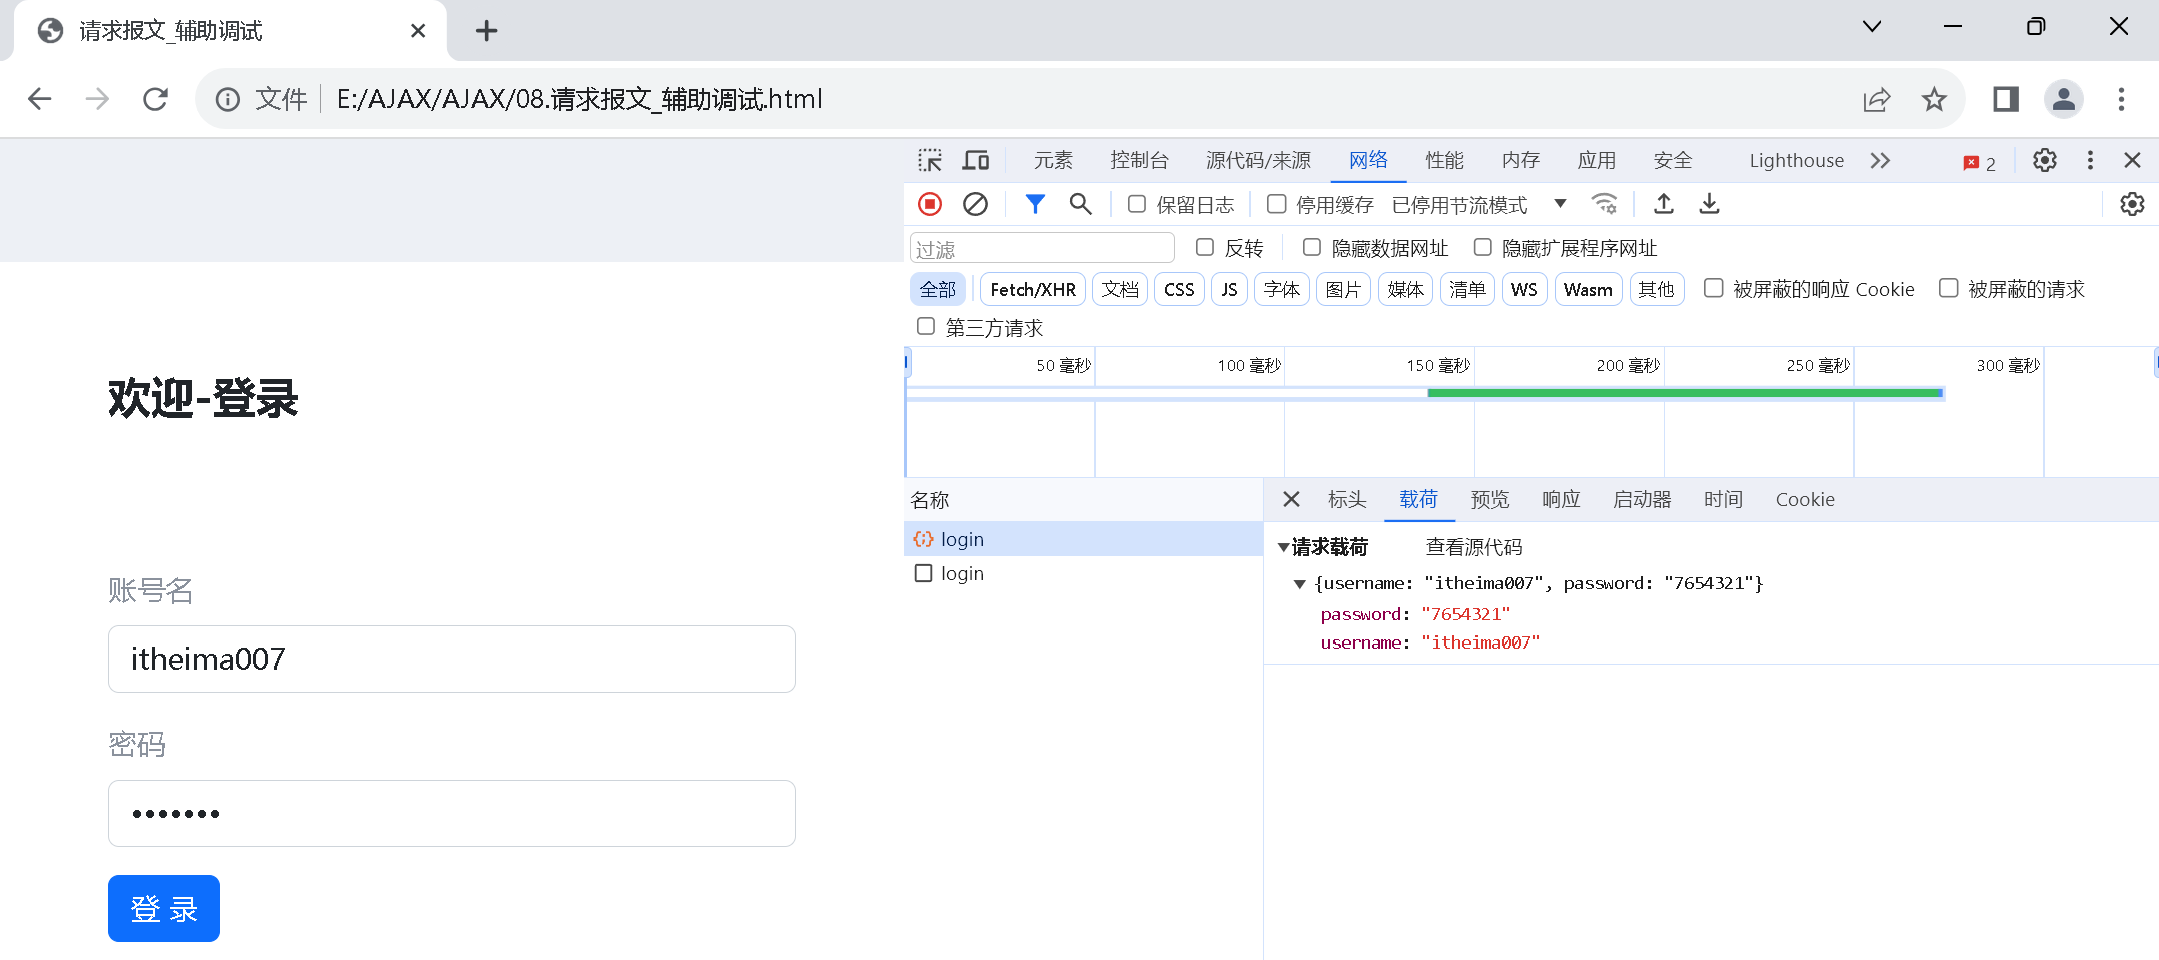
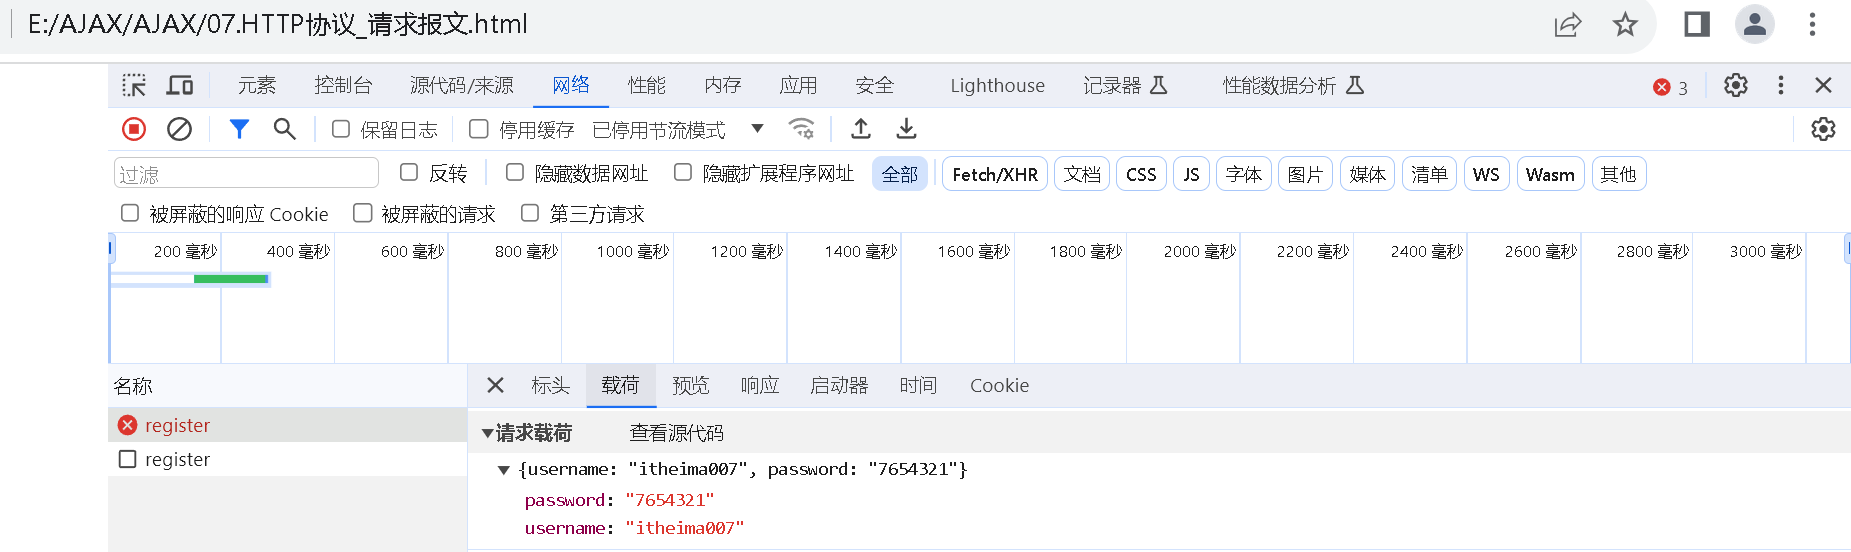
查看载荷显示的数据,检查password 和 username相关部分
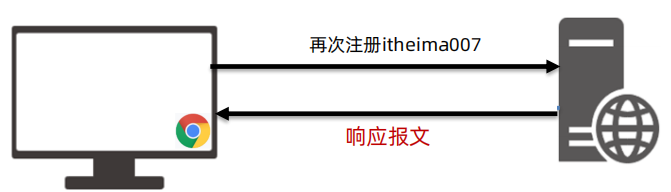
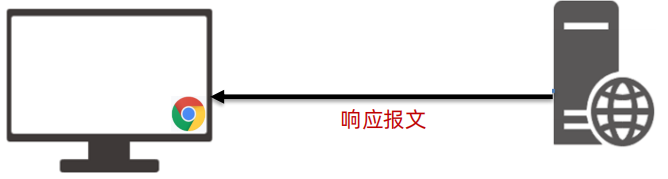
5.HTTP 协议-响应报文
6.HTTP 响应状态码
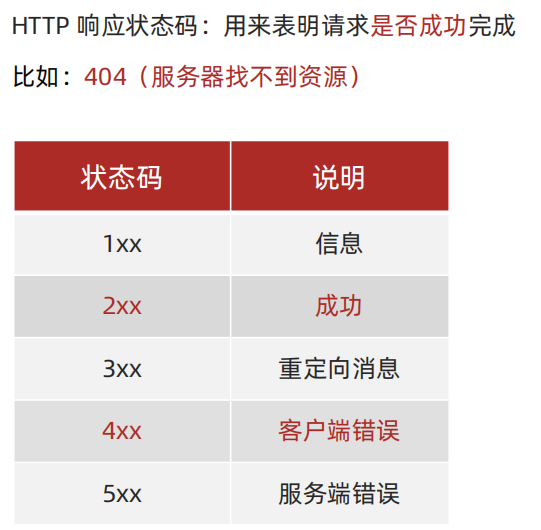
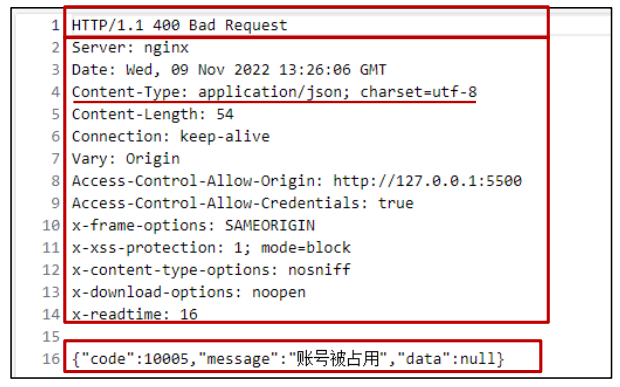
故意写错代码时,显示404状态 not found
<!DOCTYPE html>
<html lang="en">
<head>
<meta charset="UTF-8">
<meta http-equiv="X-UA-Compatible" content="IE=edge">
<meta name="viewport" content="width=device-width, initial-scale=1.0">
<title>HTTP协议_响应报文</title>
</head>
<body>
<button class="btn">注册用户</button>
<script src="https://cdn.jsdelivr.net/npm/axios/dist/axios.min.js"></script>
<script>
/*
注册用户: http://hmajax.itheima.net/api/register
请求方法: POST
参数名:
username: 用户名 (中英文和数字组成, 最少8位)
password: 密码 (最少6位)
目标: 点击按钮, 通过axios提交用户和密码, 完成注册
需求: 使用axios错误处理语法, 拿到报错信息, 弹框反馈给用户
*/
document.querySelector('.btn').addEventListener('click', () => {
axios({
url: 'http://hmajax.itheima.net/api/registrweer1ddd',
method: 'post',
data: {
username: 'itheima007',
password: '7654321'
}
}).then(result => {
// 成功
console.log(result)
}).catch(error => {
// 失败
// 处理错误信息
// console.log(error)
console.log(error.response.data.message)
// alert(error.response.data.message)
})
})
</script>
</body>
</html>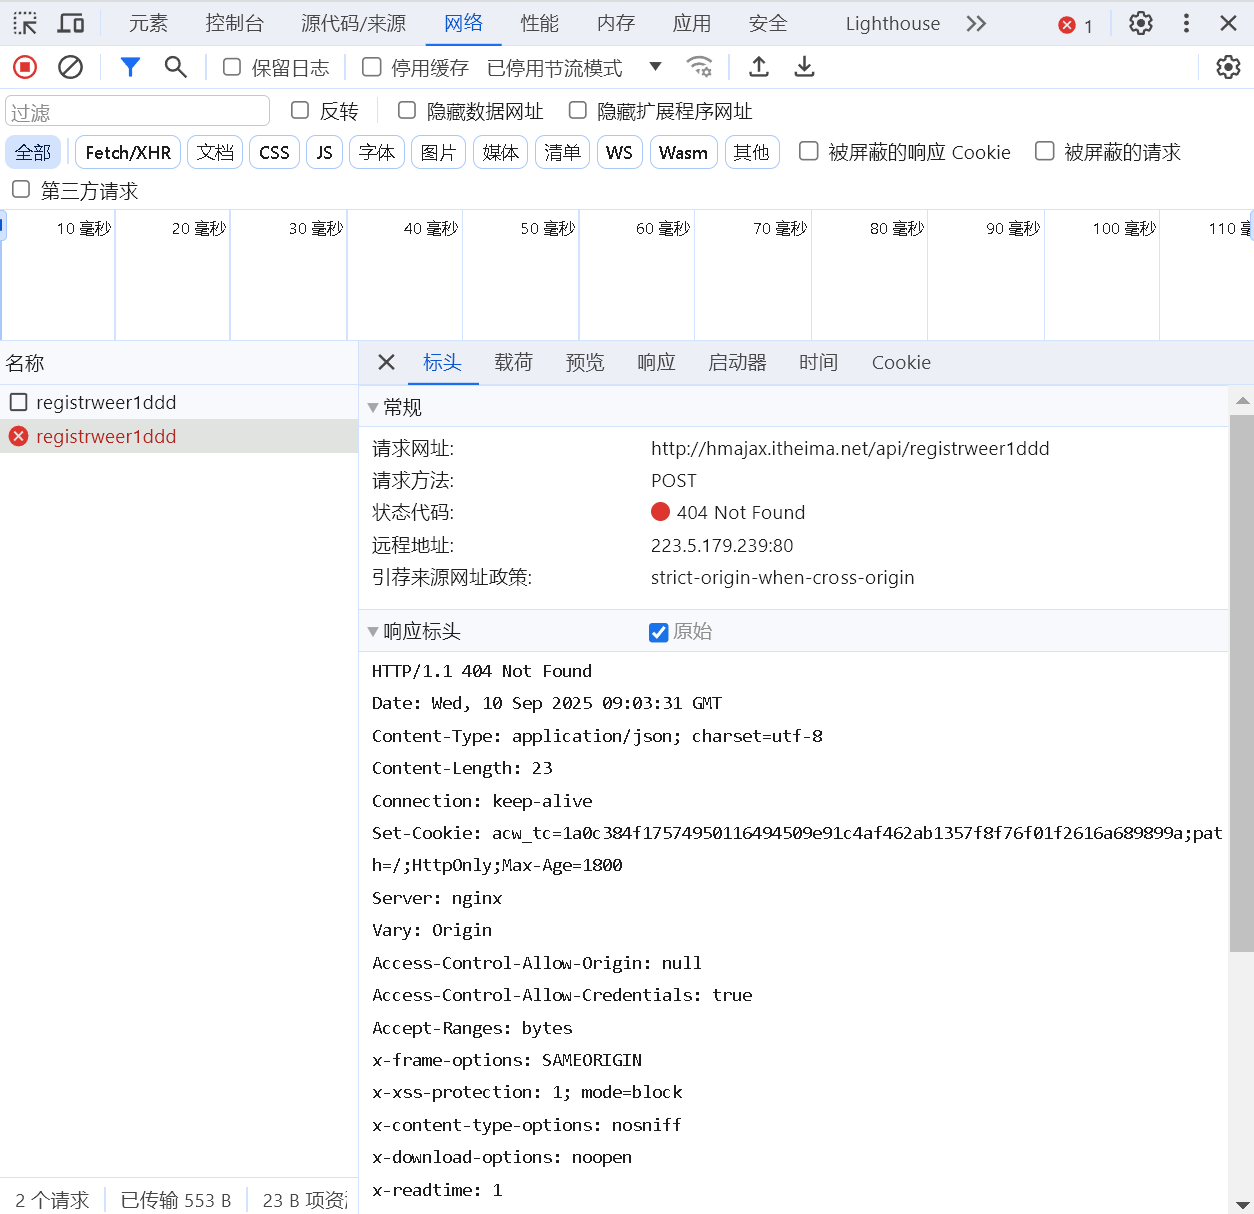 响应标头第一行显示:HTTP/1.1 404 Not Found
三、接口文档
1.接口文档
接口文档:描述接口的文章 (后端工程师)
接口:使用 AJAX 和服务器通讯时,使用的 URL,请求方法,以及参数
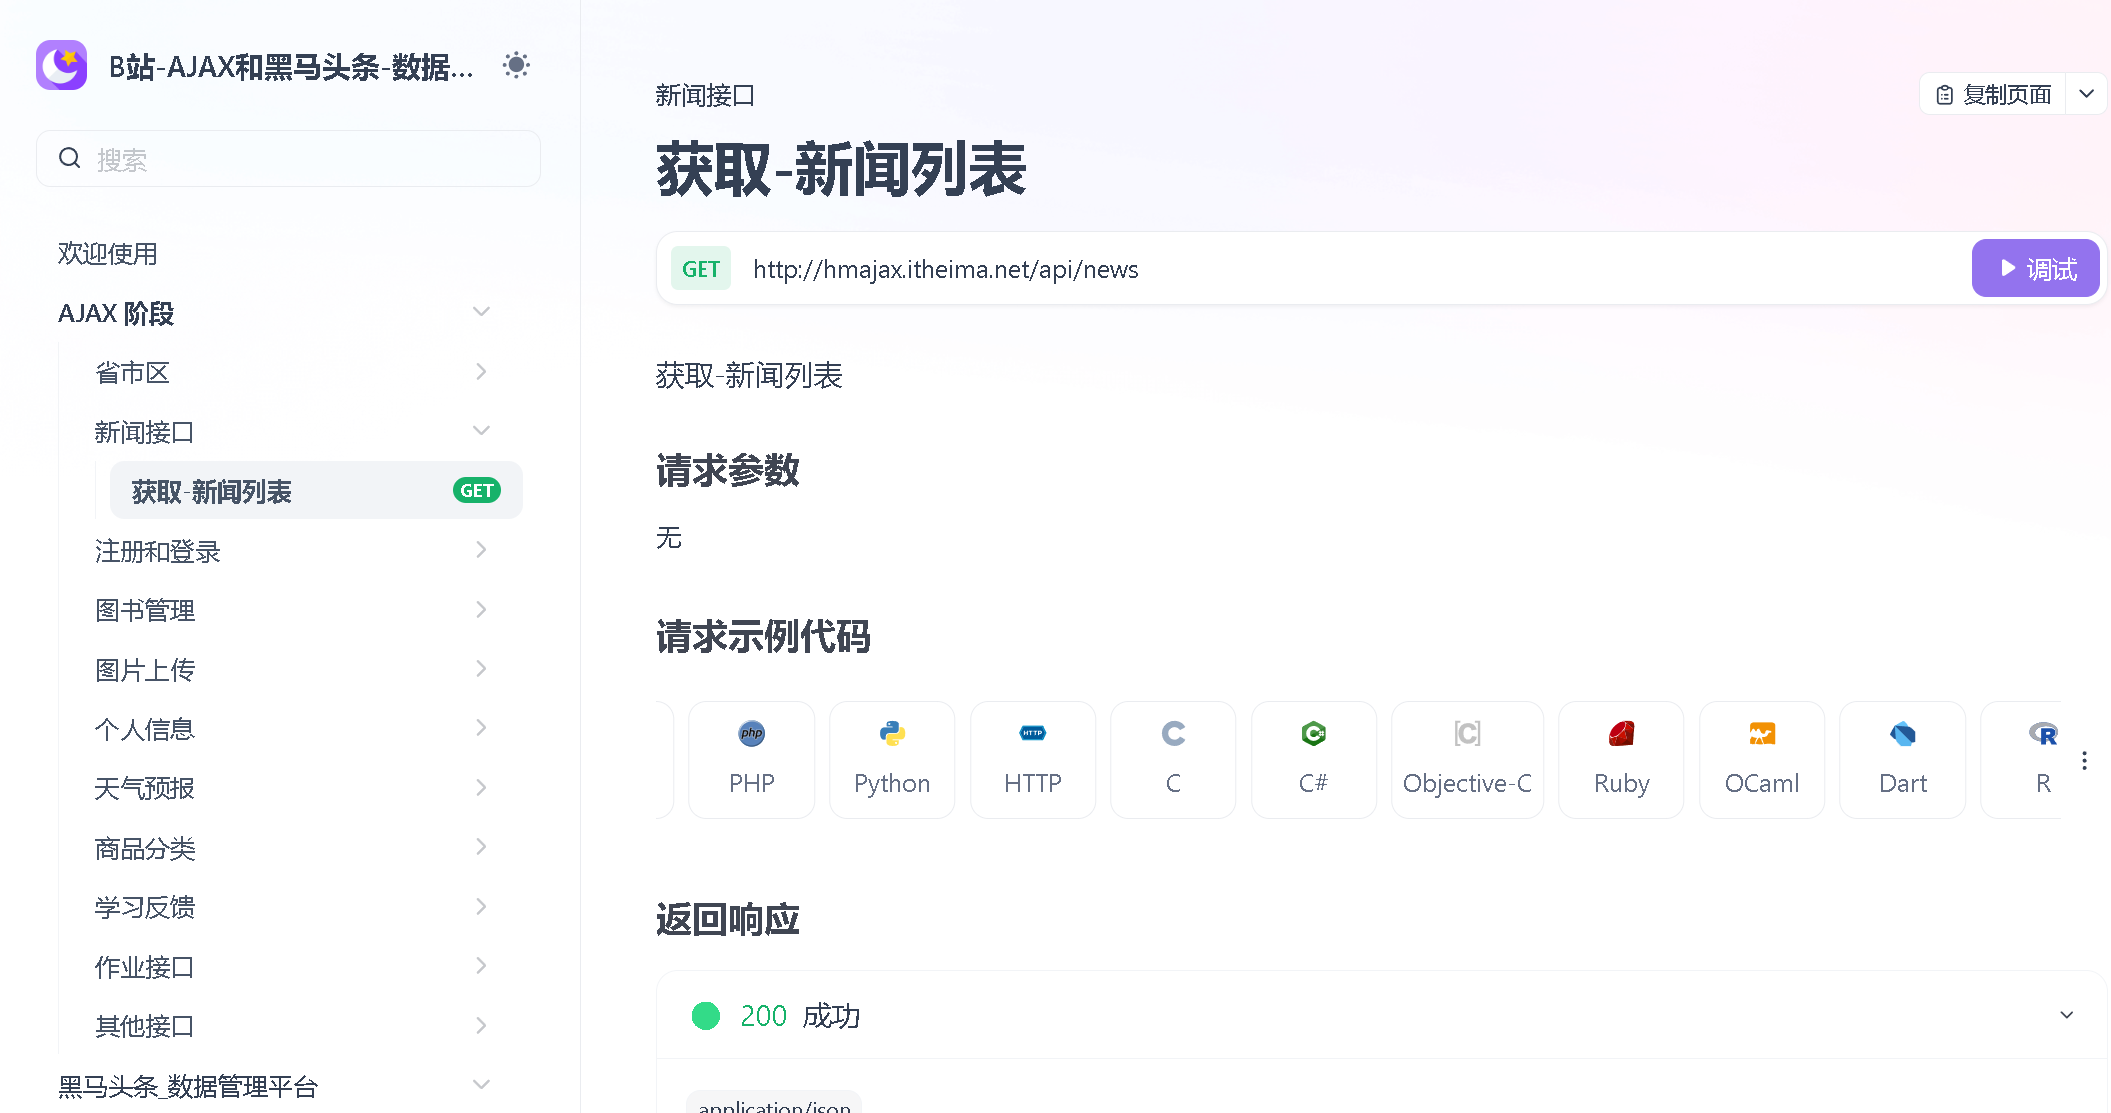
传送门:AJAX 阶段接口文档(点击超链接可进入)
由 后端 提供的 描述接口 的文章
2.案例
<!DOCTYPE html>
<html lang="en">

<head>
  <meta charset="UTF-8">
  <meta http-equiv="X-UA-Compatible" content="IE=edge">
  <meta name="viewport" content="width=device-width, initial-scale=1.0">
  <title>接口文档</title>
</head>

<body>
  <button class="btn">用户登录</button>
  <script src="https://cdn.jsdelivr.net/npm/axios/dist/axios.min.js"></script>
  <script>
    // 用户注册
    // axios({
    //   url: 'http://hmajax.itheima.net/api/register',
    //   method: 'post',
    //   data: {
    //     username: 'itheima007',
    //     password: '7654321'
    //   }
    // })

    document.querySelector('.btn').addEventListener('click', () => {
      // 用户登录
      axios({
        url: 'http://hmajax.itheima.net/api/login',
        method: 'post',
        data: {
          username: 'itheima007',
          password: '7654321'
        }
      })
    })
  </script>
</body>

</html>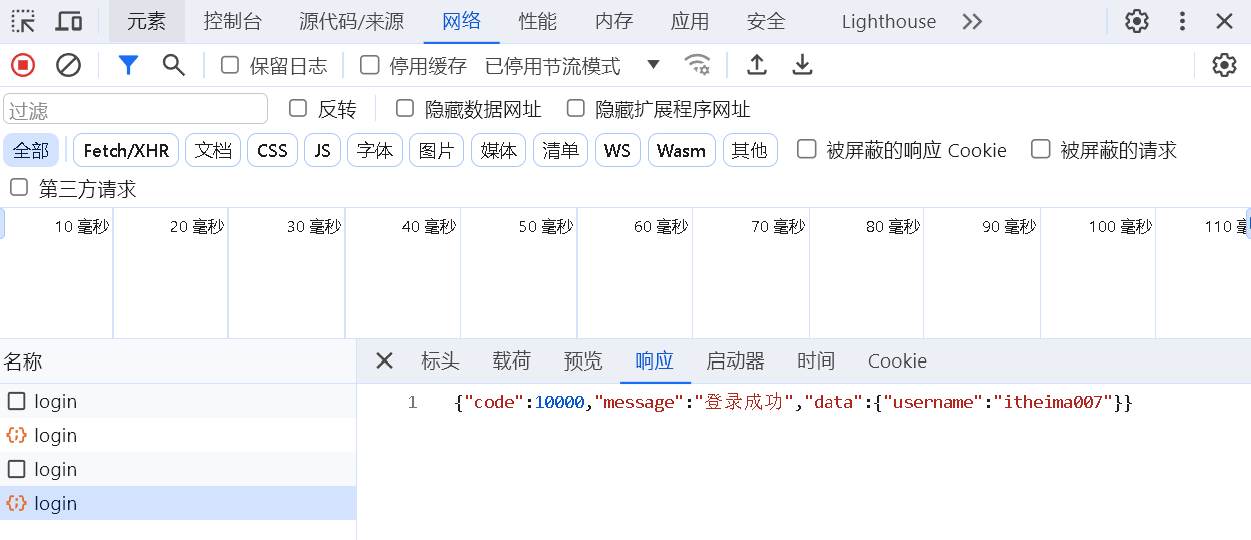
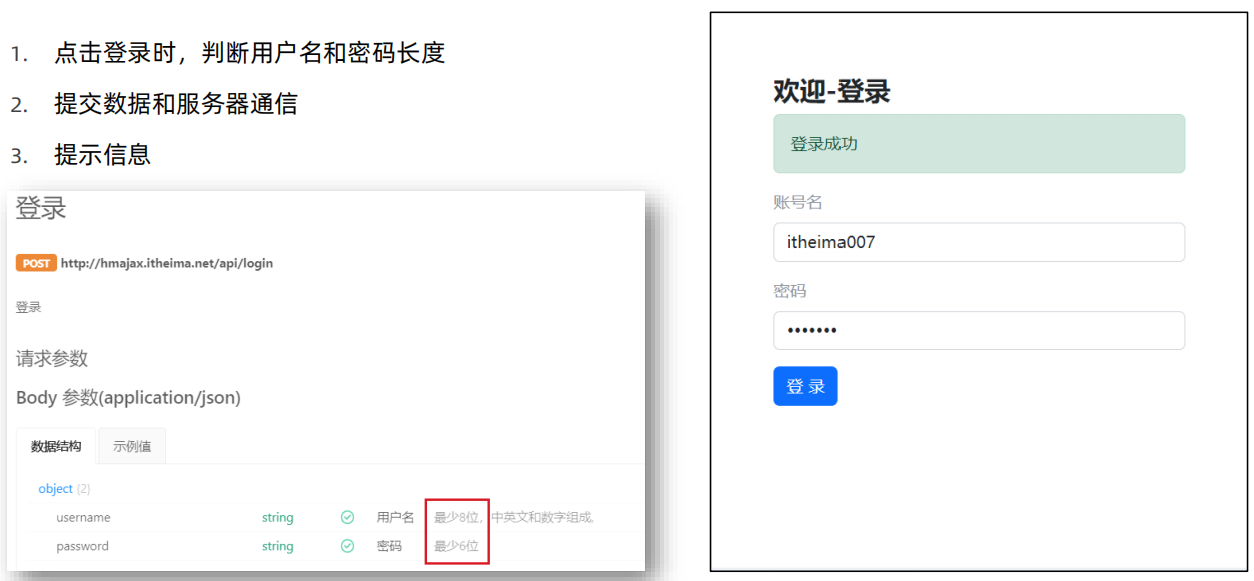
四、用户登录案例
1.用户登录
<!DOCTYPE html>
<html lang="en">

<head>
  <meta charset="UTF-8">
  <meta http-equiv="X-UA-Compatible" content="IE=edge">
  <meta name="viewport" content="width=device-width, initial-scale=1.0">
  <title>HTTP协议_请求报文</title>
</head>

<body>
  <button class="btn">注册用户</button>
  <script src="https://cdn.jsdelivr.net/npm/axios/dist/axios.min.js"></script>
  <script>
    /*
      注册用户:http://hmajax.itheima.net/api/register
      请求方法:POST
      参数名:
        username:用户名(中英文和数字组成, 最少8位)
        password:密码(最少6位)

      目标:运行后,查看请求报文
    */
   document.querySelector('.btn').addEventListener('click', () => {
    axios({
      url: 'http://hmajax.itheima.net/api/register',
      method: 'post',
      data: {
        username: 'itheima007',
        password: '7654321'
      }
    }).then(result => {
      // 成功
      console.log(result)
    }).catch(error => {
      // 失败
      // 处理错误信息
      console.log(error)
      console.log(error.response.data.message)
      alert(error.response.data.message)
    })
   })
  </script>
</body>

</html>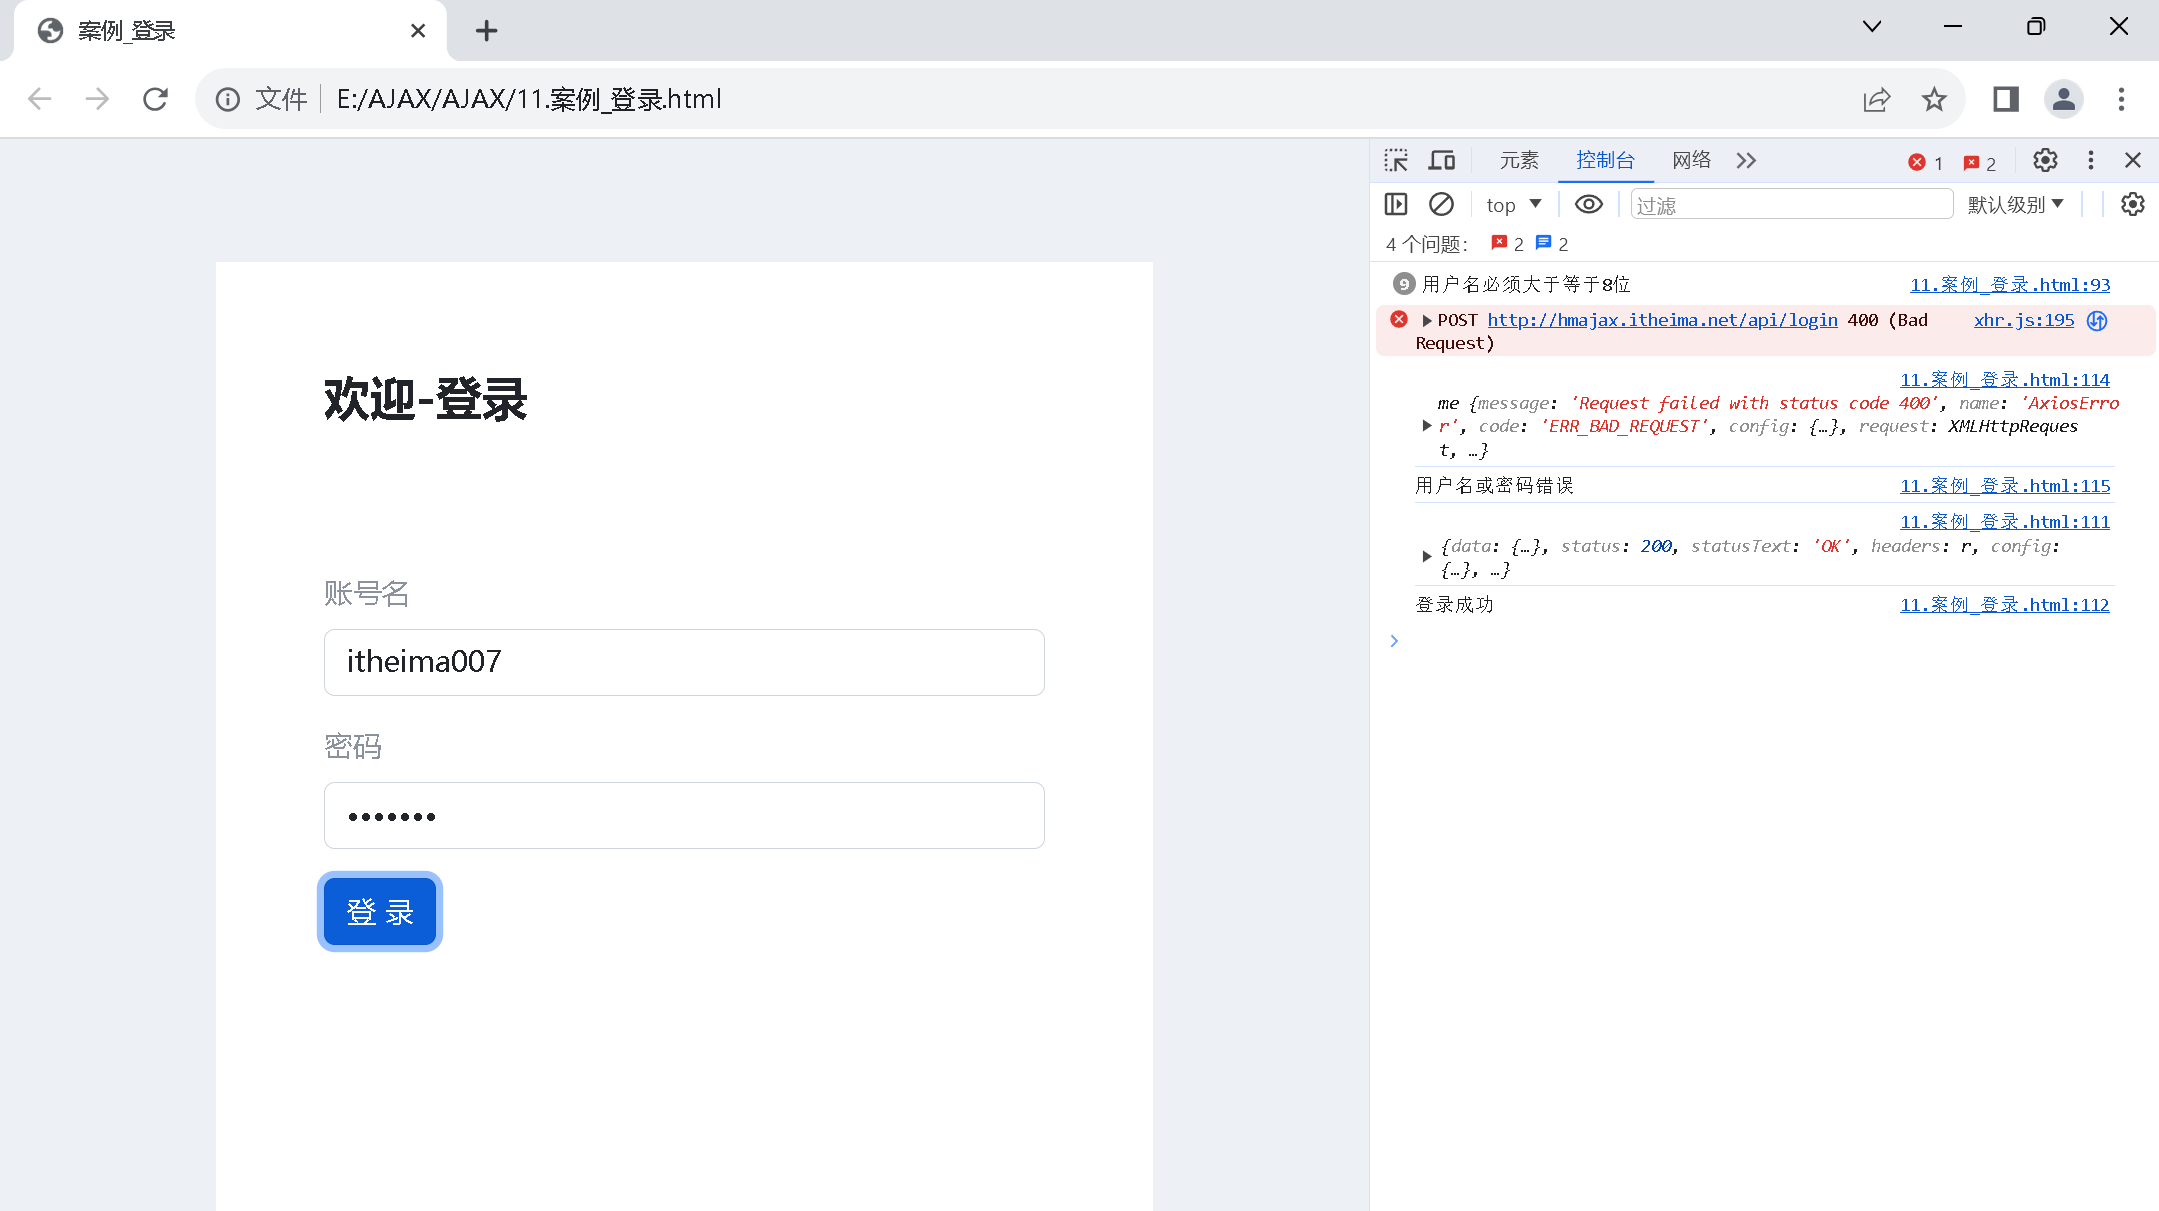
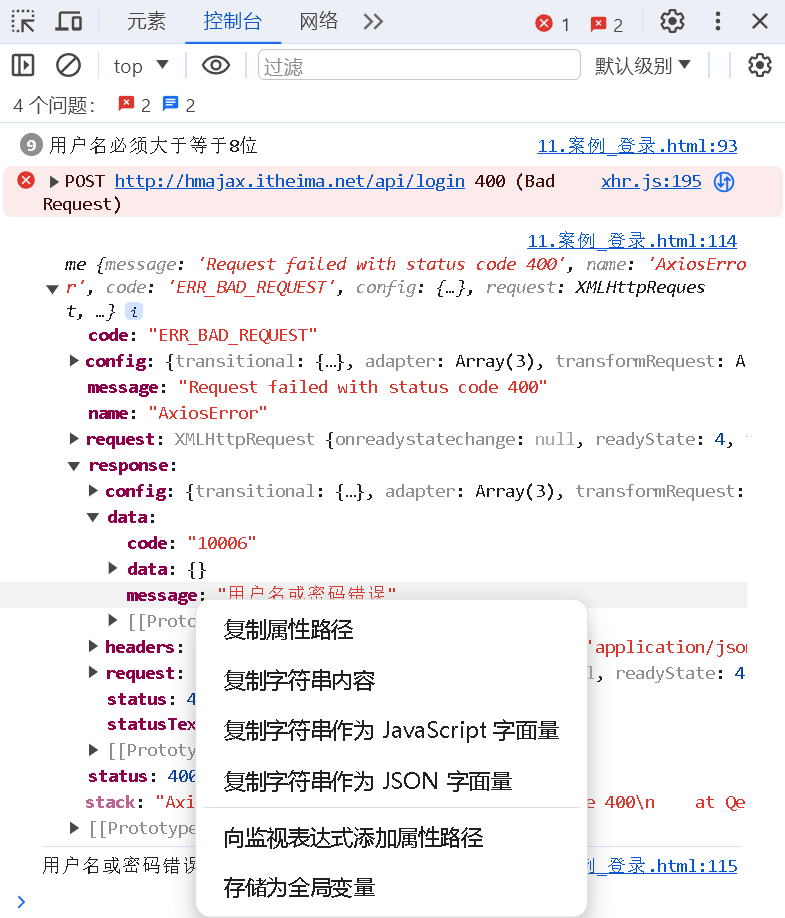
tip:想要查看出错原因,复制massage的路径,打印出来
2.用户登录-提示框
这里建议看一下原视频,老师讲的太详细了,膜拜一下!
<!DOCTYPE html>
<html lang="en">

<head>
  <meta charset="UTF-8">
  <meta http-equiv="X-UA-Compatible" content="IE=edge">
  <meta name="viewport" content="width=device-width, initial-scale=1.0">
  <title>案例_登录_提示消息</title>
  <!-- 引入bootstrap.css -->
  <link rel="stylesheet" href="https://cdn.jsdelivr.net/npm/bootstrap@5.2.2/dist/css/bootstrap.min.css">
  <!-- 公共 -->
  <style>
    html,
    body {
      background-color: #EDF0F5;
      width: 100%;
      height: 100%;
      display: flex;
      justify-content: center;
      align-items: center;
    }

    .container {
      width: 520px;
      height: 540px;
      background-color: #fff;
      padding: 60px;
      box-sizing: border-box;
    }

    .container h3 {
      font-weight: 900;
    }
  </style>
  <!-- 表单容器和内容 -->
  <style>
    .form_wrap {
      color: #8B929D !important;
    }

    .form-text {
      color: #8B929D !important;
    }
  </style>
  <!-- 提示框样式 -->
  <style>
    .alert {
      transition: .5s;
      opacity: 0;
    }

    .alert.show {
      opacity: 1;
    }
  </style>
</head>

<body>
  <div class="container">
    <h3>欢迎-登录</h3>
    <!-- 登录结果-提示框 -->
    <div class="alert alert-success" role="alert">
      提示消息
    </div>
    <!-- 表单 -->
    <div class="form_wrap">
      <form>
        <div class="mb-3">
          <label for="username" class="form-label">账号名</label>
          <input type="text" class="form-control username">
        </div>
        <div class="mb-3">
          <label for="password" class="form-label">密码</label>
          <input type="password" class="form-control password">
        </div>
        <button type="button" class="btn btn-primary btn-login"> 登 录 </button>
      </form>
    </div>
  </div>
  <script src="https://cdn.jsdelivr.net/npm/axios/dist/axios.min.js"></script>
  <script>
    // 目标1:点击登录时,用户名和密码长度判断,并提交数据和服务器通信
    // 目标2:使用提示框,反馈提示消息
    // 2.1 获取提示框
    const myAlert = document.querySelector('.alert')
    /**
     * 2.2 封装提示框函数,重复调用,满足提示需求
     * 功能:
     * 1. 显示提示框
     * 2. 不同提示文字msg,和成功绿色失败红色isSuccess(true成功,false失败)
     * 3. 过2秒后,让提示框自动消失
    */
    function alertFn(msg, isSuccess) {
      // 1> 显示提示框
      myAlert.classList.add('show')

      // 2> 实现细节
      myAlert.innerText = msg
      const bgStyle = isSuccess ? 'alert-success' : 'alert-danger'
      myAlert.classList.add(bgStyle)

      // 3> 过2秒隐藏
      setTimeout(() => {
        myAlert.classList.remove('show')
        // 提示:避免类名冲突,重置背景色
        myAlert.classList.remove(bgStyle)
      }, 2000)
    }

    // 1.1 登录-点击事件
    document.querySelector('.btn-login').addEventListener('click', () => {
      // 1.2 获取用户名和密码
      const username = document.querySelector('.username').value
      const password = document.querySelector('.password').value
      // console.log(username, password)

      // 1.3 判断长度
      if (username.length < 8) {
        alertFn('用户名必须大于等于8位', false)
        console.log('用户名必须大于等于8位')
        return // 阻止代码继续执行
      }
      if (password.length < 6) {
        alertFn('密码必须大于等于6位', false)
        console.log('密码必须大于等于6位')
        return // 阻止代码继续执行
      }

      // 1.4 基于axios提交用户名和密码
      // console.log('提交数据到服务器')
      axios({
        url: 'http://hmajax.itheima.net/api/login',
        method: 'POST',
        data: {
          username,
          password
        }
      }).then(result => {
        alertFn(result.data.message, true)
        console.log(result)
        console.log(result.data.message)
      }).catch(error => {
        alertFn(error.response.data.message, false)
        console.log(error)
        console.log(error.response.data.message)
      })
    })
  </script>
</body>

</html>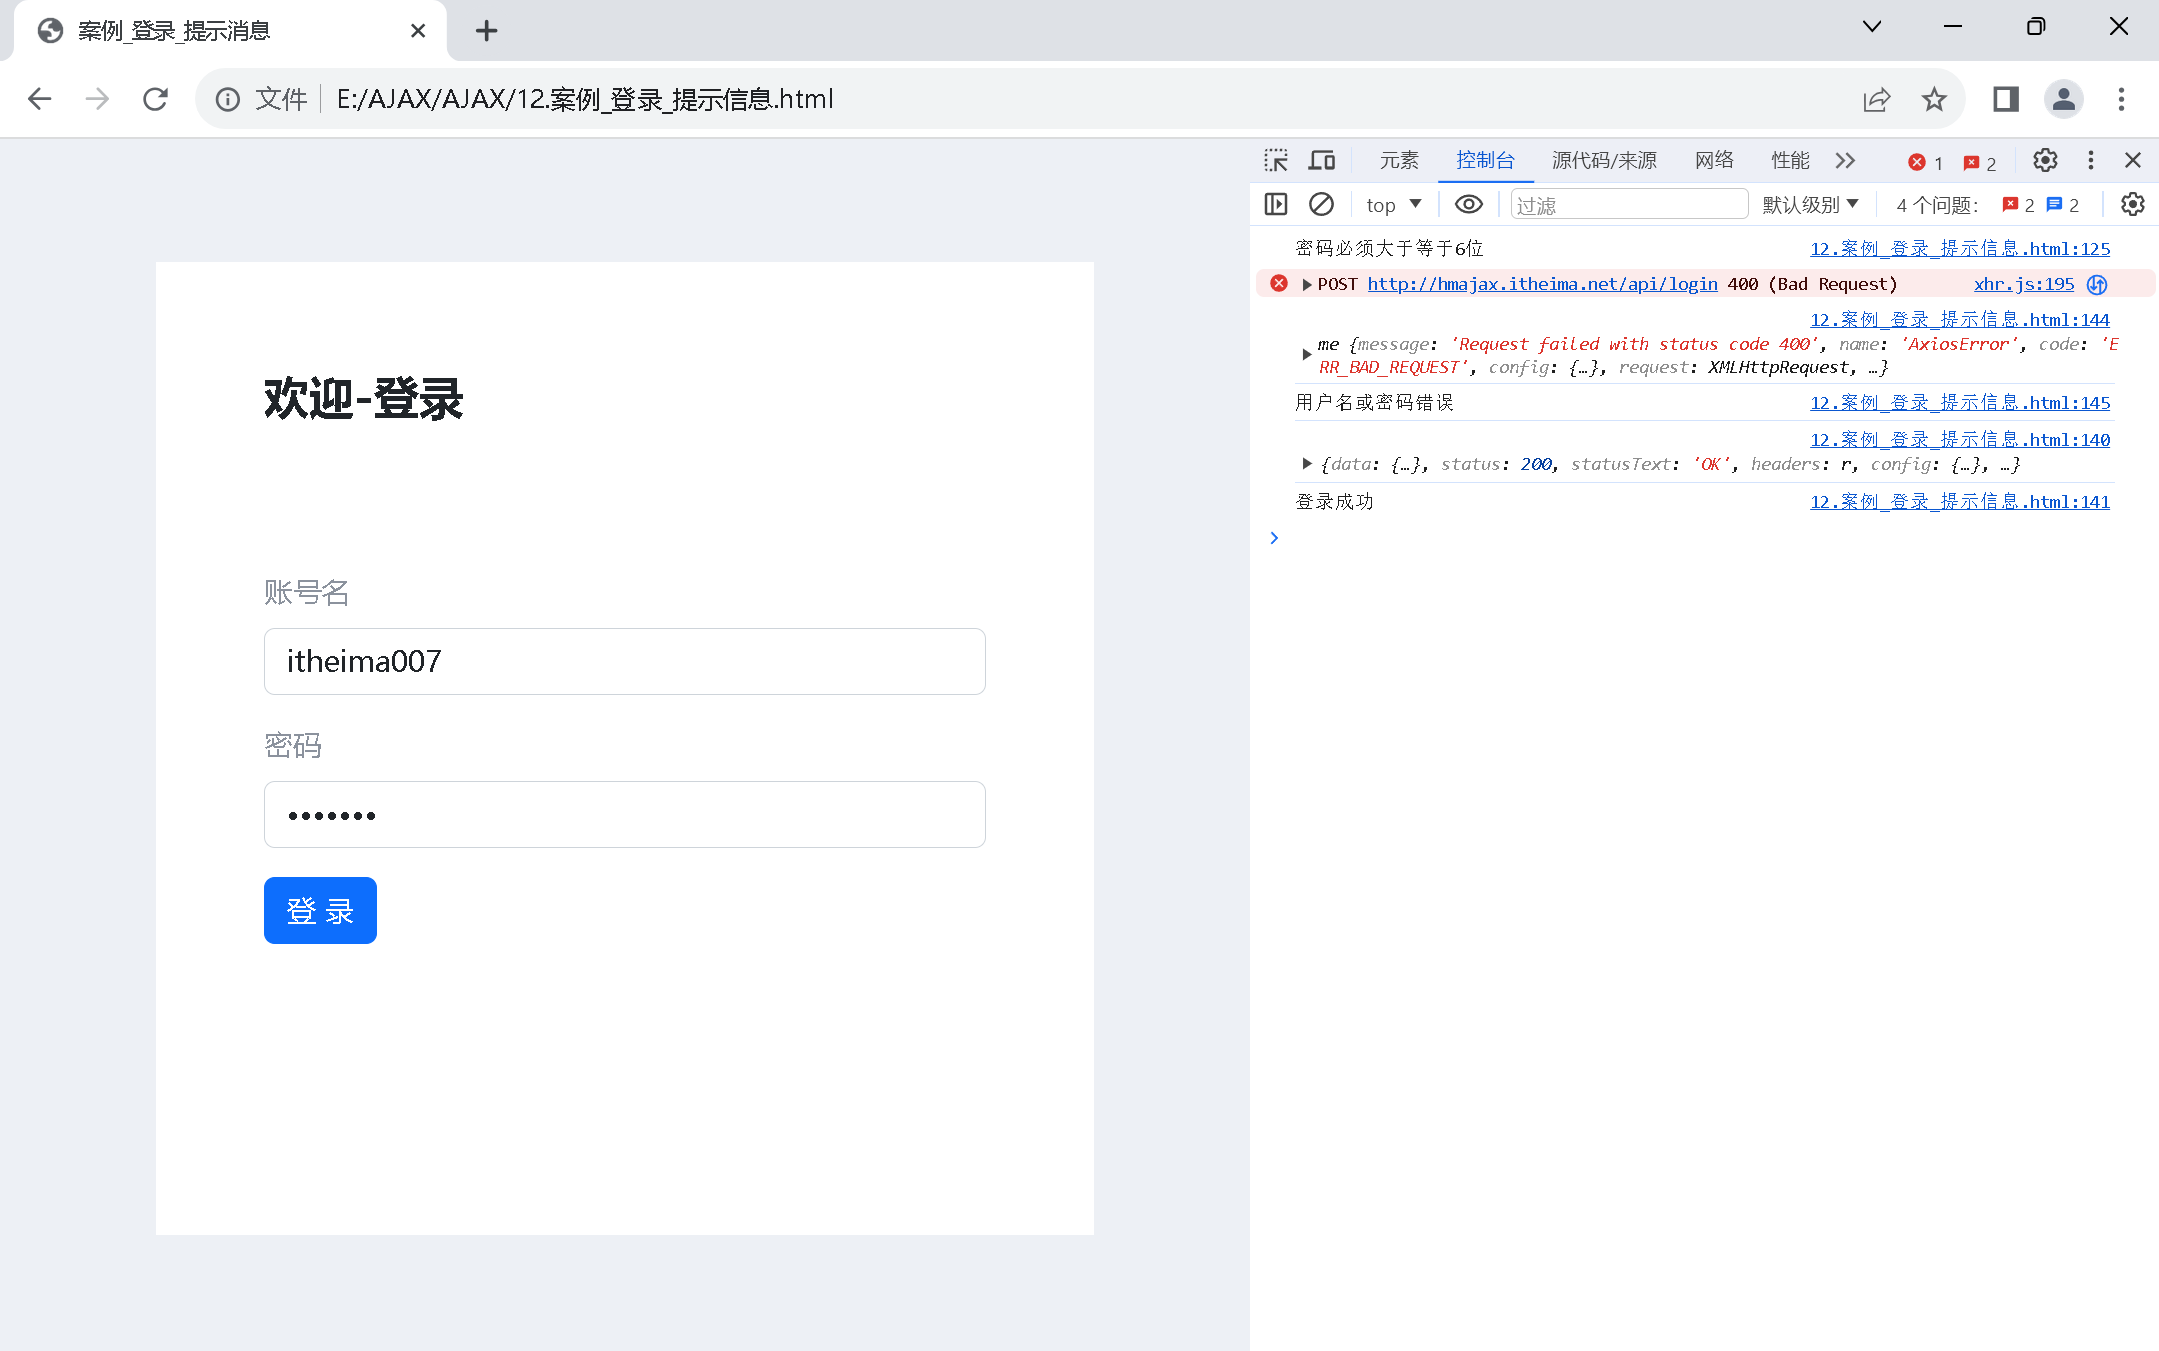
3.form-serialize 插件
form-serialize作用:快速收集表单元素的值
把插件下载到文件固定位置,需要确定好插件在文件中的位置
通过网盘分享的文件:form-serialize.js
链接: https://pan.baidu.com/s/1fktG-_YvELHqXbf6GrJZew 提取码: a2hv
<!DOCTYPE html>
<html lang="en">

<head>
  <meta charset="UTF-8">
  <meta http-equiv="X-UA-Compatible" content="IE=edge">
  <meta name="viewport" content="width=device-width, initial-scale=1.0">
  <title>form-serialize插件使用</title>
</head>

<body>
  <form action="javascript:;" class="example-form">
    <input type="text" name="username">
    <br>
    <input type="text" name="password">
    <br>
    <input type="button" class="btn" value="提交">
  </form>
  <!--
    目标:在点击提交时,使用form-serialize插件,快速收集表单元素值
    1. 把插件引入到自己网页中
  -->
  <script src="./lib/form-serialize.js"></script>
  <script>
    document.querySelector('.btn').addEventListener('click', () => {
      /**
       * 2. 使用serialize函数,快速收集表单元素的值
       * 参数1:要获取哪个表单的数据
       *  表单元素设置name属性,值会作为对象的属性名
       *  建议name属性的值,最好和接口文档参数名一致
       * 参数2:配置对象
       *  hash 设置获取数据结构
       *    - true:JS对象(推荐)一般请求体里提交给服务器
       *    - false: 查询字符串
       *  empty 设置是否获取空值
       *    - true: 获取空值(推荐)数据结构和标签结构一致
       *    - false:不获取空值
      */
      const form = document.querySelector('.example-form')
      const data = serialize(form, { hash: true, empty: true })
      // const data = serialize(form, { hash: false, empty: true })
      // const data = serialize(form, { hash: true, empty: false })
      console.log(data)
    })
  </script>
</body>

</html>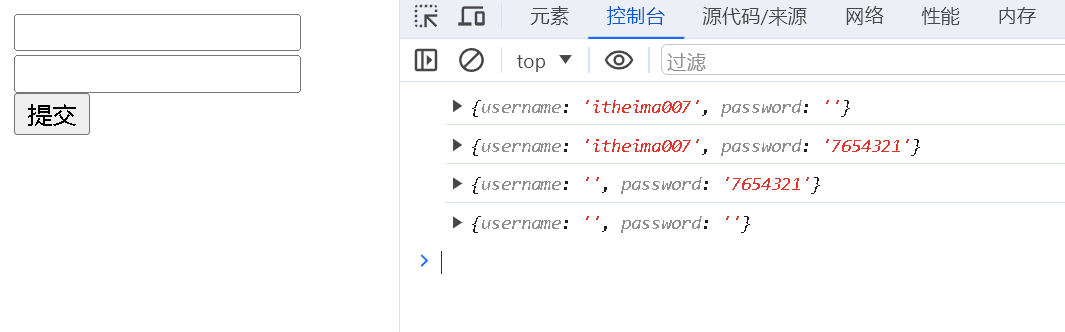
4.案例整合
<!DOCTYPE html>
<html lang="en">

<head>
  <meta charset="UTF-8">
  <meta http-equiv="X-UA-Compatible" content="IE=edge">
  <meta name="viewport" content="width=device-width, initial-scale=1.0">
  <title>案例_登录_插件使用</title>
  <!-- 引入bootstrap.css -->
  <link rel="stylesheet" href="https://cdn.jsdelivr.net/npm/bootstrap@5.2.2/dist/css/bootstrap.min.css">
  <!-- 公共 -->
  <style>
    html,
    body {
      background-color: #EDF0F5;
      width: 100%;
      height: 100%;
      display: flex;
      justify-content: center;
      align-items: center;
    }

    .container {
      width: 520px;
      height: 540px;
      background-color: #fff;
      padding: 60px;
      box-sizing: border-box;
    }

    .container h3 {
      font-weight: 900;
    }
  </style>
  <!-- 表单容器和内容 -->
  <style>
    .form_wrap {
      color: #8B929D !important;
    }

    .form-text {
      color: #8B929D !important;
    }
  </style>
  <!-- 提示框样式 -->
  <style>
    .alert {
      transition: .5s;
      opacity: 0;
    }

    .alert.show {
      opacity: 1;
    }
  </style>
</head>

<body>
  <div class="container">
    <h3>欢迎-登录</h3>
    <!-- 登录结果-提示框 -->
    <div class="alert alert-success" role="alert">
      提示消息
    </div>
    <!-- 表单 -->
    <div class="form_wrap">
      <form class="login-form">
        <div class="mb-3">
          <label for="username" class="form-label">账号名</label>
          <input type="text" class="form-control username" name="username">
        </div>
        <div class="mb-3">
          <label for="password" class="form-label">密码</label>
          <input type="password" class="form-control password" name="password">
        </div>
        <button type="button" class="btn btn-primary btn-login"> 登 录 </button>
      </form>
    </div>
  </div>
  <script src="https://cdn.jsdelivr.net/npm/axios/dist/axios.min.js"></script>
  <!-- 3.1 引入插件 -->
  <script src="./lib/form-serialize.js"></script>
  <script>
    // 目标1:点击登录时,用户名和密码长度判断,并提交数据和服务器通信
    // 目标2:使用提示框,反馈提示消息
    // 目标3:使用form-serialize插件,收集用户名和密码

    // 2.1 获取提示框
    const myAlert = document.querySelector('.alert')
    /**2.2 封装提示框函数,重复调用,满足提示需求
     * 功能:
     * 1. 显示提示框
     * 2. 不同提示文字msg,和成功绿色失败红色isSuccess(true成功,false失败)
     * 3. 过2秒后,让提示框自动消失
    */
    function alertFn(msg, isSuccess) {
      // 1> 显示提示框
      myAlert.classList.add('show')

      // 2> 实现细节
      myAlert.innerText = msg
      const bgStyle = isSuccess ? 'alert-success' : 'alert-danger'
      myAlert.classList.add(bgStyle)

      // 3> 过2秒隐藏
      setTimeout(() => {
        myAlert.classList.remove('show')
        // 提示:避免类名冲突,重置背景色
        myAlert.classList.remove(bgStyle)
      }, 2000)
    }

    // 1.1 登录-点击事件
    document.querySelector('.btn-login').addEventListener('click', () => {
      // 3.2 使用serialize函数,收集登录表单里用户名和密码
      const form = document.querySelector('.login-form')
      const data = serialize(form, { hash: true, empty: true })
      console.log(data)
      // {username: 'itheima007', password: '7654321'}
      const { username, password } = data

      // 1.2 获取用户名和密码
      // const username = document.querySelector('.username').value
      // const password = document.querySelector('.password').value
      console.log(username, password)

      // 1.3 判断长度
      if (username.length < 8) {
        alertFn('用户名必须大于等于8位', false)
        console.log('用户名必须大于等于8位')
        return // 阻止代码继续执行
      }
      if (password.length < 6) {
        alertFn('密码必须大于等于6位', false)
        console.log('密码必须大于等于6位')
        return // 阻止代码继续执行
      }

      // 1.4 基于axios提交用户名和密码
      // console.log('提交数据到服务器')
      axios({
        url: 'http://hmajax.itheima.net/api/login',
        method: 'POST',
        data: {
          username,
          password
        }
      }).then(result => {
        alertFn(result.data.message, true)
        console.log(result)
        console.log(result.data.message)
      }).catch(error => {
        alertFn(error.response.data.message, false)
        console.log(error)
        console.log(error.response.data.message)
      })
    })
  </script>
</body>

</html>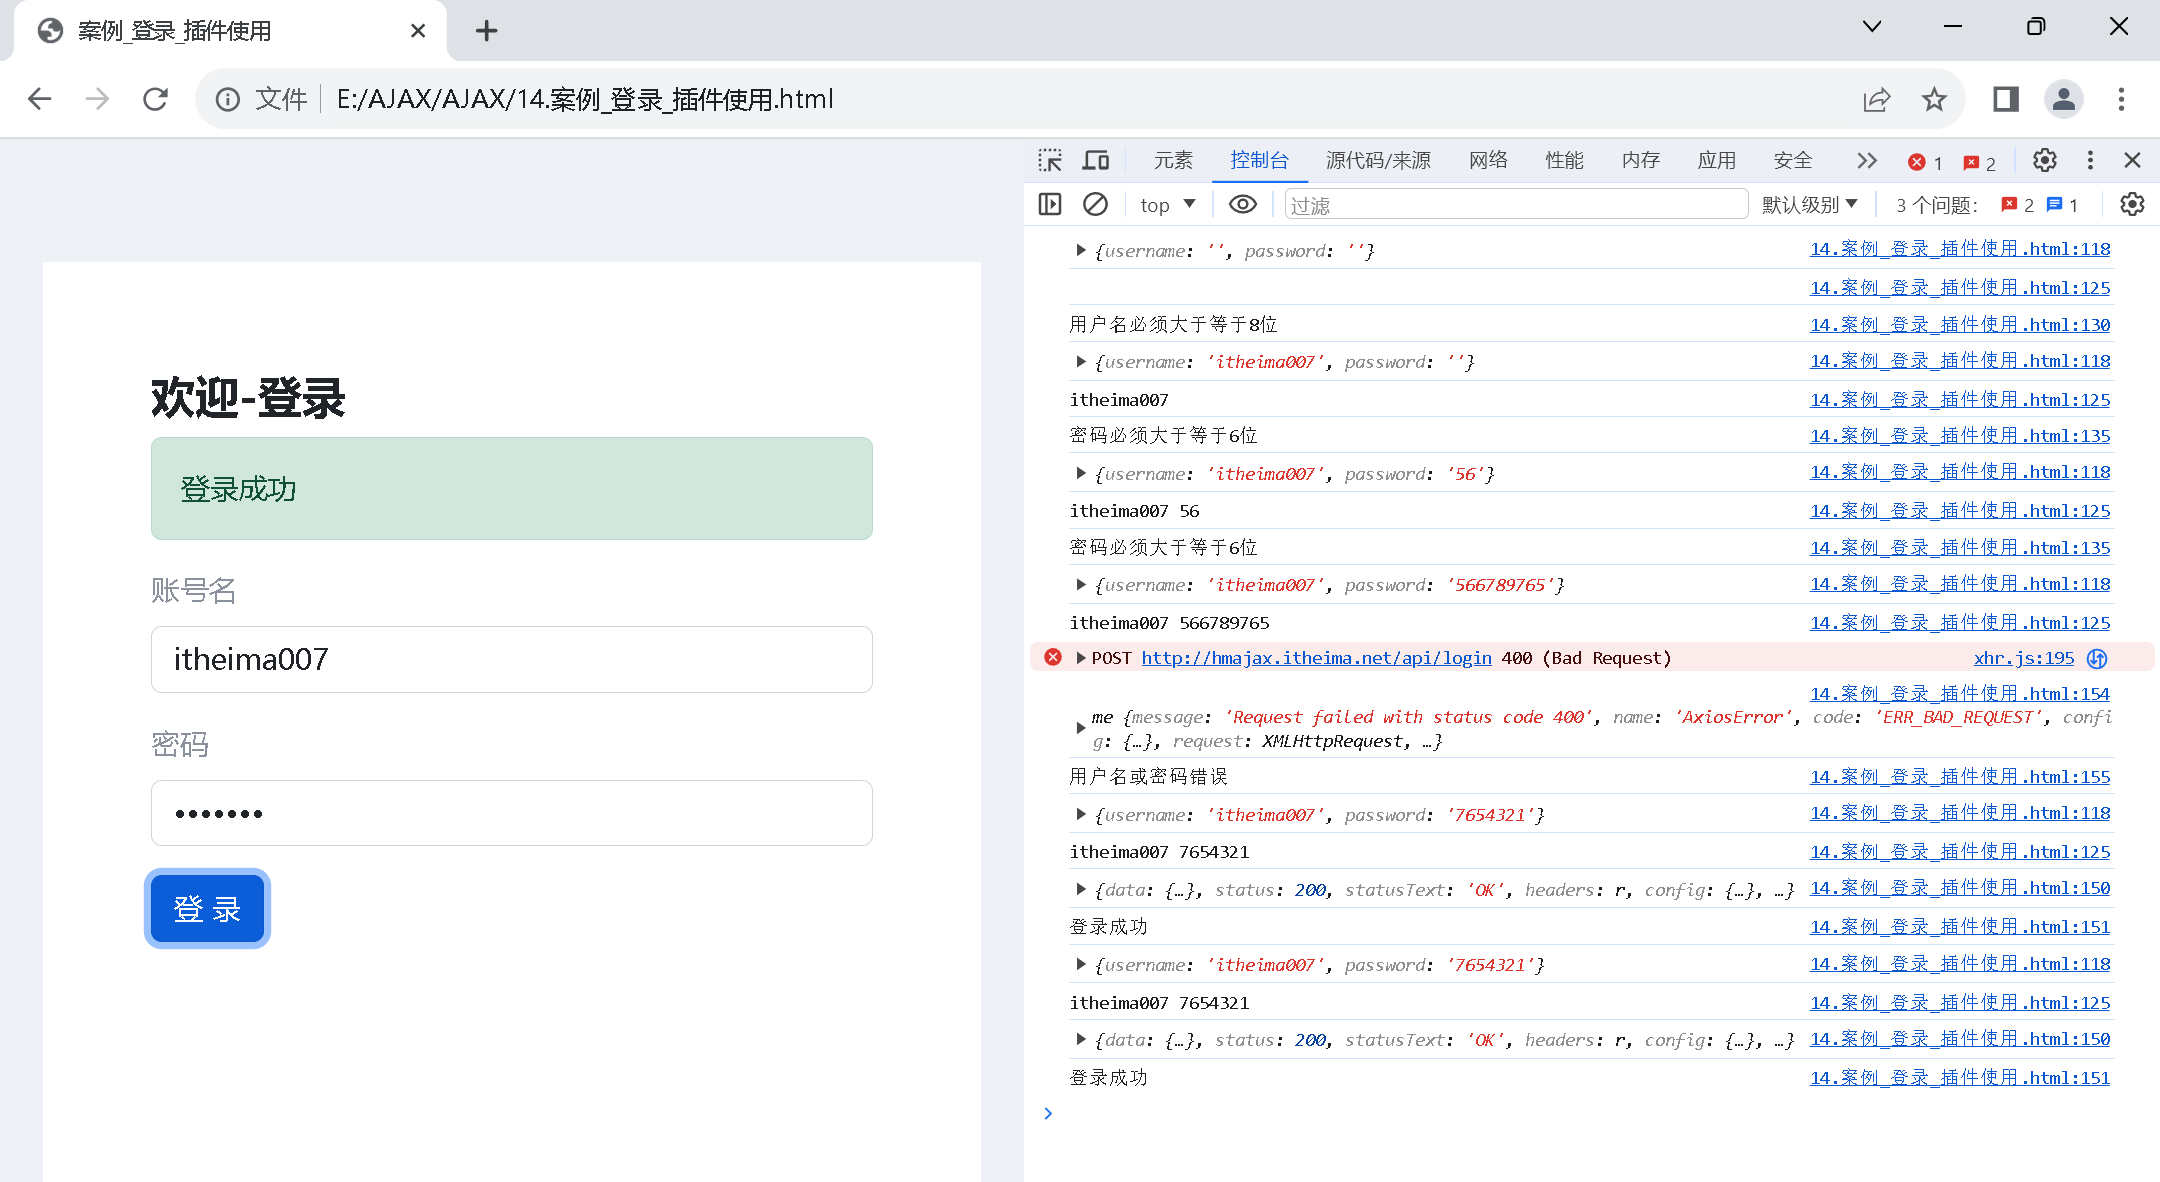
建议大家多尝试,测试代码的运行!