目录
前言
Nginx作为目前最流行的Web服务器和反向代理服务器之一,以其高性能、高并发、低内存消耗的特点,广泛应用于互联网企业。本文将详细介绍在CentOS 7.9系统中通过源码编译方式安装Nginx 1.28.0的完整过程,从环境准备到服务配置,再到优化和故障排除,为读者提供一份详实可用的技术指南。
1 安装前准备工作
1.1 系统环境检查

- 检查系统版本:
# 查看CentOS版本信息
cat /etc/redhat-release- 检查网络连接:
# 测试网络连通性
ping -c 3 8.8.8.8
# 检查yum源配置
yum repolist all- 检查磁盘空间:
# 查看磁盘使用情况
df -h
# 确保有至少500MB可用空间用于编译和安装- 检查系统资源:
# 查看内存使用情况
free -h
# 建议至少有1GB可用内存用于编译
1.2 创建专用用户(可选)
- 为了安全考虑,建议创建专用的nginx运行用户:
# 创建nginx用户
groupadd nginx
useradd -g nginx -s /sbin/nologin -M nginx

# 验证用户创建
id nginx
1.3 安装基础工具
# 安装wget下载工具
yum install wget -y
2 安装编译依赖
2.1 依赖库说明
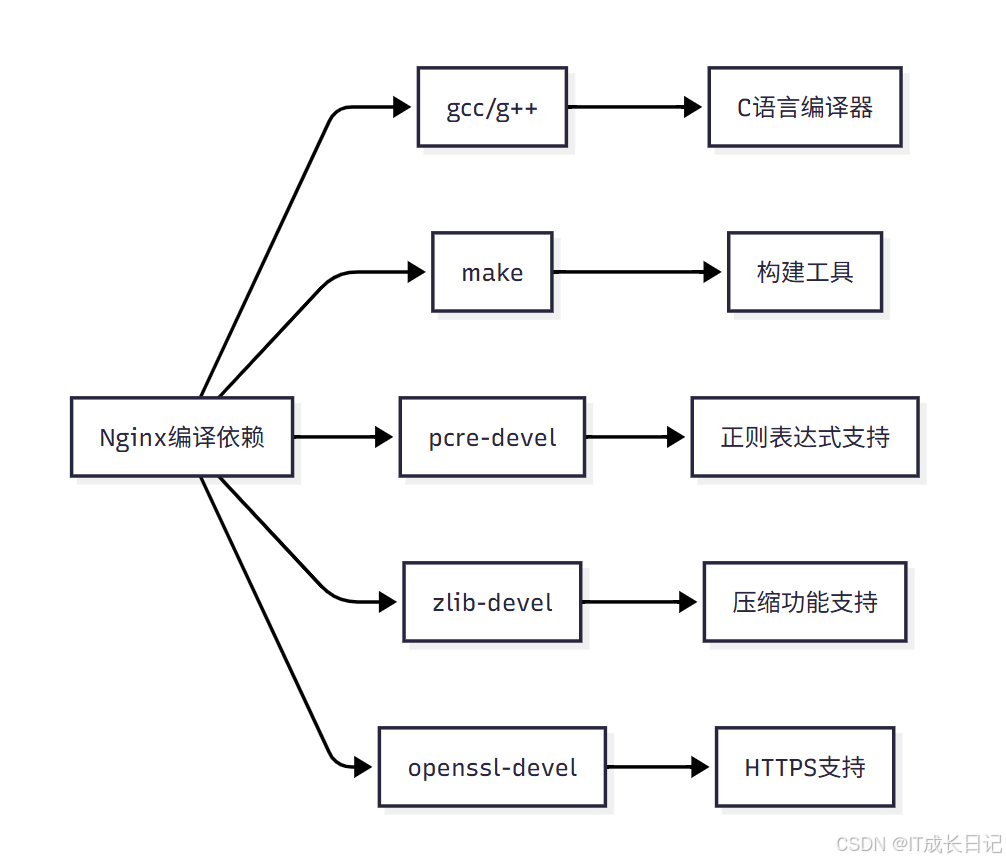
2.2 安装依赖包
# 更新yum缓存(确保包版本最新)
yum clean all && yum makecache fast

# 安装核心依赖
yum install -y gcc gcc-c++ make pcre-devel zlib-devel openssl-devel wget

# 验证依赖安装
gcc --version
make --version
pcre-config --version
3 下载并解压Nginx源码
3.1 创建工作目录
# 创建源码管理目录
mkdir -p /usr/local/src
cd /usr/local/src

# 创建Nginx安装目录
mkdir -p /usr/local/nginx
3.2 下载Nginx源码包
# 下载Nginx 1.28.0源码包
wget http://nginx.org/download/nginx-1.28.0.tar.gz

# 验证压缩包完整性
md5sum nginx-1.28.0.tar.gz
3.3 解压源码包
# 解压源码包
tar -zxvf nginx-1.28.0.tar.gz

# 进入解压后的源码目录
cd nginx-1.28.0

# 查看源码结构
ls -la- 源码目录结构说明:
nginx-1.28.0/
├── auto/          # 自动检测脚本目录
├── conf/          # 配置文件目录
├── contrib/       # 贡献代码目录
├── docs/          # 文档目录
├── html/          # 默认网页文件目录
├── man/           # 手册页目录
├── src/           # 源代码目录
└── CHANGES        # 版本变更记录
4 配置编译参数并安装
4.1 configure脚本详解
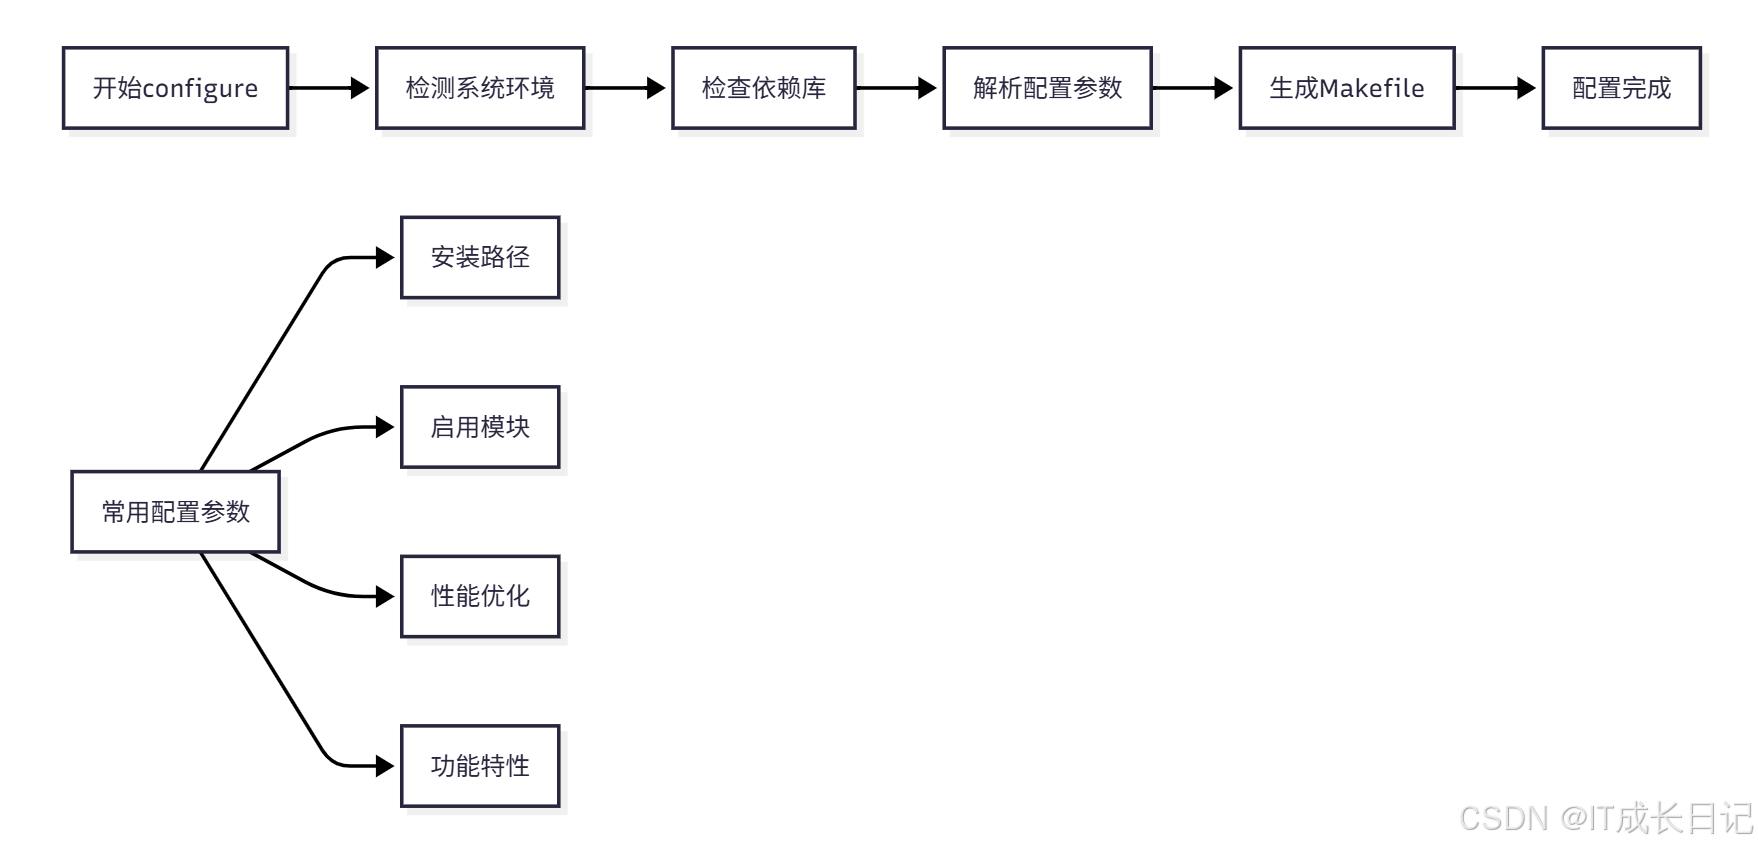
4.2 配置编译参数
# 配置编译参数
./configure \
--prefix=/usr/local/nginx \              # 安装根目录
--with-http_ssl_module \                 # 启用HTTPS模块
--with-http_stub_status_module \         # 启用状态监控模块
--with-http_gzip_static_module \         # 启用Gzip静态压缩
--with-http_realip_module \              # 启用真实IP模块
--with-http_sub_module \                 # 启用HTTP子模块
--with-pcre \                            # 关联PCRE库
--with-pcre-jit \                        # 启用PCRE JIT
--with-stream \                          # 启用TCP/UDP代理
--with-stream_ssl_module \               # 启用流SSL模块
--user=nginx \                           # 运行用户
--group=nginx # 运行用户组- 参数详细说明:
参数 |
作用 |
说明 |
--prefix |
指定安装目录 |
所有Nginx文件将安装到此目录 |
--with-http_ssl_module |
启用HTTPS支持 |
必需,支持SSL/TLS加密 |
--with-http_stub_status_module |
启用状态监控 |
提供Nginx运行状态页面 |
--with-http_gzip_static_module |
启用Gzip压缩 |
提高传输效率 |
--with-pcre |
关联PCRE库 |
支持正则表达式 |
--user/--group |
指定运行用户 |
提高安全性 |
4.3 编译和安装
# 编译(使用多线程加速)
make -j4
# 安装
make install
编译优化建议:
- 根据CPU核心数调整-j参数,如4核CPU使用-j4
- 如果编译失败,检查错误信息并解决依赖问题
- 编译过程可能需要几分钟时间,请耐心等待
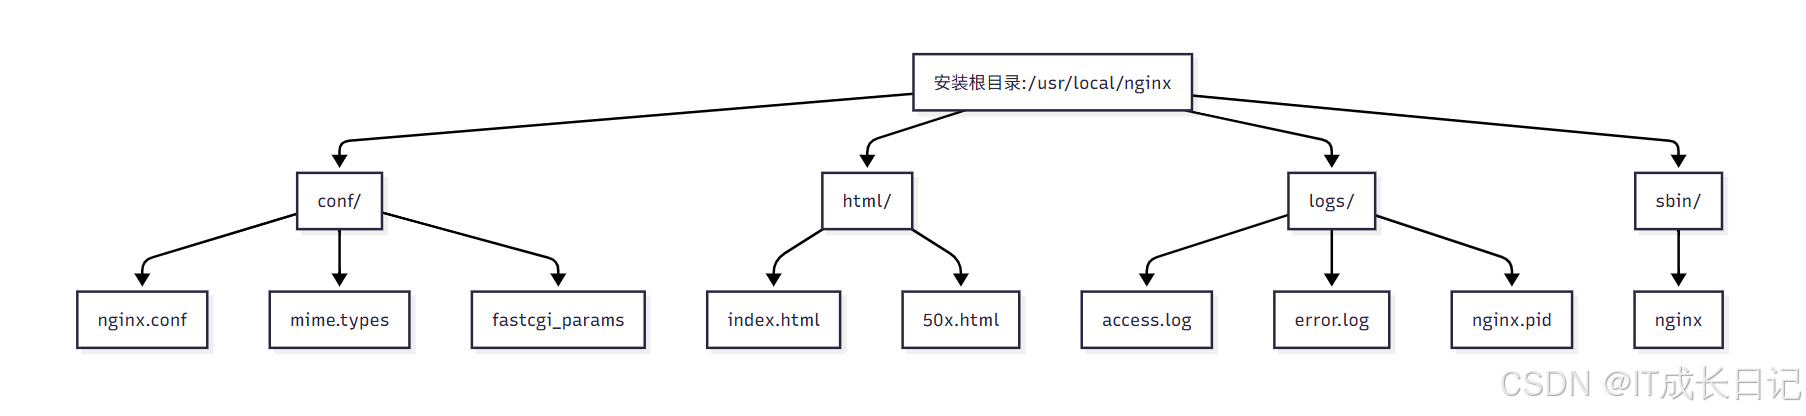
4.4 验证安装路径
# 查看安装目录结构
ls -la /usr/local/nginx/- 目录结构说明:
5 配置Nginx系统服务
5.1 systemd服务文件

5.2 创建服务文件
# 创建systemd服务文件
vim /usr/lib/systemd/system/nginx.service- 将以下内容粘贴到文件中:
[Unit]
Description=Nginx HTTP Server
After=network.target remote-fs.target nss-lookup.target

[Service]
Type=forking
ExecStart=/usr/local/nginx/sbin/nginx -c /usr/local/nginx/conf/nginx.conf
ExecStop=/usr/local/nginx/sbin/nginx -s quit
ExecReload=/usr/local/nginx/sbin/nginx -s reload
PIDFile=/usr/local/nginx/logs/nginx.pid
Restart=on-failure
RestartSec=5
User=nginx
Group=nginx

[Install]
WantedBy=multi-user.target- 服务文件详解:
配置项 |
作用 |
说明 |
Description |
服务描述 |
便于识别服务 |
After |
依赖服务 |
确保网络等基础服务就绪 |
Type=forking |
进程类型 |
Nginx是守护进程 |
ExecStart |
启动命令 |
指定配置文件路径 |
ExecStop |
停止命令 |
优雅停止,不中断连接 |
ExecReload |
重载命令 |
平滑重载配置 |
PIDFile |
PID文件 |
管理进程的标识 |
Restart |
重启策略 |
失败后自动重启 |
User/Group |
运行用户 |
提高安全性 |
5.3 启动并设置开机自启
# 重新加载systemd服务
systemctl daemon-reload

# 启动Nginx服务
systemctl start nginx

# 设置开机自启
systemctl enable nginx

# 查看服务状态
systemctl status nginx- 状态检查:
# 查看Nginx进程
ps aux | grep nginx

# 查看监听端口
netstat -tlnp | grep :80
# 或
ss -tlnp | grep :80
6 开放防火墙端口
6.1 firewalld配置
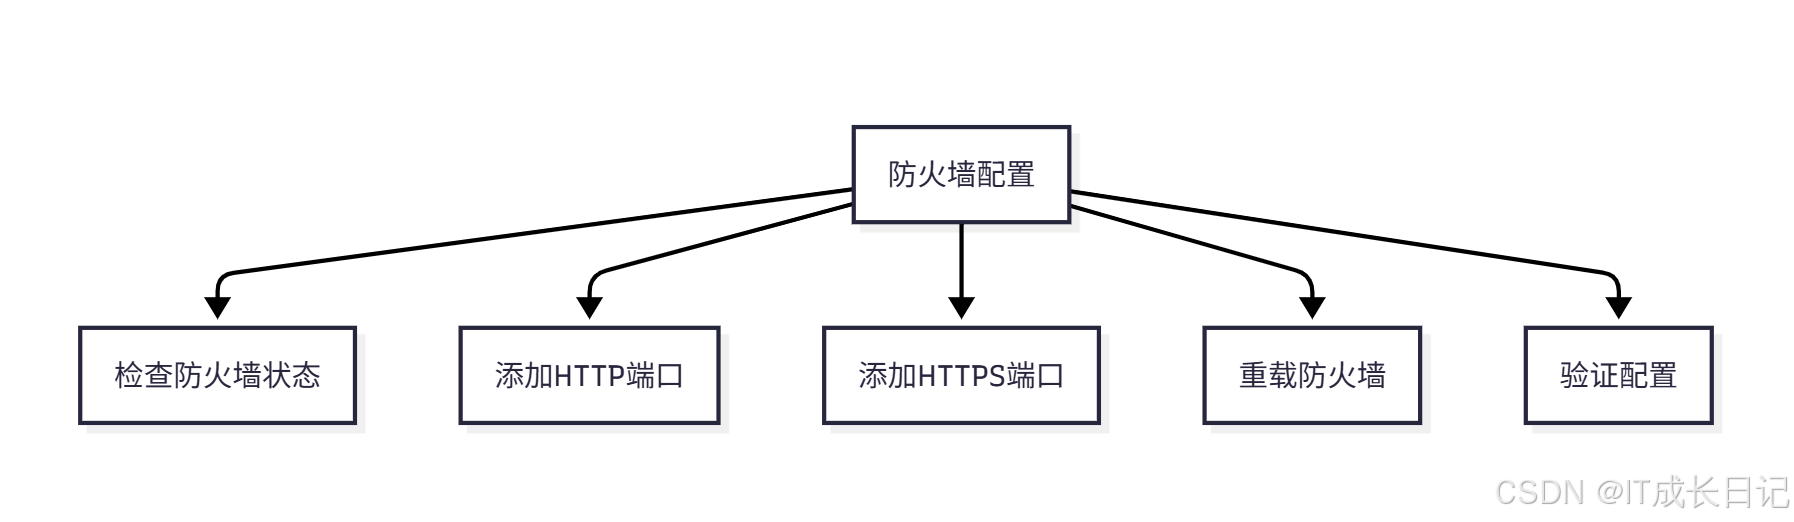
6.2 配置防火墙规则
# 检查防火墙状态
systemctl status firewalld

# 开放80端口(HTTP)
firewall-cmd --add-port=80/tcp --permanent

# 开放443端口(HTTPS)
firewall-cmd --add-port=443/tcp --permanent

# 重载防火墙规则
firewall-cmd --reload

# 验证端口配置
firewall-cmd --list-ports- 防火墙管理常用命令:
# 查看防火墙状态
systemctl status firewalld

# 启动防火墙
systemctl start firewalld

# 停止防火墙(不推荐)
systemctl stop firewalld

# 禁用防火墙(开发环境)
systemctl disable firewalld

# 添加端口规则
firewall-cmd --add-port=端口号/协议 --permanent

# 移除端口规则
firewall-cmd --remove-port=端口号/协议 --permanent

# 查看已开放的端口
firewall-cmd --list-ports
7 验证Nginx安装成功
7.1 命令行验证
# 查看Nginx版本
/usr/local/nginx/sbin/nginx -v

# 测试配置文件语法
/usr/local/nginx/sbin/nginx -t

# 查看Nginx编译参数
/usr/local/nginx/sbin/nginx -V
7.2 浏览器访问验证
- 在浏览器中输入服务器IP地址:http://服务器IP
- 应该看到Nginx默认欢迎页,包含"Welcome to nginx!"字样
- 如果看不到页面,检查防火墙设置和Nginx服务状态
7.3 高级验证
# 查看Nginx状态页面
curl http://localhost/nginx_status
# 需要先配置stub_status模块

# 测试HTTP响应
curl -I http://localhost

# 测试HTTPS(如果已配置)
curl -I https://localhost
8 Nginx配置优化
8.1 基础配置优化
- 优化nginx.conf关键参数:
# 编辑主配置文件
vim /usr/local/nginx/conf/nginx.conf
user nginx nginx;
worker_processes auto;
worker_rlimit_nofile 65535;
events {
worker_connections 65535;
use epoll;
multi_accept on;
}
http {
include mime.types;
default_type application/octet-stream;
# 日志格式
log_format main '$remote_addr - $remote_user [$time_local] "$request" '
'$status $body_bytes_sent "$http_referer" '
'"$http_user_agent" "$http_x_forwarded_for"';
access_log /usr/local/nginx/logs/access.log main;
error_log /usr/local/nginx/logs/error.log warn;
# 性能优化
sendfile on;
tcp_nopush on;
tcp_nodelay on;
keepalive_timeout 65;
keepalive_requests 1000;
# Gzip压缩
gzip on;
gzip_min_length 1k;
gzip_buffers 4 16k;
gzip_http_version 1.1;
gzip_comp_level 6;
gzip_types text/plain text/css text/javascript application/json application/javascript application/xml+rss application/atom+xml image/svg+xml;
# 连接超时
client_header_timeout 60;
client_body_timeout 60;
send_timeout 60;
# 文件上传限制
client_max_body_size 50m;
# 虚拟主机配置
include /usr/local/nginx/conf.d/*.conf;
}8.2 创建虚拟主机配置
# 创建虚拟主机配置目录
mkdir -p /usr/local/nginx/conf.d
# 创建第一个虚拟主机配置文件
vim /usr/local/nginx/conf.d/default.conf
server {
listen 80;
server_name localhost;
root /usr/local/nginx/html;
index index.html index.htm;
# 访问日志
access_log /usr/local/nginx/logs/default.access.log;
error_log /usr/local/nginx/logs/default.error.log;
# 静态文件缓存
location ~* \.(jpg|jpeg|png|gif|ico|css|js)$ {
expires 7d;
add_header Cache-Control "public, no-transform";
}
# PHP支持(可选)
location ~ \.php$ {
fastcgi_pass 127.0.0.1:9000;
fastcgi_index index.php;
fastcgi_param SCRIPT_FILENAME $document_root$fastcgi_script_name;
include fastcgi_params;
}
}8.3 SSL/TLS配置
# 创建SSL配置文件
vim /usr/local/nginx/conf.d/ssl.conf
server {
listen 443 ssl http2;
server_name yourdomain.com;
# SSL证书配置
ssl_certificate /etc/nginx/ssl/yourdomain.com.crt;
ssl_certificate_key /etc/nginx/ssl/yourdomain.com.key;
# SSL优化
ssl_session_cache shared:SSL:1m;
ssl_session_timeout 5m;
ssl_ciphers HIGH:!aNULL:!MD5;
ssl_prefer_server_ciphers on;
# 网站根目录
root /usr/local/nginx/html;
index index.html;
# HTTP跳转HTTPS
if ($scheme = "http") {
return 301 https://$host$request_uri;
}
}9 Nginx维护与管理
9.1 日常维护命令
# 启动Nginx
systemctl start nginx

# 停止Nginx(优雅停止)
systemctl stop nginx

# 重启Nginx
systemctl restart nginx

# 重载配置(不中断服务)
systemctl reload nginx

# 查看服务状态
systemctl status nginx

# 查看Nginx进程
ps aux | grep nginx

# 查看监听端口
netstat -tlnp | grep nginx

# 查看错误日志
tail -f /usr/local/nginx/logs/error.log

# 查看访问日志
tail -f /usr/local/nginx/logs/access.log
9.2 日志管理
# 创建日志轮转配置
vim /etc/logrotate.d/nginx
/usr/local/nginx/logs/*.log {
daily
missingok
rotate 52
compress
delaycompress
notifempty
create 644 nginx nginx
sharedscripts
postrotate
if [ -f /usr/local/nginx/logs/nginx.pid ]; then
kill -USR1 `cat /usr/local/nginx/logs/nginx.pid`
fi
endscript
}9.3 升级Nginx
# 备份当前版本
cp -r /usr/local/nginx /usr/local/nginx.bak

# 下载新版本源码
cd /usr/local/src
wget http://nginx.org/download/nginx-新版本号.tar.gz
tar -zxvf nginx-新版本号.tar.gz
cd nginx-新版本号

# 使用相同配置参数编译
./configure --prefix=/usr/local/nginx \
--with-http_ssl_module \
--with-http_stub_status_module \
# ... 其他原有参数

# 编译(不安装)
make

# 备份二进制文件
mv /usr/local/nginx/sbin/nginx /usr/local/nginx/sbin/nginx.old

# 复制新二进制文件
cp objs/nginx /usr/local/nginx/sbin/

# 测试新版本
/usr/local/nginx/sbin/nginx -t

# 重启服务
systemctl restart nginx
10 总结
Nginx作为现代Web架构的核心组件,其重要性不言而喻。通过源码编译安装的方式,我们不仅能够获得最新的功能和安全更新,还能够根据实际需求进行深度定制和优化。