目录
前言:
对于Java代码审计,还是需要从开发开始学起,学习语言,少不了敲大量的代码,本文章以一个MVC框架开发的用户登入界面作为例子,介绍MVC开发的整个流程,
由于笔者个人水平有限,行文如有不当,还请各位师傅评论指正,非常感谢
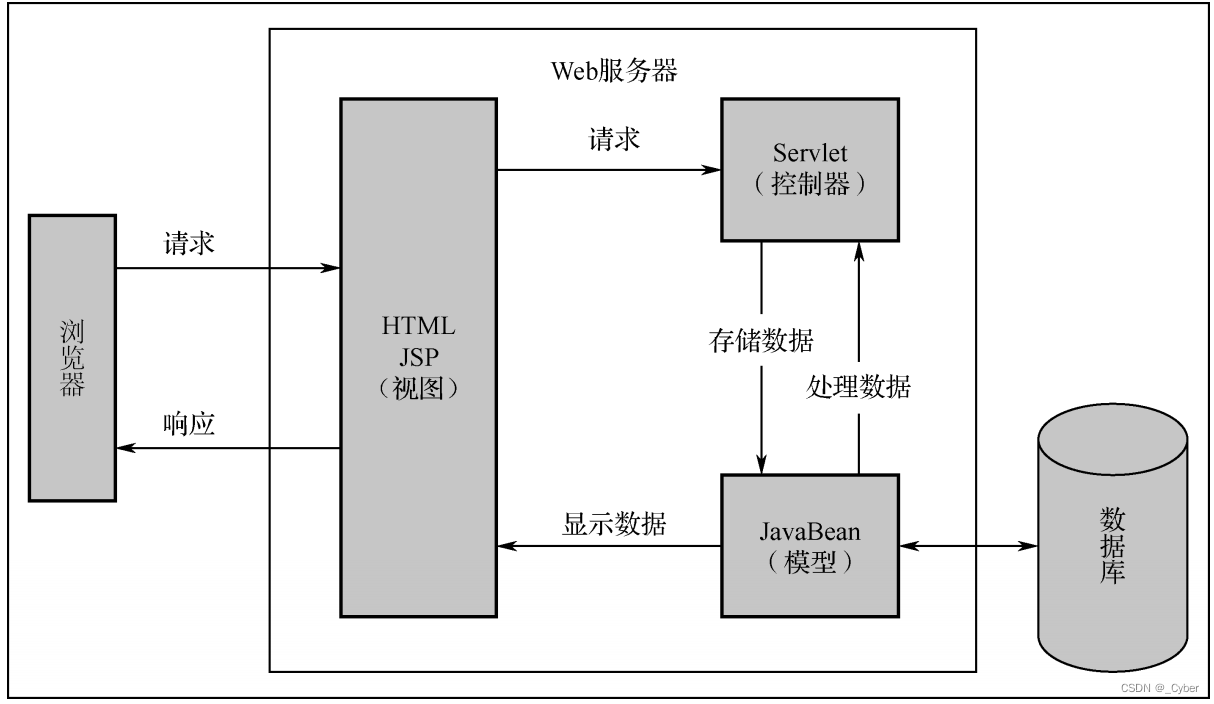
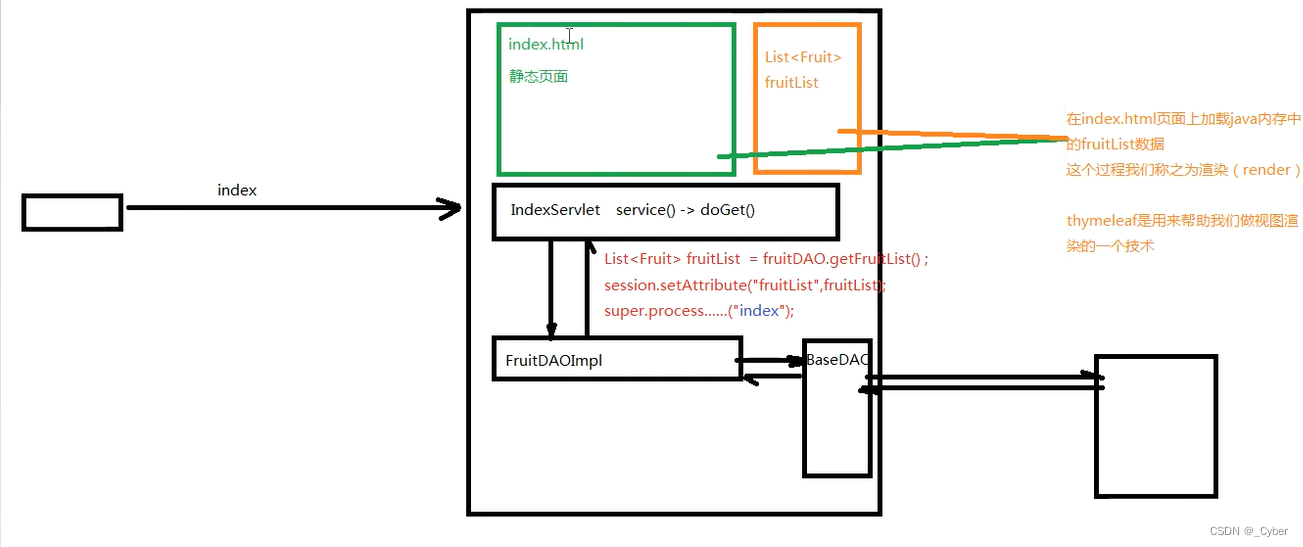
基于本项目的 MVC 模式的具体实现如图 3-1 所示
(一)servlet
根据前端传来的数据重写doPost或者doGet请求
void service(requestresponse)-不是抽象的
- string method=req.getMethod();获取请求的方式
- 各种if判断,根据请求方式不同,决定去调用不同的do方法
- 在HttpServlet这个抽象类中,do方法都差不多.
0x01 接收method
public abstract class BaseServlet extends HttpServlet {
    @Override
    protected void service(HttpServletRequest req, HttpServletResponse resp)
            throws ServletException, IOException {
        //设置请求、响应编码格式
        req.setCharacterEncoding("utf-8");
        resp.setContentType("text/html; charset=utf-8");
        //获取请求信息
        String methodName = req.getParameter("method");
        //处理请求信息(动态调用方法处理请求--》反射)
        try {
            //反射方法获取所在类的类对象
            Class cla = this.getClass();
            //反射方法获取要被调用的方法对象
            Method m= cla.getMethod(methodName, HttpServletRequest.class,HttpServletResponse.class);
            //反射执行的方法
            m.invoke(this, req,resp);
        } catch (Exception e) {
            e.printStackTrace();
        }
    }
}
0x02 获取参数,传给service层
        String uname = req.getParameter("uname");
        String pwd = req.getParameter("pwd");
        //处理请求信息
        System.out.println("DataServlet.Userlogin()"+uname+":"+pwd);
getParameter(name),通过此方法前端的name属性对应接受。
0x03 创建业务层对象
//创建业务层对象
        UserService us = new UserServiceImpl();
        User u= us.getUserInfoService(uname,pwd);
        System.out.println("用户查询登陆结果为:"+u);
0x03 保持Session
if (u!=null) {//登陆成功
            //将用户信息存储到session
            hs.setAttribute("user", u);

            //重定向到mian.jsp
            resp.sendRedirect("/16/main.jsp");
        }else {//登录失败
            //将登陆标记添加
            hs.setAttribute("flag", "loginfalse");
            //重定向到login.jsp
            resp.sendRedirect("/16/login.jsp");
        }
会话结束
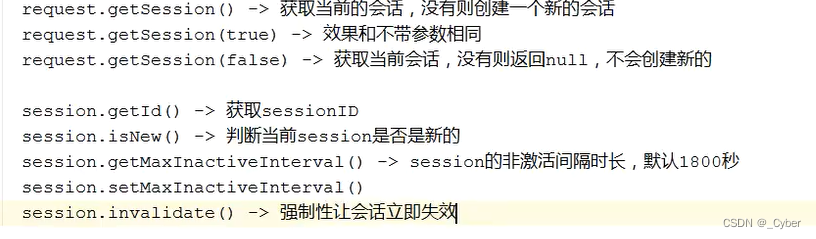
    public void UserOut(HttpServletRequest req, HttpServletResponse resp) throws IOException {
        //获取请求信息
        //处理请求信息
        //获取session、销毁session
        HttpSession hs = req.getSession();
        hs.invalidate();
        //相应处理结果
        //直接响应
        //请求转发
        //重定向
        resp.sendRedirect("/16/login.jsp");
    }
常见API:
0x04 保存作用域
public void UserReg(HttpServletRequest req, HttpServletResponse resp) throws IOException {
        //获取请求信息
        String uname = req.getParameter("uname");
        String pwd = req.getParameter("pwd");
        String sex = req.getParameter("sex");
        int age =Integer.parseInt(req.getParameter("age")) ;
        String birthday = req.getParameter("birthday");
        //处理请求信息
        //获取业务层对象
        UserService us = new UserServiceImpl();
        //处理注册
        int i=us.getUserInfoService(uname, pwd,sex,age,birthday);

        //相应处理结果
        //获取session对象
        HttpSession hs = req.getSession();
        //重定向到登陆界面
        if(i>0){
            //注册成功,添加标记到session
            hs.setAttribute("flag", "regsuccess");
            resp.sendRedirect("/16/login.jsp");
        }else{
            //重定向到注册页面
            resp.sendRedirect("/16/login.jsp");
        }
    }
这个用户注册页面,hs.setAttribute(k,v);就是在session中保存作用域,下面简单介绍
补充:
- request:一次请求和响应有效,sendRedirect(" ")则失效
- session: 一次会话有效,只要time没有过期(所以说缩短time可以防御CSRF)
- application:一次应用范围有效,

- page:用的很少,在jsp页面会涉及
0x05 服务器内部转发和客户端重定向
1、服务器内部转发
request.getRequestDispatcher("/add.jsp").forward(request,response);
2、客户端重定向
response.sendRedirect("/16/login.jsp");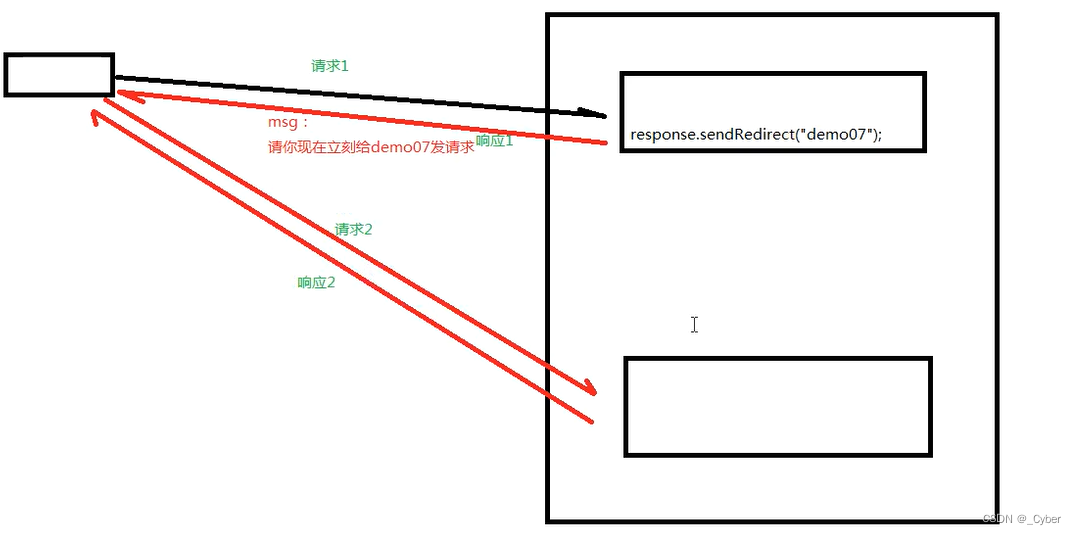
本项目的servlet层
本项目没有用到spring框架里面的DispatcherServlet,再接下来的几天会详细介绍。
1、先写抽象类
package com.xiaowei.servlet;

import java.io.IOException;
import java.lang.reflect.Method;

import javax.servlet.ServletException;
import javax.servlet.http.HttpServlet;
import javax.servlet.http.HttpServletRequest;
import javax.servlet.http.HttpServletResponse;

public abstract class BaseServlet extends HttpServlet {
    @Override
    protected void service(HttpServletRequest req, HttpServletResponse resp)
            throws ServletException, IOException {
        req.setCharacterEncoding("utf-8");
        resp.setContentType("text/html; charset=utf-8");
        String methodName = req.getParameter("method");
        try {
            Class cla = this.getClass();
            Method m= cla.getMethod(methodName, HttpServletRequest.class,HttpServletResponse.class);
            //反射执行的方法
            m.invoke(this, req,resp);
        } catch (Exception e) {
            e.printStackTrace();
        }
    }
}
2、再进行实现
package com.xiaowei.servlet;

import java.io.IOException;
import java.lang.reflect.Method;
import java.util.Calendar;

import javax.servlet.ServletException;
import javax.servlet.http.HttpServlet;
import javax.servlet.http.HttpServletRequest;
import javax.servlet.http.HttpServletResponse;
import javax.servlet.http.HttpSession;

import com.xiaowei.pojo.User;
import com.xiaowei.Service.UserService;
import com.xiaowei.Service.impl.UserServiceImpl;

public  class DataServlet extends BaseServlet {

    //登陆处理方法
    public void Userlogin(HttpServletRequest req, HttpServletResponse resp) throws IOException {
        //获取请求信息
        String uname = req.getParameter("uname");
        String pwd = req.getParameter("pwd");
        //处理请求信息
        System.out.println("DataServlet.Userlogin()"+uname+":"+pwd);

        //创建业务层对象
        UserService us = new UserServiceImpl();
        User u= us.getUserInfoService(uname,pwd);
        System.out.println("用户查询登陆结果为:"+u);

        //响应处理结果
        //直接响应
        //请求转发

        //获取session对象
        HttpSession hs = req.getSession();

        if (u!=null) {//登陆成功
            //将用户信息存储到session
            hs.setAttribute("user", u);

            //重定向到mian.jsp
            resp.sendRedirect("/16/main.jsp");
        }else {//登录失败
            //将登陆标记添加
            hs.setAttribute("flag", "loginfalse");
            //重定向到login.jsp
            resp.sendRedirect("/16/login.jsp");
        }
    }
    //退出处理方法
    public void UserOut(HttpServletRequest req, HttpServletResponse resp) throws IOException {
        //获取请求信息
        //处理请求信息
        //获取session、销毁session
        HttpSession hs = req.getSession();
        hs.invalidate();
        //相应处理结果
        //直接响应
        //请求转发
        //重定向
        resp.sendRedirect("/16/login.jsp");
    }
    //注册处理方法
    public void UserReg(HttpServletRequest req, HttpServletResponse resp) throws IOException {
        //获取请求信息
        String uname = req.getParameter("uname");
        String pwd = req.getParameter("pwd");
        String sex = req.getParameter("sex");
        int age =Integer.parseInt(req.getParameter("age")) ;
        String birthday = req.getParameter("birthday");
        //处理请求信息
        //获取业务层对象
        UserService us = new UserServiceImpl();
        //处理注册
        int i=us.getUserInfoService(uname, pwd,sex,age,birthday);

        //相应处理结果
        //获取session对象
        HttpSession hs = req.getSession();
        //重定向到登陆界面
        if(i>0){
            //注册成功,添加标记到session
            hs.setAttribute("flag", "regsuccess");
            resp.sendRedirect("/16/login.jsp");
        }else{
            //重定向到注册页面
            resp.sendRedirect("/16/login.jsp");
        }
    }
}
补充 :thymeleaf
首先实现二个功能:
- 使用步骤:添加jar,新建viewBaseServlet(有两个方法),配置两个<context-param>:view-prefix,view-suffix
- 部分标签:<th:if> ,<th:unless> ,<th:each> ,<th:text>
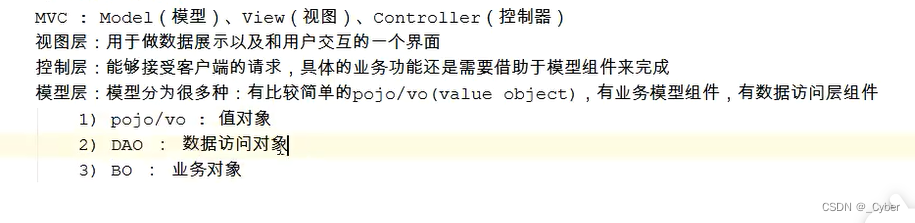
(二)Model层
1、Dojo
package com.xiaowei.pojo;

import java.util.Objects;

public class User {
    private  int uid;
    private  String pwd;
    private String sex;
    private int age;
    private String birthday;
    private String uname;

    public int getUid() {
        return uid;
    }

    public void setUid(int uid) {
        this.uid = uid;
    }

    public String getPwd() {
        return pwd;
    }

    public void setPwd(String pwd) {
        this.pwd = pwd;
    }

    public String getSex() {
        return sex;
    }

    public void setSex(String sex) {
        this.sex = sex;
    }

    public int getAge() {
        return age;
    }

    public void setAge(int age) {
        this.age = age;
    }

    public String getBirthday() {
        return birthday;
    }

    public void setBirthday(String birthday) {
        this.birthday = birthday;
    }

    public String getUname() {
        return uname;
    }

    public void setUname(String uname) {
        this.uname = uname;
    }

    public User() {
    }

    public User(int uid, String pwd, String sex, int age, String birthday, String uname) {
        this.uid = uid;
        this.pwd = pwd;
        this.sex = sex;
        this.age = age;
        this.birthday = birthday;
        this.uname = uname;
    }

    @Override
    public String toString() {
        return "User{" +
                "uid=" + uid +
                ", pwd='" + pwd + '\'' +
                ", sex='" + sex + '\'' +
                ", age=" + age +
                ", birthday='" + birthday + '\'' +
                ", uname='" + uname + '\'' +
                '}';
    }
}
2、DAO
直接访问数据库
2.1 定义抽象类
package com.xiaowei.Dao;

import com.xiaowei.pojo.User;

public interface UserDao {
    //根据用户名和密码,查询用户信息
    User getUserInfoDao(String uname,String pwd);
    int regUserInfoDao(String uname,String pwd,String sex,int age,String birthdag);
}
2.2 实现接口
package com.xiaowei.Dao.impl;

import com.xiaowei.Dao.UserDao;
import com.xiaowei.pojo.User;
import com.xiaowei.util.DBUtil;
import java.sql.Connection;
import java.sql.PreparedStatement;
import java.sql.ResultSet;

public class UserDaoImpl implements UserDao {
    //根据uname和pwd查看用户的个人信息
    @Override
            public User getUserInfoDao(String uname, String pwd) {
                //声明jdbc变量
                Connection coon = null;
                PreparedStatement ps = null;
                ResultSet rs = null;
                User u = null;
                try {
                    //创建数据库连接
                    coon = DBUtil.getConnection();
                    //创建sql命令
                    String sql = "select * from t_user where uname=? and pwd=?";//预编译可以防止SQL注入,查询无order by即可
                    //创建SQL命令对象
                    ps = coon.prepareStatement(sql);
            //给占位符赋值
            ps.setString(1,uname);
            ps.setString(2,pwd);
            //执行sql命令
            rs = ps.executeQuery();
            //遍历
            while(rs.next()){
                //给变量赋值
                u = new User();
                u.setUid(rs.getInt("uid"));
                u.setUname(rs.getString("uname"));
                u.setPwd(rs.getString("pwd"));
                u.setSex(rs.getString("sex"));
                u.setAge(rs.getInt("age"));
                u.setBirthday(rs.getString("birthday"));
            }

        } catch (Exception e) {
            e.printStackTrace();
        } finally {
            DBUtil.closeAll(rs, ps, coon);
        }
        return u;
    }
    //用户注册
    @Override
    public int regUserInfoDao(String uname, String pwd, String sex, int age, String birthdag) {
      String sql = "insert into t_user values(default,?,?,?,?,?)";//防止SQL注入
      return DBUtil.executeDML(sql,uname,pwd,sex,age,birthdag);
    }
}
3. util层
我们把对数据库访问单独拿出来,作为util层
package com.xiaowei.util;
import java.io.IOException;
import java.io.InputStream;
import java.sql.Connection;
import java.sql.DriverManager;
import java.sql.PreparedStatement;
import java.sql.ResultSet;
import java.sql.SQLException;
import java.sql.Statement;
import java.util.Properties;
public class DBUtil {
    //声明全局变量记录jdbc参数
    private static String driver;
    private static String url;
    private static String username;
    private static String password;
    //使用静态代码块,在类加载时即完成对属性文件的读取
    static{
        //动态获取属性配置文件的流对象
        InputStream in=DBUtil.class.getResourceAsStream("/db.properties");
        //创建Properties对象
        Properties p=new Properties();
        //加载
        try {
            p.load(in);//会将属性配置文件的所有数据存储到Properties对象中
            //将读取的jdbc参数赋值给全局变量
            driver=p.getProperty("driver");
            url=p.getProperty("url");
            username=p.getProperty("username");
            password=p.getProperty("password");
            //加载驱动
            Class.forName(driver);
        } catch (IOException e) {
            // TODO Auto-generated catch block
            e.printStackTrace();
        } catch (ClassNotFoundException e) {
            // TODO Auto-generated catch block
            e.printStackTrace();
        }
    }
    //创建连接对象并返回
    public static Connection getConnection(){
        Connection conn=null;
        try {
            conn = DriverManager.getConnection(url, username, password);
        } catch (SQLException e) {
            // TODO Auto-generated catch block
            e.printStackTrace();
        }

        return conn;
    }
    //关闭资源
    public static void closeAll(ResultSet rs,Statement stmt,Connection conn){
        try {
            if(rs!=null){
                rs.close();
            }
        } catch (SQLException e1) {
            // TODO Auto-generated catch block
            e1.printStackTrace();
        }
        try {
            stmt.close();
        } catch (SQLException e) {
            // TODO Auto-generated catch block
            e.printStackTrace();
        }
        try {
            conn.close();
        } catch (SQLException e) {
            // TODO Auto-generated catch block
            e.printStackTrace();
        }


    }
    //封装增加删除修改的通用工具方法
    /**
     * @param sql SQL语句
     * @param objs	SQL语句占位符实参,如果没有参数则传入null
     * @return 返回增删改的结果,类型为int
     */
    public static int executeDML(String sql,Object...objs){
        // 声明jdbc变量
        Connection conn = null;
        PreparedStatement ps = null;
        int i = -1;
        try {
            // 获取连接对象
            conn = DBUtil.getConnection();
            // 开启事务管理
            conn.setAutoCommit(false);
            // 创建SQL命令对象
            ps = conn.prepareStatement(sql);
            // 给占位符赋值
            if(objs!=null){
                for(int j=0;j<objs.length;j++){
                    ps.setObject(j+1,objs[j]);
                }
            }
            // 执行SQL
            i = ps.executeUpdate();
            conn.commit();
        } catch (Exception e) {
            try {
                conn.rollback();
            } catch (SQLException e1) {
                // TODO Auto-generated catch block
                e1.printStackTrace();
            }
            e.printStackTrace();
        } finally {
            DBUtil.closeAll(null, ps, conn);
        }
        return i;
    }
}
4、Service
4.1 抽象类
package com.xiaowei.Service;
import com.xiaowei.pojo.User;

public interface UserService {
    /**用户登陆
     *
     * @param uname
     * @param pwd
     * @return
     */
    User getUserInfoService(String uname, String pwd);

    /**用户注册
     *
     * @param uname
     * @param pwd
     * @param sex
     * @param age
     * @param birthday
     * @return
     */
    int getUserInfoService(String uname, String pwd, String sex, int age,
                           String birthday);

}
4.2 实现类
package com.xiaowei.Service.impl;

import com.xiaowei.Dao.UserDao;
import com.xiaowei.Dao.impl.UserDaoImpl;
import com.xiaowei.Service.UserService;
import com.xiaowei.pojo.User;

public class UserServiceImpl implements UserService {
    //创建Dao对象
    UserDao ud = new UserDaoImpl();


    @Override
    public User getUserInfoService(String uname, String pwd) {
        //处理登录业务
        return ud.getUserInfoDao(uname,pwd);
    }


    //用户注册
    @Override
    public int getUserInfoService(String uname, String pwd, String sex,
                                  int age, String birthday) {
        //处理注册业务
        return ud.regUserInfoDao(uname,pwd,sex,age,birthday);
    }

}
(三)View
0x01 info.jsp
<%--
  Created by IntelliJ IDEA.
  User: xiaowei
  Date: 2022-10-15
  Time: 12:55
  To change this template use File | Settings | File Templates.
--%>
<%@ page language="java" import="java.util.*" pageEncoding="UTF-8"%>
<%
  String path = request.getContextPath();
  String basePath = request.getScheme()+"://"+request.getServerName()+":"+request.getServerPort()+path+"/";
%>


<!DOCTYPE html>
<html>
<head>
  <base href="<%=basePath%>">
  <meta http-equiv="Content-Type" content="text/html; charset=utf-8" />
  <meta http-equiv="X-UA-Compatible" content="IE=edge">
  <meta name="viewport" content="width=device-width, initial-scale=1.0, maximum-scale=1.0, user-scalable=no" />
  <meta name="renderer" content="webkit">
  <title>网站信息</title>
  <link rel="stylesheet" href="css/pintuer.css">
  <link rel="stylesheet" href="css/admin.css">
  <script src="js/jquery.js"></script>
  <script src="js/pintuer.js"></script>
</head>
<body>
<div class="panel admin-panel">
  <div><strong><span></span> 网站信息</strong></div>
  <div>
    <form method="post" action="">
      <div>
        <div>
          <label>网站标题:</label>
        </div>
        <div>
          <input type="text" name="stitle" value="" />
          <div></div>
        </div>
      </div>
      <div>
        <div>
          <label>网站LOGO:</label>
        </div>
        <div>
          <input type="text" id="url1" name="slogo" class="input tips" style="width:25%; float:left;" value="" data-toggle="hover" data-place="right" data-image=""  />
          <input type="button" class="button bg-blue margin-left" id="image1" value="+ 浏览上传" >
        </div>
      </div>
      <div>
        <div>
          <label>网站域名:</label>
        </div>
        <div>
          <input type="text" name="surl" value="" />
        </div>
      </div>
      <div style="display:none">
        <div>
          <label>副加标题:</label>
        </div>
        <div>
          <input type="text" name="sentitle" value="" />
          <div></div>
        </div>
      </div>
      <div>
        <div>
          <label>网站关键字:</label>
        </div>
        <div>
          <textarea name="skeywords" style="height:80px"></textarea>
          <div></div>
        </div>
      </div>
      <div>
        <div>
          <label>网站描述:</label>
        </div>
        <div>
          <textarea name="sdescription"></textarea>
          <div></div>
        </div>
      </div>
      <div>
        <div>
          <label>联系人:</label>
        </div>
        <div>
          <input type="text" name="s_name" value="" />
          <div></div>
        </div>
      </div>
      <div>
        <div>
          <label>手机:</label>
        </div>
        <div>
          <input type="text" name="s_phone" value="" />
          <div></div>
        </div>
      </div>
      <div>
        <div>
          <label>电话:</label>
        </div>
        <div>
          <input type="text" name="s_tel" value="" />
          <div></div>
        </div>
      </div>
      <div style="display:none;">
        <div>
          <label>400电话:</label>
        </div>
        <div>
          <input type="text" name="s_400" value="" />
          <div></div>
        </div>
      </div>
      <div>
        <div>
          <label>传真:</label>
        </div>
        <div>
          <input type="text" name="s_fax" value="" />
          <div></div>
        </div>
      </div>
      <div>
        <div>
          <label>QQ:</label>
        </div>
        <div>
          <input type="text" name="s_qq" value="" />
          <div></div>
        </div>
      </div>
      <div style="display:none">
        <div>
          <label>QQ群:</label>
        </div>
        <div>
          <input type="text" name="s_qqu" value="" />
          <div></div>
        </div>
      </div>

      <div>
        <div>
          <label>Email:</label>
        </div>
        <div>
          <input type="text" name="s_email" value="" />
          <div></div>
        </div>
      </div>
      <div>
        <div>
          <label>地址:</label>
        </div>
        <div>
          <input type="text" name="s_address" value="" />
          <div></div>
        </div>
      </div>

      <div>
        <div>
          <label>底部信息:</label>
        </div>
        <div>
          <textarea name="scopyright" style="height:120px;"></textarea>
          <div></div>
        </div>
      </div>
      <div>
        <div>
          <label></label>
        </div>
        <div>
          <button class="button bg-main icon-check-square-o" type="submit"> 提交</button>
        </div>
      </div>
    </form>
  </div>
</div>
</body></html>
0x02 login.jsp
<%--
  Created by IntelliJ IDEA.
  User: xiaowei
  Date: 2022-10-15
  Time: 12:57
  To change this template use File | Settings | File Templates.
--%>
<%@ page language="java" import="java.util.*" pageEncoding="UTF-8"%>
<%
    String path = request.getContextPath();
    String basePath = request.getScheme()+"://"+request.getServerName()+":"+request.getServerPort()+path+"/";
%>

<!DOCTYPE html>
<html>
<head>
    <base href="<%=basePath%>">
    <meta http-equiv="Content-Type" content="text/html; charset=utf-8" />
    <meta http-equiv="X-UA-Compatible" content="IE=edge">
    <meta name="viewport" content="width=device-width, initial-scale=1.0, maximum-scale=1.0, user-scalable=no" />
    <meta name="renderer" content="webkit">
    <title>登录</title>
    <link rel="stylesheet" href="css/pintuer.css">
    <link rel="stylesheet" href="css/admin.css">
    <script src="js/jquery.js"></script>
    <script src="js/pintuer.js"></script>
</head>
<body>
<div></div>
<div>
    <div class="line bouncein">
        <div class="xs6 xm4 xs3-move xm4-move">
            <div style="height:150px;"></div>
            <div class="media media-y margin-big-bottom">
            </div>
            <form action="data" method="get">

                <!-- 声明处理请求的方法 -->
                <input type="hidden" name="method" value="Userlogin" />
                <div class="panel loginbox">
                    <div class="text-center margin-big padding-big-top"><h1>chy超级管理系统</h1></div>

                    <!-- 声明java代码块 -->
                    <%
                        //获取session中的标记
                        Object obj =session.getAttribute("flag");
                        if(obj!=null){
                            if("loginfalse".equals((String)obj)){ %>
                    <div style="text-align:center;color:red"; ><h1>用户名或密码错误</h1></div>
                    <%
                    }else if("regsuccess".equals((String)obj)){
                    %>
                    <div style="text-align:center;color:red"; ><h1>新用户注册成功</h1></div>
                    <%
                            }
                        }
                        session.invalidate();/* 销毁session */
                    %>

                    <div style="padding:30px; padding-bottom:10px; padding-top:10px;">
                        <div>
                            <div class="field field-icon-right">
                                <input type="text" class="input input-big" name="uname" placeholder="登录账号" data-validate="required:请填写账号" />
                                <span class="icon icon-user margin-small"></span>
                            </div>
                        </div>
                        <div>
                            <div class="field field-icon-right">
                                <input type="password" class="input input-big" name="pwd" placeholder="登录密码" data-validate="required:请填写密码" />
                                <span class="icon icon-key margin-small"></span>
                            </div>
                        </div>
                        <div>
                            <div>
                                <input type="text" class="input input-big" name="code" placeholder="填写右侧的验证码" data-validate="required:请填写右侧的验证码" />
                                <img src="images/passcode.jpg" alt="" width="100" height="32" style="height:43px;cursor:pointer; "this.src=this.src+'?'">

                            </div>
                        </div>
                    </div>
                    <div style="padding:30px;"><input type="submit" class="button button-block bg-main text-big input-big" value="登录"></div>
                    <div style="font-size:20px; position:relative;left:300px;top:-20px"><a href="reg.jsp">注册</a></div>
                </div>
            </form>
        </div>
    </div>
</div>

</body>
</html>
0x03 main.jsp
<%--
Created by IntelliJ IDEA.
User: xiaowei
Date: 2022-10-15
Time: 12:58
To change this template use File | Settings | File Templates.
--%>
<%@page import="com.xiaowei.pojo.User"%>
<%@ page language="java" import="java.util.*" pageEncoding="UTF-8"%>
<%
String path = request.getContextPath();
String basePath = request.getScheme()+"://"+request.getServerName()+":"+request.getServerPort()+path+"/";
%>
<!DOCTYPE html>
<html>
<head>
<base href="<%=basePath%>">
<meta http-equiv="Content-Type" content="text/html; charset=utf-8" />
<meta http-equiv="X-UA-Compatible" content="IE=edge">
<meta name="viewport" content="width=device-width, initial-scale=1.0, maximum-scale=1.0, user-scalable=no" />
<meta name="renderer" content="webkit">
<title>chy参与管理系统修改</title>
<link rel="stylesheet" href="css/pintuer.css">
<link rel="stylesheet" href="css/admin.css">
<script src="js/jquery.js"></script>
<script type="text/javascript">
//给退出登陆添加单击事件,通过id选择器
$(function(){
$("#out").click(function(){
return window.confirm("你需要退出登陆吗?")
})
})
</script>
</head>
<body style="background-color:#f2f9fd;">
<div class="header bg-main" style="border:solid 1px">
<div class="logo margin-big-left fadein-top">
<h1><img src="images/y.jpg" class="radius-circle rotate-hover" height="50" alt="" />chy超级管理系统</h1>
</div>
<!-- 加入欢迎用户登陆的界面 span行内标签-->
<!-- 加边框 -->
<div style="position:relative;left:900px"><span style="font-size:20px;color:white;"> 欢迎:<%=( (User)session.getAttribute("user")).getUname() %>进入系统</span> <a id="out" class="button button-little bg-red" href="data?method=UserOut"><span></span> 退出登录</a> </div>
</div>
<div>
<div><strong><span></span>菜单列表</strong></div>
<h2><span></span>基本设置</h2>
<ul style="display:block">
<li><a href="info.html" target="right"><span></span>网站设置</a></li>
<li><a href="pass.html" target="right"><span></span>修改密码</a></li>
<li><a href="page.html" target="right"><span></span>单页管理</a></li>
<li><a href="adv.html" target="right"><span></span>首页轮播</a></li>
<li><a href="book.html" target="right"><span></span>留言管理</a></li>
<li><a href="column.html" target="right"><span></span>栏目管理</a></li>
</ul>
<h2><span></span>栏目管理</h2>
<ul>
<li><a href="list.html" target="right"><span></span>内容管理</a></li>
<li><a href="add.html" target="right"><span></span>添加内容</a></li>
<li><a href="cate.html" target="right"><span></span>分类管理</a></li>
</ul>
</div>
<script type="text/javascript">
$(function(){
$(".leftnav h2").click(function(){
$(this).next().slideToggle(200);
$(this).toggleClass("on");
})
$(".leftnav ul li a").click(function(){
$("#a_leader_txt").text($(this).text());
$(".leftnav ul li a").removeClass("on");
$(this).addClass("on");
})
});
</script>
<ul>
<li><a href="{:U('Index/info')}" target="right"> 首页</a></li>
<li><a href="##" id="a_leader_txt">网站信息</a></li>
<li><b>当前语言:</b><span style="color:red;">中文</span>
切换语言:<a href="##">中文</a> <a href="##">英文</a> </li>
</ul>
<div>
<iframe scrolling="auto" rameborder="0" src="info.jsp" name="right" width="100%" height="100%"></iframe>
</div>
<div style="text-align:center;">
</div>
</body>
</html>0x04 reg.jsp
<%--
  Created by IntelliJ IDEA.
  User: xiaowei
  Date: 2022-10-15
  Time: 13:01
  To change this template use File | Settings | File Templates.
--%>
<%@ page language="java" import="java.util.*" pageEncoding="UTF-8"%>
<%
    String path = request.getContextPath();
    String basePath = request.getScheme()+"://"+request.getServerName()+":"+request.getServerPort()+path+"/";
%>


<!DOCTYPE html>
<html>
<head>
    <base href="<%=basePath%>">
    <meta http-equiv="Content-Type" content="text/html; charset=utf-8" />
    <meta http-equiv="X-UA-Compatible" content="IE=edge">
    <meta name="viewport" content="width=device-width, initial-scale=1.0, maximum-scale=1.0, user-scalable=no" />
    <meta name="renderer" content="webkit">
    <title></title>
    <link rel="stylesheet" href="css/pintuer.css">
    <link rel="stylesheet" href="css/admin.css">
    <script src="js/jquery.js"></script>
    <script src="js/pintuer.js"></script>
</head>
<body>
<div class="panel admin-panel">
    <div><strong><span></span>新用户注册 </strong></div>
    <div>
        <form method="post" action="data">
            <input type="hidden" name="method" value="UserReg" />

            <div>
                <div>
                    <label for="sitename">用户名:</label>
                </div>
                <div>
                    <input type="text" class="input w50" id="mpass" name="uname" size="50" placeholder="请输入新用户名" data-validate="required:请输入原始密码" />
                </div>
            </div>
            <div>
                <div>
                    <label for="sitename">新密码:</label>
                </div>
                <div>
                    <input type="password" class="input w50" name="pwd" size="50" placeholder="请输入新密码" data-validate="required:请输入新密码,length#>=5:新密码不能小于5位" />
                </div>
            </div>
            <div>
                <div>
                    <label for="sitename">确认新密码:</label>
                </div>
                <div>
                    <input type="password" class="input w50" name="" size="50" placeholder="请再次输入新密码" data-validate="required:请再次输入新密码,repeat#pwd:两次输入的密码不一致" />
                </div>
            </div>
            <div style="position:relative;left:100px; top:-10px">
                性别:男<input type="radio" name="sex" value="男" checked="checked">女<input type="radio" name="sex" value="女" >
            </div>
            <!-- 年龄 -->
            <div>
                <div>
                    <label for="sitename">年龄:</label>
                </div>
                <div>
                    <input type="text" class="input w50" id="mpass" name="age" size="50" placeholder="请输入年龄"  />
                </div>
            </div>
            <!-- 出生日期 -->
            <div>
                <div>
                    <label for="sitename">出生日期:</label>
                </div>
                <div>
                    <input type="date" class="input w50" id="mpass" name="birthday" size="50"  />
                </div>

            </div>
            <div>
                <div>
                    <label></label>
                </div>
                <div>
                    <button class="button bg-main icon-check-square-o" type="submit"> 提交</button>
                </div>
            </div>
        </form>
    </div>
</div>
</body></html>
css,js,image这里不再提供。
本文含有隐藏内容,请 开通VIP 后查看