一、效果

二、说明
最近在开发微信小程序,但是用的lin-ui和@vant 都没有下拉选择框组件。在网上搜索一番后,发现了一个挺简单且很好用的下拉框组件。
链接在这里:https://blog.csdn.net/WeiflR10/article/details/121494131
原文中是直接写入数据,在此基础上我修改了一下,让它成为一个可复用的组件。
三、代码
my_select.js
Component({
 properties: {
  title:{
   type: String,
   value: ""
  },
  nameList: {
   type: Array,
   value: [],
   observer: function(){
   //有的时候选项组是后端获取数据来的,初始化时可能为[],所以这里使用obersver,当父组件中值改变时触发
    this.processData();
   }
  },
  nowId: {
   type: Number,
   value: -1
  },
  nowName: {
   type: String,
   value: "",
   observer: function(){
    this.setData({select: this. properties.nowName,
     selectId: this.properties.nowId,});
   }
  },
  placeholder: {
   type: String,
   value: ""
  }
 },

 /**
  * 页面的初始数据
  */
 data: {
  selectcontent: [],
  changable: false, //箭头切换
  select: undefined, //选中的值
  selectId: undefined, //选中的id
 },
 methods: {
 // 下拉框收起和展开
  startChange(e) {
   this.setData({
    changable: !this.data.changable
   })
  },
  // 选择数据后回显
  changecontent(e) {
   this.setData({
    select: e.currentTarget.dataset.datavalue.name,
    selectId: e.currentTarget.dataset.datavalue.id,
    changable: false
   })
   this.triggerEvent("handleChange", {selectId: this.data.selectId, select: this.data.select});//向父组件传参
  },
  //处理数据,复制一遍,因为子组件不能直接改变父组件的传进来的值。
  processData(){
   let options = [];
   let that = this;
   this.properties.nameList.forEach((item) => {
    options.push({
     id: item.id,
     name: item.name,
    });
   }); //forEach
   this.setData({
    selectcontent: options,
    select: that.properties.nowName,
    selectId: that.properties.nowId,
   });
  }
 }
})
my_select.json
{
 "component": true,
 "usingComponents": {}
}
my_select.wxml
需要说明的是这里的箭头icon是使用的lin-ui,使用可以换成你自己用的ui框架或者用静态图片也可以。
<!--pages/components/my_select/my_select.wxml-->
<view class="select_all_view">
 <!-- 内容说明,可以没有 -->
 <view class="select_title" wx:if="{{title}}">{{title}}</view>
 <view class="select_view">
  <!-- 输入框 -->
  <view class="inputPlaceholder" bindtap="startChange">
   <text wx:if='{{select}}'>{{select}}</text>
   <text wx:else="{{select}}">{{placeholder}}</text>
   <view class="jiantou1" wx:if='{{changable}}'>
    <l-icon name="down" size="30" />
   </view>
   <view class="jiantou1" wx:else='{{changable}}'>
    <l-icon name="left" size="30" />
   </view>
  </view>
  <!-- 下拉展开后的可选择内容 -->
  <view class="content" wx:if='{{changable}}'>
   <view class="{{item.id==selectId ? 'active':''}}" wx:for="{{selectcontent}}" wx:key="idnex" bindtap="changecontent" data-datavalue="{{item}}">
    {{item.name}}
   </view>
  </view>
 </view>
</view>
my_select.wxss
这里z-index:99是为了显示在其他内容之上。但是也承认有一个缺陷是,这个组件如果用在modal里面,显示会有一些问题。
.select_all_view{
 display: flex;
 z-index: 999;
}
.select_view{
 display: inline;
}
.select_title{
 margin-right: 10rpx;
}
.inputPlaceholder{
 min-width: 300rpx;
 height: 45rpx;
 background-color: rgba(255, 255, 255, 0.5);
 border: 1px solid #DEDEDE;
 padding: 4rpx 0rpx 10rpx 10rpx;
 color: #252525;
 font-weight: 400;
 border-radius: 10rpx;
 position: relative;
 overflow:hidden;
 text-overflow: ellipsis;
 white-space:nowrap;
}
.jiantou1{
 position: absolute;
 right: 10rpx;
 top: 8rpx;
}
.content{
 position: absolute;
 z-index: 999;
 min-width: 280rpx;
 max-height:270rpx;
 background: #FFFFFF;
 box-shadow: 0px 0px 10px 1px rgba(88, 88, 88, 0.8);
 border-radius: 0 0 5% 5%;
 padding: 20rpx;
 overflow-x: hidden;
 overflow-y: scroll;
}
.content>.inputPlaceholder{
 padding: 10rpx 0;
}
.select_view .active{
 color:#46678d;
}
四、使用
先创建一个component,把代码复制过去。
和其他组件一样,需要在使用的page页面的json文件里引入。
 "usingComponents": {
  "my_select": "path/my_select/my_select"
 }
然后就能在页面中使用了
示例
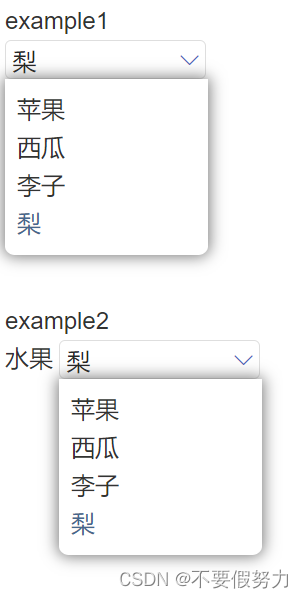
example1
<my_select
	nowId="{{curfId}}"
	nameList="{{fruits}}"
	nowName="{{curfruitName}}"
	placeholder="请选择水果"
	bind:handleChange="changeFruit">
</my_select>

example2
<my_select
	title="水果"
	nowId="{{curfId}}"
	nameList="{{fruits}}"
	nowName="{{curfruitName}}"
	placeholder="请选择水果"
	bind:handleChange="changeFruit">
</my_select>
data: {
   curfId: 4,
   fruits: [{name: "苹果" ,id: 1},
   {name: "西瓜" ,id: 2},
   {name: "李子" ,id: 3},
   {name: "梨" ,id: 4}
  ],
  curfruitName:"梨" ,
  title: "水果"
 },
   changeFruit(e){
    console.log(e.detail.selectId);
    console.log(e.detail.select);
    // process();
 }
效果图
api
参数
| 参数 | 类型 | 说明 | 默认值 |
|---|---|---|---|
| title | String | 选择框前的说明文字,可以为空 | “” |
| namlist | array | 选项的名称和id格式为[{name: “xxx”,id: 1,{name: “xxx”,id: 2}}]。id不可重复 | [] |
| nowId | Number | 初始选中选项id | -1 |
| nowName | String | 初始选中选项 | “” |
| placeholder | String | 未选择时展示的字段 | “” |
事件
| 事件名称 | 说明 |
|---|---|
| bind:handleChange | 选中值改变时会触发,event.detail.select是选中项的名称,event.detail.selectId选中项的id |
本文含有隐藏内容,请 开通VIP 后查看