目录
一、手机号码登录逻辑分析
手机号码登录逻辑分析:
1、手机号码格式是否正确
2、拼图滑块验证通过
3、验证码是否为空(注意,这里我们前端并没有拿到发送的手机验证码,所以只能判空)
4、发起登录请求
1.1、抽取前两个验证的代码
前两个验证我们前面已经做了,可以直接封装成函数
Login.vue中:
	toVerify(){
            // 1、验证手机号是否正确
            if(!validateTelephoneNumber(this.phoneNum)){
                alert("请输入正确的手机号");
                this.$refs.phone.focus();
                return
            }

            // 2、进行滑块验证
            if (this.msg == "再试一次" || this.msg == "向右滑动") {
                alert("请先进行滑块验证");
                return
            }
        },
        getCode(){
            this.toVerify();
        	//3、发起请求
            ...
        }
如果只是按照上面进行抽取,则会有验证不通过还发起请求的bug
所以,this.toVerify();应换成:
toVerify(){
            // 1、验证手机号是否正确
            if(!validateTelephoneNumber(this.phoneNum)){
                alert("请输入正确的手机号");
                this.$refs.phone.focus();
                return
            }

            // 2、进行滑块验证
            if (this.msg == "再试一次" || this.msg == "向右滑动") {
                alert("请先进行滑块验证");
                return
            }
            // 【!!!!!!!!】
            return true
            // 【!!!!!!!!】
        },
        getCode(){
            if(!this.toVerify()){
                return
            };
        	//3、验证成功后,发起请求
            ...
        }
1.2、发起登录请求
api.js中:
// 手机号登录请求
export const PhoneLoginAPI = params => request.post("/phoneRegin",qs.stringify(params));
Login.vue中:
import { SendSMSAPI, PhoneLoginAPI } from "@/request/api";
...
		// 点击登录按钮
    async submitFn() {
      if (!this.verifyFn()) return;
      // 3.手机验证码的验证
      if (!this.SMScode.trim()) {
        //非空判断
        alert("请输入手机验证码!");
        return;
      }
      // 做登录功能
      // alert("验证通过,可以登录了");
      let res = await PhoneLoginAPI({
        verifyCode: this.SMScode,
        phone: this.phoneNum,
      });
      if(!res)return;
      // 登录成功之后的逻辑
      // (1)提示登陆成功
      alert("登陆成功!")
      // (2)关闭登录窗口
      this.changeIsShowLoginModal(false)
      // (3)保存token值
      localStorage.setItem("x-auth-token",res["x-auth-token"])
      // (4)登录状态的切换(成功之后要显示昵称\头像\购物车按钮...)
      console.log(res);
      this.changeIsLogined(true);
    },

1.3、购物车按钮的布局
登陆之后的购物车按钮布局:
TopBar.vue文件中:
<li class="btn" @click="changeIsShowLoginModal(true)" v-show="!isLogined">
登录</li>
<li class="btn cart-btn" v-show="isLogined">
<img src="@/assets/img/cart.png" /><span>购物车</span><b>{{ cartTotal }}</b>
</li>
import { mapMutations, mapState } from "vuex";
export default {
data() {
return {
// 购物车数量
cartTotal: 0,
};
},
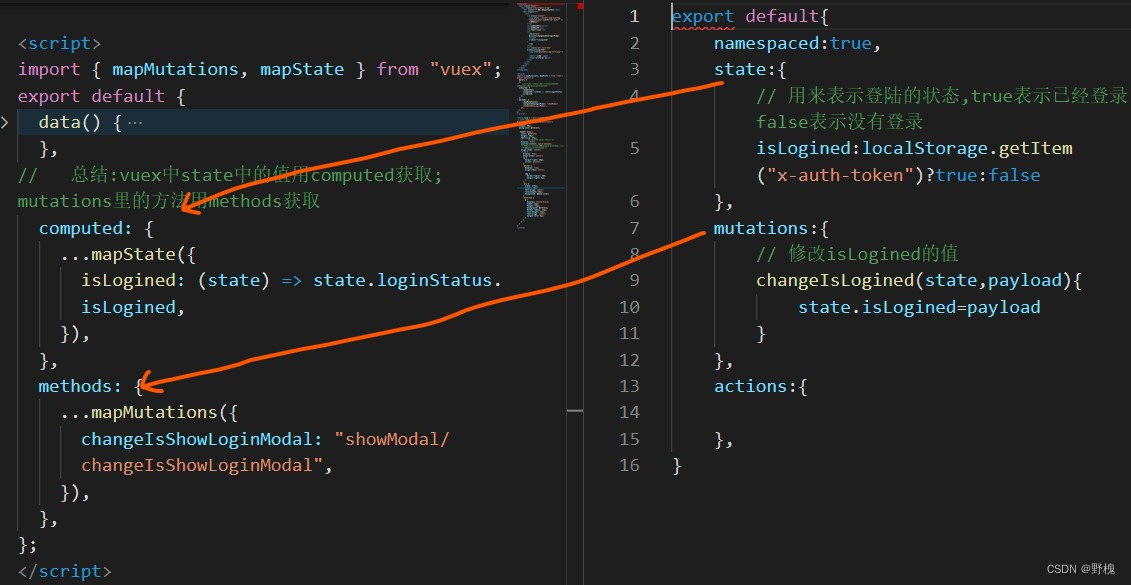
// 总结:vuex中state中的值用computed获取;mutations里的方法用methods获取
computed: {
...mapState({
isLogined: (state) => state.loginStatus.isLogined,
}),
},
methods: {
...mapMutations({
changeIsShowLoginModal: "showModal/changeIsShowLoginModal",
}),
},
};
</script>
...
.btn {
width: 124px;
height: 40px;
text-align: center;
line-height: 40px;
background: @base-color;
}
.cart-btn {
b {
display: inline-block;
width: 22px;
height: 22px;
background: #f0604d;
border-radius: 11px;
line-height: 22px;
text-align: center;
margin-left: 5px;
}
}
}
...总结:
vuex中state中的值用computed获取;mutations以及actions里的方法都用methods获取
1.4、购物车按钮展示(登录状态)分析
因为该购物车按钮需要依靠 有没有登录这个状态的值 来进行展示,并且,这个值会在Login.vue这个文件中进行修改,所以,我们把有没有登录这个状态值放在Vuex中:
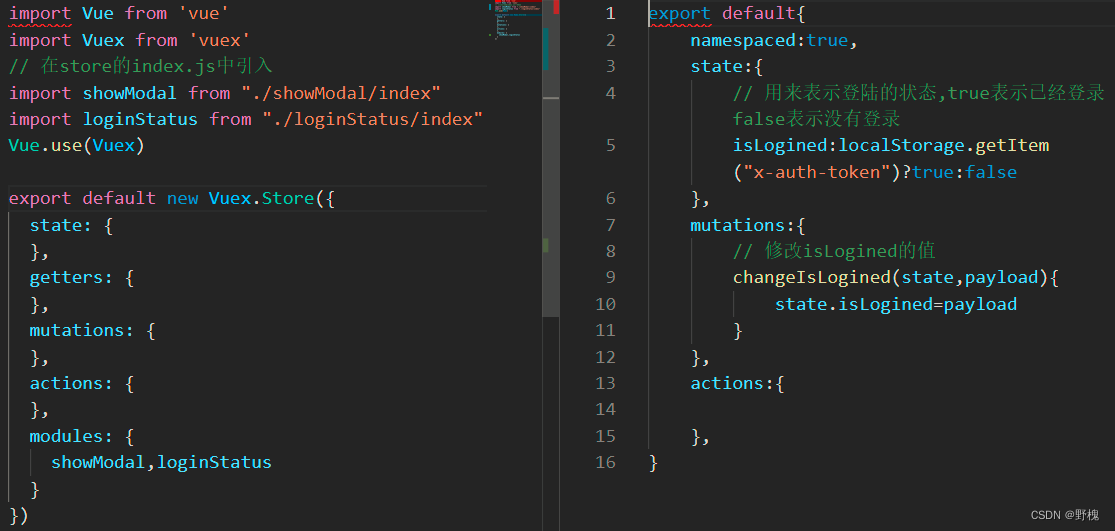
store目录中新建文件夹loginStatus,中新建index.js:
左边是store文件夹里的index.js文件,用来引入模块
右边是store文件夹下的loginStatus文件夹下的index.js文件,存储了"isLogined" [登陆状态]
最后在登录的回调函数中进行修改这个值。即在Login.vue中:
	...mapMutations({
            chanIsShowLoginModal:"showModal/chanIsShowLoginModal",
            chanIsLogined:"loginStatus/chanIsLogined"
        }),
	...
 (4)登录状态的切换(成功之后要显示昵称\头像\购物车按钮...)
      this.changeIsLogined(true);
二、提示组件的封装
2.1、icon图标的使用
2.1.1、在全局中引入

效果图中icon的链接:
https://at.alicdn.com/t/font_2730880_ylrio3ahhx.css
2.1.2、具体图标名称
| 图标名称 | 图标类名 |
|---|---|
| YDUI-复选框(选中) | icon-yduifuxuankuangxuanzhong |
| YDUI-复选框 | icon-yduifuxuankuang |
| loading | icon-loading |
| toast-失败_画板 1 | icon-toast-shibai_huaban |
| toast-警告 | icon-toast-jinggao |
| toast _成功 | icon-toast_chenggong |
2.1.3、在组件中使用
<i class="iconfont icon-loading"></i>
2.2、Toast组件的初步封装与使用
https://at.alicdn.com/t/font_2730880_ylrio3ahhx.css
iconfont的样式链接内容粘贴到src/assets/css/public.less中,
components目录下新建Toast.vue
<template>
    <div class="toast">
        <i class="iconfont icon-toast-shibai_huaban"></i>
        <span>提示内容</span>
    </div>
</template>
<style lang = "less" scoped>
.toast{
  position: fixed;
  padding: 10px 20px;
  display: flex;
  justify-content: center;
  align-items: center;
  background: #fff;
  left: 50%;
  top: 0;
  transform: translateX(-50%);
  border-radius: 10px;

  .iconfont{
    margin-right: 10px;
  }
  .icon-toast-shibai_huaban{
    color: red;
  }
  .icon-toast_chenggong{
    color: green;
  }
  .icon-toast-jinggao{
    color: orange;
  }
}
</style>
App.vue中引入注册使用即可 。
2.3、Toast组件展示
Toast组件展示与否最终可以在各个组件中调用,所以放在Vuex中。
然后在App中:
<Toast v-show="isShowToast"></Toast>
<script>
...
import {mapState} from "vuex"
export default {
   ...
    computed:{
        ...mapState({
            isShowToast:state=>state.showToast.isShowToast
        })
    }
}
</script>
在TopBar组件中,先找头像尝试点击触发展示:
<img @click="showToastFn" src="../assets/img/userImg.f8bbec5e.png" width="26" alt="">

<script>
    methods:{
        ...mapMutations({
            chanIsShowLoginModal:"showModal/chanIsShowLoginModal",
            chanIsShowToast:"showToast/chanIsShowToast"
        }),
        showToastFn(){
            this.chanIsShowToast(true)
        }
    }
</script>
2.4、Toast组件的进场离场效果
Vue提供了transition组件,配合css3可以用来做进场离场效果:进入/离开 & 列表过渡 — Vue.js
App.vue中添加:
<template>
  	<div id="app">
        <transition name="slide">
            <Toast v-show="isShowToast"></Toast>
        </transition>
        ...
   </div>
</template>
<style lang="less">
/* 入场的起始状态 = 离场的结束状态 */
.slide-enter, .slide-leave-to{
  opacity: 0;
}
.slide-enter-active, .slide-leave-active{
  transition: opacity .3s linear;
}
.slide-enter-to, .slide-leave{
  opacity: 1;
}
</style>
在TobBar.vue组件中:
methods:{
...mapMutations({
chanIsShowLoginModal:"showModal/chanIsShowLoginModal",
chanIsShowToast:"showToast/chanIsShowToast"
}),
showToastFn(){
this.chanIsShowToast(true);
setTimeout(()=>{
this.chanIsShowToast(false);
},1500)
}
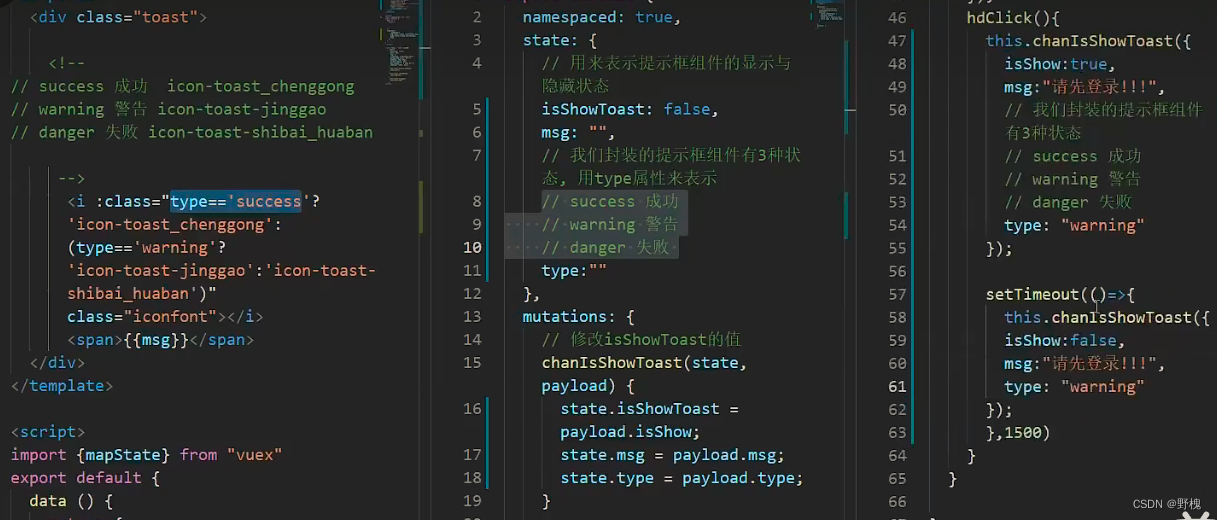
}2.5、封装Toast的属性
一个完整的Toast组件最好需要有展示、颜色、类型三种属性:
在vuex中,补充:
export default{
    namespaced:true,
    state: {
        // 表示是否展示提示
        isShowToast:false,
        // toast的内容
        toastMsg: "默认内容",
        // toast的类型(success, danger, info)
        toastType: "success"
    },
    mutations: {
        chanIsShowToast(state,payload){
            console.log(payload);
            state.isShowToast = payload.isShow;
            if(payload.isShow){
                state.toastMsg = payload.msg;
                state.toastType = payload.type;
            }

        }
    },
    actions: {

    },
}
Toast.vue组件:
<template>
    <div class="toast">
        <!-- <i class="iconfont icon-toast-shibai_huaban"></i>
        <span>提示内容</span> -->
        <i
      :class="toastType=='success' ? 'iconfont icon-toast_chenggong' : (toastType=='danger' ? 'iconfont icon-toast-shibai_huaban' : 'iconfont icon-toast-jinggao')"
    ></i>
    <span>{{toastMsg}}</span>
    </div>
</template>
<script>
import {mapState} from "vuex"
export default {
    data () {
        return {
        }
    },
    computed:{
        ...mapState({
            toastMsg:state=>state.showToast.toastMsg,
            toastType:state=>state.showToast.toastType,
        })
    }
}
</script>
最后在TopBar.vue组件中,调用的时候传入对象:
		showToastFn(){
            this.chanIsShowToast({
                isShow:true,
                msg:"请先登录",
                type:"danger"
            });
            setTimeout(()=>{
                this.chanIsShowToast({
                    isShow:false,
                });
            },1500)
        }
2.6、Toast组件自动关闭的处理
Toast组件应该具备自动关闭的功能,而不是每次调用都要写一段定时器代码来关闭。
即TopBar.vue组件中去掉setTimeout方法,在TopBar.vue中:
	import {mapMutations,mapState,mapActions} from "vuex"
	methods:{
        ...mapMutations({
            chanIsShowLoginModal:"showModal/chanIsShowLoginModal"
        }),
        ...mapActions({
            asyncIsShowToast:"showToast/asyncIsShowToast"
        }),
        showToastFn(){
            this.asyncIsShowToast({
                isShow:true,
                msg:"请先登录",
                type:"danger"
            });
            /* setTimeout(()=>{
                this.chanIsShowToast({
                    isShow:false,
                });
            },1500) */
        }
    }
在Vuex中书写actions:
actions: {
        asyncIsShowToast(context,payload){
            context.commit("chanIsShowToast",payload)
            setTimeout(()=>{
                context.commit("chanIsShowToast",{
                    isShow:false
                })
            },1000)

        }
    },

2.7、 封装Toast组件总结
1.结构样式
2.显示和隐藏的变量存在vuex中
3.过渡效果(进场和离场)
4.msg和type的处理(toast文字和图标的处理)
5.定时器,隐藏toast组件
6.定时器优化--抽取定时器到actions方法中,让调用更加简便。
以后在任意组件中想要使用提示框:
	import {mapActions} from "vuex"
	methods:{
        ...mapActions({
            asyncChanToastState:"showToast/asyncChanToastState"
        }),
        showToastFn(){
            this.asyncChanToastState({
                msg:"请先登录",
                type:"danger"
            });
        }
    }
三、微信登录二维码的获取与展示
3.1、获取微信二维码
在 public/ndex.html 的head标签中引入:
<script src="https://res.wx.qq.com/connect/zh_CN/htmledition/js/wxLogin.js"></script>
把Login.vue文件中展示二维码图片的盒子上添加 id=“weixin” ,将来获取的微信二维码会以iframe的方式嵌入到这个盒子中:
<div id="weixin" class="qrcode" v-show="!isShowForm">
     二维码
</div>
在api.js中:
// 微信登录(这个接口必须用qs对数据进行格式化)
export const WeixinLoginApi = (params) => request.post(`/wechatUsers/PCLogin`, qs.stringify(params));
在点击切换到微信登录的函数中:
    weixinClick() {
      // 点击切换微信扫码登录这一项,并向微信扫码登录
      this.isShowForm = false;
      // 申请微信登录二维码
      let _this = this;
      new WxLogin({
        id: "weixin",
        appid: "wx67cfaf9e3ad31a0d", // 这个appid要填死
        scope: "snsapi_login",
        // 扫码成功后重定向的接口
        redirect_uri: "https://sc.wolfcode.cn/cms/wechatUsers/shop/PC",
        // state填写编码后的url
        state: encodeURIComponent(
          window.btoa("http://127.0.0.1:8080" + _this.$route.path)
        ),
        // 调用样式文件
        href: "data:text/css;base64,Lyogd3hsb2dpbi5jc3MgKi8NCi5pbXBvd2VyQm94IC50aXRsZSwgLmltcG93ZXJCb3ggLmluZm97DQogIGRpc3BsYXk6IG5vbmU7DQp9DQoNCi5pbXBvd2VyQm94IC5xcmNvZGV7DQogIG1hcmdpbi10b3A6IDIwcHg7DQp9",
      });
    },
3.2、微信二维码样式调整
把今天其他文件夹中的wxLoginStyle文件夹放到utils文件夹中,然后在这个wxLoginStyle目录下用node执行js文件:
node data-url.js
得到:
data:text/css;base64,Lyogd3hsb2dpbi5jc3MgKi8NCi5pbXBvd2VyQm94IC50aXRsZSwgLmltcG93ZXJCb3ggLmluZm97DQogIGRpc3BsYXk6IG5vbmU7DQp9DQoNCi5pbXBvd2VyQm94IC5xcmNvZGV7DQogIG1hcmdpbi10b3A6IDIwcHg7DQp9
把它填到上面的href属性,隐藏头部尾部。
最后调整页面iframe外层盒子的样式,使二维码居中
#weixin{
    /* background-color: #fcf; */
    display: flex;
    justify-content: center;
    margin-top: -20px;
}
如果运行报错,在当前页面引入:
<script src="http://res.wx.qq.com/open/js/jweixin-1.4.0.js" type="text/javascript"></script>
完成至此已经可以进行扫码登录了。
如果扫码跳转的时候被谷歌浏览器被拦截,需要修改谷歌浏览器设置。
打开谷歌浏览器设置,搜索 “弹出式窗口和重定向”,

微信登陆流程:
四、微信扫码登录——临时票据code换取token
我们需要在顶部组件TopBar.vue,加载的时候,用临时票据code换取token
import {WeixinLoginApi} from "@/request/api"
...
created(){
    // 微信登录第二步:临时票据code换取token
    let mycode = this.$route.query.code;
    if (mycode) {
        // 有code才去换取token
        WeixinLoginApi({
          code: mycode,
        }).then((res) => {
          console.log(res);
          if (res.code === 0) {
            // 登录成功
            // 1、提示用户登录成功
            this.asyncChanToastState({
                msg:"登录成功",
                type:"success"
            });
            // 2、保存token值
            localStorage.setItem("x-auth-token", res["x-auth-token"]);
            // 3、改变登录状态
            this.chanIsLogined(true);
          }
        })
    }
}
登陆成功,清除地址栏上显示的code,在成功的回调函数中:
// 4、清除浏览器地址栏上的code
this.$router.push(this.$route.path);
/*
setTimeout(()=>{
	this.$router.go(0)
},2000)
*/
当返回的res.code不为0,表示登录失败
if (res.code === 0) {
	...
}else{
    // 登陆失败给出提示信息
    this.asyncChanToastState({
        msg:res.message,
        type:"danger"
    });
}
拿不到code的时候,也更新一下用户登录状态:
	if(mycode){
    	....
    }
	else{
      // 没有mycode的时候也设置用户状态
      // 没有code说明,用户没扫码
      // 说明用户已经登录的不用扫码,或者用户没有登录没扫码,
      // 判断用户能否拿到token来做出登录状态的更新
      let mytoken = localStorage.getItem("x-auth-token")
      this.chanIsLogined(Boolean(mytoken));
    }
五、手机验证码登录
在Login.vue中,修改两个参数,并且补上res.code==0(但是每天一个手机号有限定发送短信验证码的次数):
	// 去做登录
      LoginAPI({
        phone: this.phoneNumber,
        password: this.SMScode,
      }).then((res) => {
        console.log(res);
        if(res.code==0){
            alert("登录成功");
            localStorage.setItem("x-auth-token", res["x-auth-token"]);
            this.chanIsShowLoginMadal(false);
            this.chanIsLogined(true);
        }else{
          alert(res.message);
        }
      });