目录
前言
- 你是否不想再重复使用
RedisTemplate来手动地来操纵缓存? - 你是否苦于不知道如何配置 Redis 配置类中的序列化器和反序列化器?
- 你是否想如何才能得到纯净可读的 JSON 格式的 Redis value ?
- 你是否想知道 Spring Cache 和 Redis 如何搭配使用实现注解式开发缓存?
- 你是否想知道 Spring Cache 中有哪些注解?它们分别是怎么使用的?

- 恭喜你,找到宝藏了。本文将一站式教你解决上述所有问题。
1. Spring Cache is All You Need
- 使用 Spring Cache 可以简化缓存优化的开发。
1.1 Spring Cache介绍
Spring Cache 是 Spring 提供的一整套的缓存解决方案,它不是具体的缓存实现,它只提供一整套的接口和代码规范、配置、注解等,用于整合各种缓存方案,比如 Redis、Caffeine、Guava Cache、Ehcache。使用注解方式替代原有硬编码方式缓存,语法更加简单优雅!
Spring Cache 是一个框架,实现了基于注解的缓存功能,只需要简单地加一个注解,就能实现缓存功能。Spring Cache 提供了一层抽象,底层可以切换不同的 cache 实现。
Spring Cache 是通过
CacheManager接口来统一不同的缓存技术。CacheManager是 Spring 提供的各种缓存技术抽象接口。针对不同的缓存技术需要实现不同的 CacheManager:CacheManager 描述 EhCacheCacheManager 使用EhCache作为缓存技术 GuavaCacheManager 使用Google的GuavaCache作为缓存技术 RedisCacheManager 使用Redis作为缓存技术
1.2 Spring Cache常用注解
| 注解 | 功能 | 添加位置 |
|---|---|---|
@EnableCaching |
开启缓存注解功能 | Spring Boot启动类上 |
@Cacheable |
在方法执行前Spring先查看缓存中是否有数据。如果有数据,则直接返回缓存中的数据;若没有数据,调用方法并将方法返回值放到缓存中 | 业务层的查询方法上 |
@CachePut |
将方法的返回值放到缓存中 | 业务层的新增方法上 |
@CacheEvict |
将一条或多条数据从缓存中删除 | 业务层的修改和删除方法上 |
1)@CachePut注解的使用
@CachePut注解中有四个入参:
| 入参 | 说明 |
|---|---|
String value |
配置缓存【分区】,相当于缓存的标示,每个缓存【分区】下可以有多个 key |
String key |
配置缓存的【分区】下的具体表示,此处支持SpringEL 表达式 (后面会介绍),动态命名 |
String cacheManeger |
String 选择配置类中的缓存配置对象 beanname,不选走默认 |
String condition |
注解生效条件, 支持 SpringEL 表达式 例如: #result != null 结果不为null,才进行缓存 |
- 为了动态地构建
key的值,key支持 Spring 表达式语言 SpringEL (Spring Expression Language) 。#为 SpringEL 的开始标识,固定写法。 - Spring Cache 的使用核心在于设计如何动态地计算
key的值,下面总结了key的四种常用的构造方法:
| key的写法 | 说明 |
|---|---|
| key = “#p0.id” | 把第[0]个入参的属性 id 作为key |
| key = “#user.id” | 把入参 User user 的属性 id 作为key |
| key = “#root.args[0].id” | 把第[0]个入参的属性 id 作为key |
| key = “#result.id” | 把返回值 User user 的属性 id 作为key |
举例:下面的代码展示了
save()方法,把返回值user的 ID 作为 key 。@CachePut(value = "userCache", key = "#result.id") @PostMapping public User user(User user) { userService.save(user); return user; }
2)@CacheEvict注解的使用
前面介绍了 SpEL 动态地计算
key的值,其实 SpEL 还支持多种不同的写法。下面三种key的 SpEL 都是等价的。举例 1 :下面的
@CacheEvict中的key为#p0。其中,#为 SpEL 的开始标识,固定写法。而p0表示@CacheEvict注解所修饰的方法的第 [0] 个入参,即Long id。@CacheEvict(value = "userCache", key = "#p0") @DeleteMapping("/{id}") public void delete(@PathVariable Long id) { userService.removeById(id); }举例 2 :下面的
@CacheEvict中的key为#root.args[0]。其中,#为 SpEL 的开始标识,固定写法。而root.args[0]表示@CacheEvict注解所修饰的方法的第 [0] 个入参,即Long id。@CacheEvict(value = "userCache", key = "#root.args[0]") @DeleteMapping("/{id}") public void delete(@PathVariable Long id) { userService.removeById(id); }举例 3 (推荐) :下面的
@CacheEvict中的key为#id。其中,#为 SpEL 的开始标识,固定写法。而id表示@CacheEvict注解所修饰的方法的入参Long id,两者的名称必须相同。@CacheEvict(value = "userCache", key = "#id") @DeleteMapping("/{id}") public void delete(@PathVariable Long id) { userService.removeById(id); }以上三种
key的 SpEL 效果都是相同的。都是以方法的入参Long id作为缓存的 key 。
3)@Cacheable
@Cacheable注解通常修饰查询的方法,但还支持条件判断参数condition和unless:- 只有满足
condition中的条件时才缓存数据。 - 满足
unless中的条件则不缓存。
- 只有满足
例如,可以支持当查询结果不为空的时候才缓存:
@Cacheable(value = "userCache", key = "#id", unless = "#result == null")
@GetMapping("/{id}")
public User getById(@PathVariable Long id) {
    User user = userService.getById(id);
    return user;
}
举例:常见的分页查询。可以拼接 key :
@Cacheable(value = "userCache", key = "#user.id + '_' + #user.name")
@GetMapping("/list")
public List<User> list(User user) {
    LambdaQueryWrapper<User> queryWrapper = new LambdaQueryWrapper<>();
    queryWrapper.eq(user.getId() != nul1, User::getId, user.getId());
    queryWrapper.eq(user.getName() != nul1, User::getName, user.getName());
    List<User> list = userService.list(queryWrapper);
    return list;
}
4)总结
- Spring Cache 的使用核心在于设计如何动态地计算
key的值,下面总结了key的四种常用的构造方法:
| key的写法 | 说明 |
|---|---|
| key = “#p0.id” | 把第[0]个入参的属性 id 作为key |
| key = “#user.id” | 把入参 User user 的属性 id 作为key |
| key = “#root.args[0].id” | 把第[0]个入参的属性 id 作为key |
| key = “#result.id” | 把返回值 User user 的属性 id 作为key |
1.3 Spring Cache使用方式
- Spring Cache 使用只需要三步:导入Maven依赖坐标、缓存配置、添加注解。
- 在 Spring Boot 项目中,使用缓存技术只需在项目中导入相关缓存技术的依赖包,并在启动类上使用
@EnableCaching开启缓存支持即可。 - 例如,使用 Redis 作为缓存技术,只需要导入Spring Data Redis 的Maven 坐标即可。
1)导入Maven坐标
打开
pom.xml文件,确保已经添加了以下依赖的坐标:<!-- Spring Data Redis --> <dependency> <groupId>org.springframework.boot</groupId> <artifactId>spring-boot-starter-data-redis</artifactId> </dependency> <!-- common-pool Redis连接池依赖 --> <dependency> <groupId>org.apache.commons</groupId> <artifactId>commons-pool2</artifactId> </dependency> <!-- Spring Cache --> <dependency> <groupId>org.springframework.boot</groupId> <artifactId>spring-boot-starter-cache</artifactId> </dependency>
2)修改Spring Boot配置文件
打开
application.yml,添加 Spring Cache 的相关配置:spring: # 配置Redis连接 redis: host: 192.168.148.100 port: 6379 password: xsh981104 database: 0 # 设置Lettuce Redis连接池 lettuce: pool: max-active: 8 # 最大连接数 max-idle: 8 # 最大空闲连接 min-idle: 0 # 最小空闲连接 max-wait: 100ms # 等待时长 # 配置Spring Cache缓存 cache: type: redis # 设置缓存技术使用Redis redis: time-to-live: 3600000 # 设置缓存有效期为60min
3)创建Redis配置类
创建
src/main/java/edu/ouc/config/RedisConfig.java。Redis 配置类
RedisConfig.java用于声明 Redis 缓存的序列化方式【JSON】,配置缓存时间等。@Configuration @EnableCaching // 开启Spring Cache缓存注解 @ConditionalOnClass(RedisOperations.class) @EnableConfigurationProperties(RedisProperties.class) public class RedisConfig extends CachingConfigurerSupport { // 实例化具体的缓存配置类 // 设置序列化方式为JSON // 设置缓存时间,单位为秒 private RedisCacheConfiguration instanceConfig(Long ttl) { // 1.创建jackson的Redis缓存序列化器 Jackson2JsonRedisSerializer<Object> jackson2JsonRedisSerializer = new Jackson2JsonRedisSerializer<>(Object.class); // // 2.常见的Jackson的对象映射器,并设置一些基本属性 // // 2.1 创建Jackson的对象映射器对象 // ObjectMapper objectMapper = new ObjectMapper(); // // 2.2 在序列化过程中关闭把日期时间转换成时间戳 // objectMapper.disable(SerializationFeature.WRITE_DATES_AS_TIMESTAMPS); // // 2.3 注册Java的时间模块 // objectMapper.registerModule(new JavaTimeModule()); // // 2.4 禁用映射器注解 // objectMapper.configure(MapperFeature.USE_ANNOTATIONS, false); // 被弃用 // // 2.5 设置JSON序列化器,且不为空时才序列化 // objectMapper.setSerializationInclusion(JsonInclude.Include.NON_NULL); // // 2.6 不懂 // objectMapper.activateDefaultTyping(LaissezFaireSubTypeValidator.instance, // ObjectMapper.DefaultTyping.NON_FINAL, JsonTypeInfo.As.PROPERTY); // 2.新版本Jackson推荐使用JsonMapper,替换上面的老版本的ObjectMapper JsonMapper jsonMapper = JsonMapper.builder() .configure(MapperFeature.USE_ANNOTATIONS, false) .disable(SerializationFeature.WRITE_DATES_AS_TIMESTAMPS) .build(); jsonMapper.registerModule(new JavaTimeModule()); jsonMapper.setSerializationInclusion(JsonInclude.Include.NON_NULL); jsonMapper.activateDefaultTyping(LaissezFaireSubTypeValidator.instance, ObjectMapper.DefaultTyping.NON_FINAL, JsonTypeInfo.As.PROPERTY); // 3.为序列化器设置对象映射器 jackson2JsonRedisSerializer.setObjectMapper(jsonMapper); // 4.返回Redis缓存配置对象 return RedisCacheConfiguration.defaultCacheConfig() .entryTtl(Duration.ofSeconds(ttl)) // 设置缓存时间 .disableCachingNullValues() .serializeValuesWith(RedisSerializationContext.SerializationPair.fromSerializer(jackson2JsonRedisSerializer)); } // 配置缓存Manager @Bean @Primary //同类型多个bean时,默认生效! 默认缓存时间1小时! 可以选择! public RedisCacheManager cacheManagerHour(RedisConnectionFactory redisConnectionFactory) { RedisCacheConfiguration instanceConfig = instanceConfig(1 * 3600L); //缓存时间1小时 //构建缓存对象 return RedisCacheManager.builder(redisConnectionFactory) .cacheDefaults(instanceConfig) .transactionAware() .build(); } //缓存24小时配置 @Bean public RedisCacheManager cacheManagerDay(RedisConnectionFactory redisConnectionFactory) { RedisCacheConfiguration instanceConfig = instanceConfig(24 * 3600L); //缓存时间24小时 //构建缓存对象 return RedisCacheManager.builder(redisConnectionFactory) .cacheDefaults(instanceConfig) .transactionAware() .build(); } }
4)启动类开启缓存注解
打开你的 Spring Boot 的启动类,添加打开缓存注解。重点看第 5 行代码:
@Slf4j  // 日志
@SpringBootApplication  // Spring Boot启动类
@ServletComponentScan   // Servlet组件扫描,扫描过滤器
@EnableTransactionManagement    // 开启Spring事务注解管理
@EnableCaching  // 开启Spring Cache缓存
public class ReggieTakeOutApplication {

    public static void main(String[] args) {
        SpringApplication.run(ReggieTakeOutApplication.class, args);
        // 打印Slf4j日志
        log.info("项目启动成功");
    }
}
5)开始编码
举例:黑马《瑞吉外卖》项目的套餐分页查询业务层方法,重点看第 3 行代码,直接添加注解
@Cacheable,Spring Cache 就会先去 Redis 中查询是否有数据,如果有数据,则直接返回缓存中的数据;若没有数据,调用方法并将方法返回值放到缓存中。非常地方便好用。总而言之,Spring Cache + Redis 作为缓存时,思考的重点是
key的设计,如何设计出区分度高、可读性高的 key 才是开发者需要认真思考的。// 根据条件查询套餐集合 @Override @Cacheable(value = "setmealCache", key = "#setmeal.categoryId + '_' + #setmeal.status") public List<Setmeal> list(Setmeal setmeal) { // 1.创建查询条件封装器 LambdaQueryWrapper<Setmeal> lqw = new LambdaQueryWrapper<>(); // 2.添加查询条件:根据类别ID查询 lqw.eq(setmeal.getCategoryId() != null, Setmeal::getCategoryId, setmeal.getCategoryId()); // 3.添加查询条件:根据售卖状态查询 lqw.eq(setmeal.getStatus() != null, Setmeal::getStatus, setmeal.getStatus()); // 4.调用数据层返回套餐对象构成的集合 return this.list(lqw); }
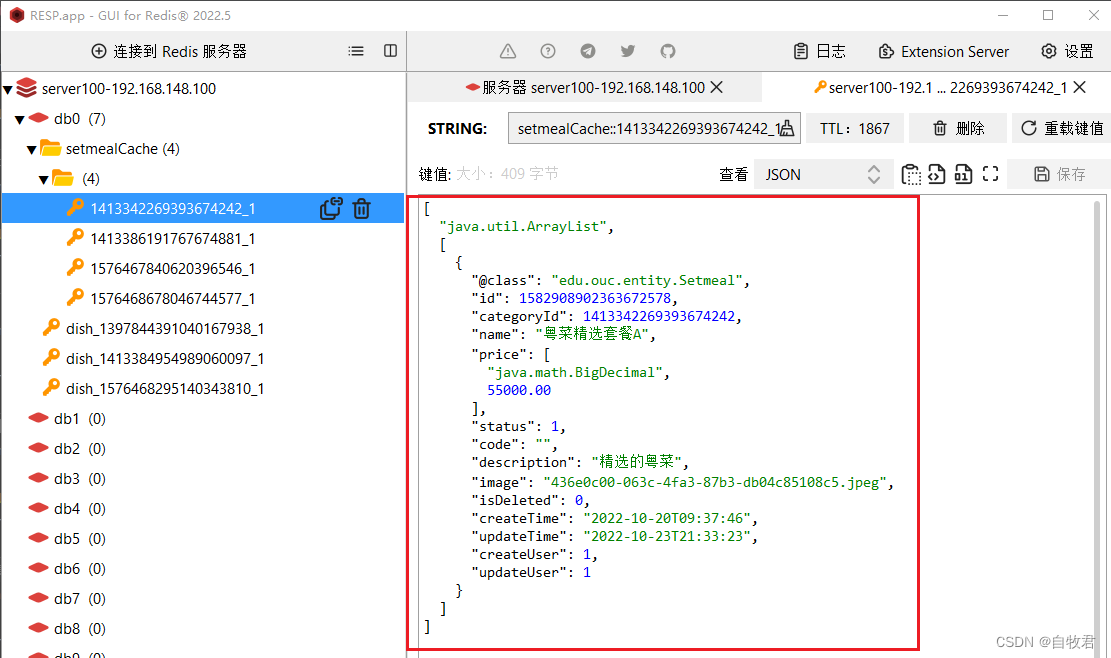
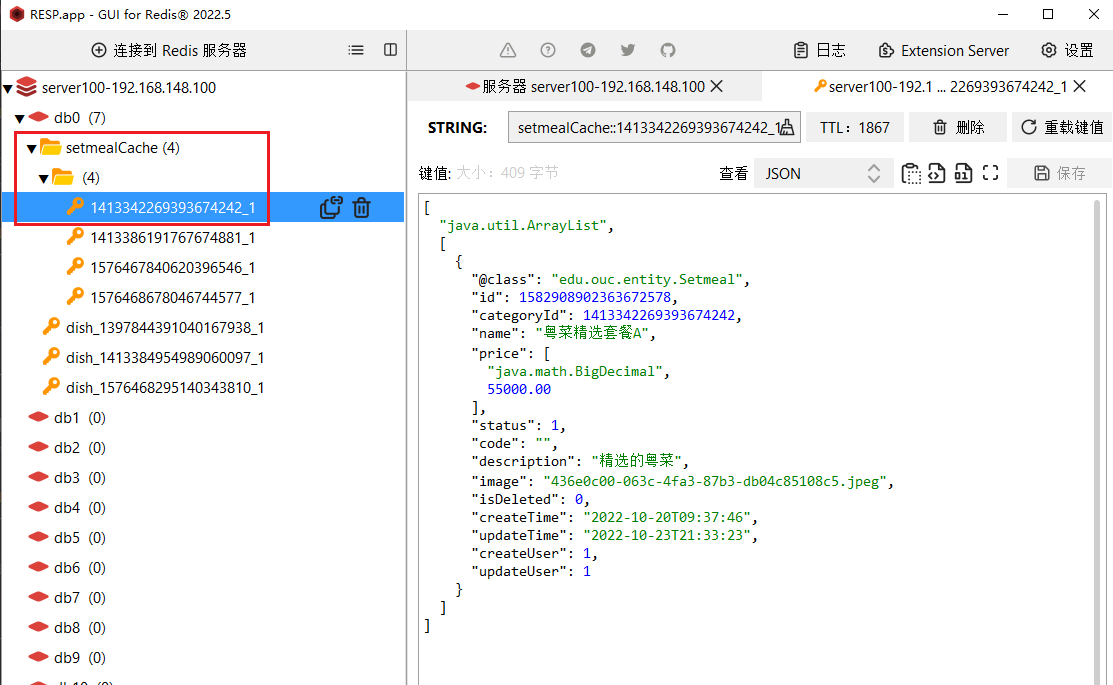
6)Redis中缓存的数据展示
缓存的 Value 值都是可读性很高的、纯净的 JSON 字符串:

Spring Cache + Redis 自动化缓存的方案就成功搭建起来了,大家赶快用起来吧。有问题可以欢迎评论和私信。