我们现在的工作已经十分依赖集成开发工具 IDEA 了,本文就借助 IDEA 创建一个 Servlet ,并且在 IDEA 工具内通过 tomcat 来启动服务和本地调试。
项目地址
git clone https://gitee.com/kendoziyu/code-servlet-parent.git
其中,develop-servlet 就是本文的项目。
1.创建项目
首先 File -> New -> Project… 打开创建项目窗口

接着就是给你的项目找一个合适的名字和合适的路径,我的项目命名为 develop-servlet

点击 Finish 完成创建,并且在新的窗口中打开项目。
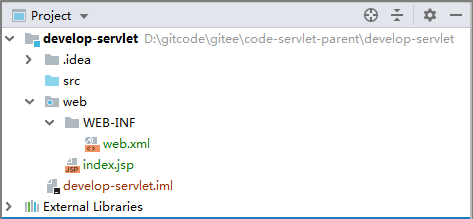
自动创建的模板,为我们创建了以下文件:
/web/WEB-INF/web.xml
/web/index.jsp
*自定义修改
首先,这个 web 文件夹的取名,不太符合我的习惯,我更喜欢命名为 webapp。
右击 web 文件夹 --> Refactor --> Rename…
另外,当前 3.1 是稳定版本,4.0 是 alpha 版本,所以我们稍稍改动一下 web.xml,把 servlet 版本改为 3.1
<?xml version="1.0" encoding="UTF-8"?>
<web-app xmlns="http://xmlns.jcp.org/xml/ns/javaee"
         xmlns:xsi="http://www.w3.org/2001/XMLSchema-instance"
         xsi:schemaLocation="http://xmlns.jcp.org/xml/ns/javaee http://xmlns.jcp.org/xml/ns/javaee/web-app_3_1.xsd"
         version="3.1">
</web-app>
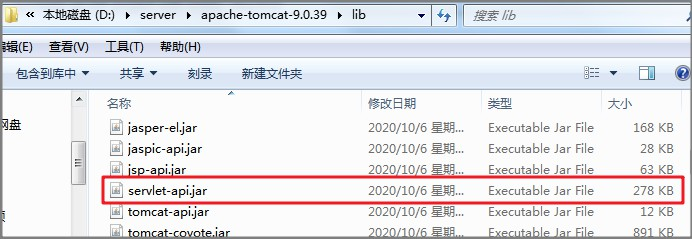
2.添加 Servlet 依赖
在 tomcat 安装目录下的 lib 下有 servlet-api.jar,而我的 tomcat 安装目录是 D:\server\apache-tomcat-9.0.39
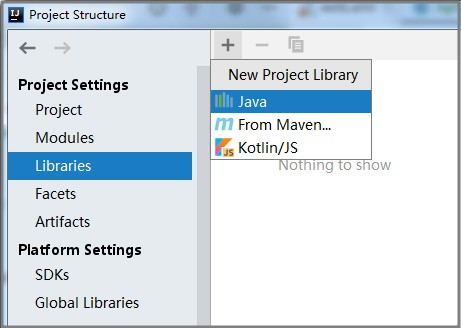
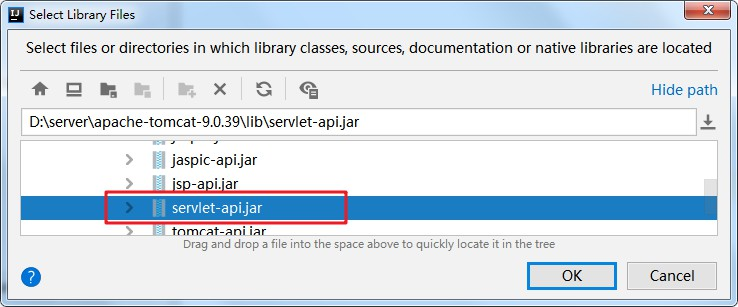
接着我们在 idea 中添加依赖库,我们先通过 File --> Project Structure… 打开窗口:
D:\server\apache-tomcat-9.0.39\lib\servlet-api.jar
3.创建 LoginServlet
package coderead.servlet;

import javax.servlet.ServletException;
import javax.servlet.http.HttpServlet;
import javax.servlet.http.HttpServletRequest;
import javax.servlet.http.HttpServletResponse;
import java.io.IOException;

/**
 * JSP 页面的 Servlet
 *
 * @author kendoziyu
 * @since 2020/10/21 0021
 */
public class LoginServlet extends HttpServlet {

    @Override
    protected void doGet(HttpServletRequest request, HttpServletResponse response) throws ServletException, IOException {
        response.getWriter().write("<h1> Hello World </h1>");
    }

    @Override
    protected void doPost(HttpServletRequest req, HttpServletResponse resp) throws ServletException, IOException {
        super.doPost(req, resp);
    }
}
4. 配置 web.xml
我们声明一个名为 loginServlet 的 servlet 对应类 coderead.servlet.LoginServlet,并且配置它的拦截 url 地址为 /Login
<?xml version="1.0" encoding="UTF-8"?>
<web-app xmlns="http://xmlns.jcp.org/xml/ns/javaee"
         xmlns:xsi="http://www.w3.org/2001/XMLSchema-instance"
         xsi:schemaLocation="http://xmlns.jcp.org/xml/ns/javaee http://xmlns.jcp.org/xml/ns/javaee/web-app_3_1.xsd"
         version="3.1">

    <servlet>
        <servlet-name>loginServlet</servlet-name>
        <servlet-class>coderead.servlet.LoginServlet</servlet-class>
    </servlet>

    <servlet-mapping>
        <servlet-name>loginServlet</servlet-name>
        <url-pattern>/Login</url-pattern>
    </servlet-mapping>
</web-app>
5. 添加运行项
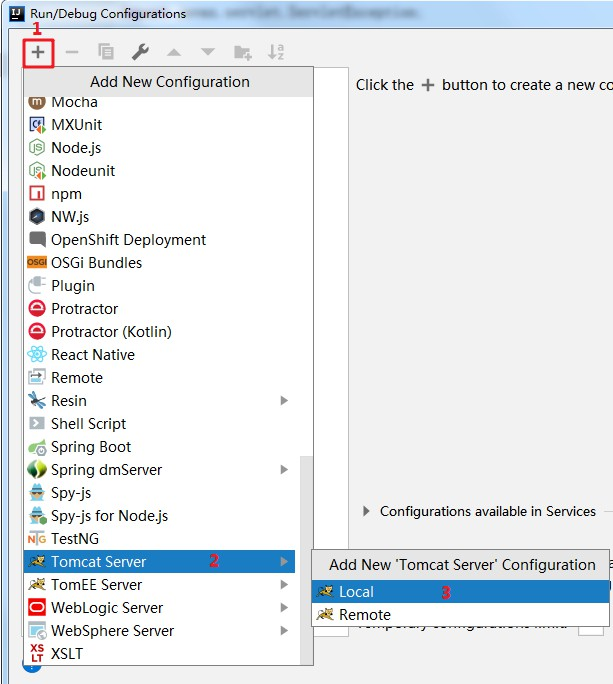
我们打算用 tomcat 的方式来运行我们的项目,首先我们要 Add Configuration…

然后在 Run/Debug Configuration 窗口,选择 Tomcat Server -> Local
接着我们就需要设置应用服务器 Applicaiton Server:
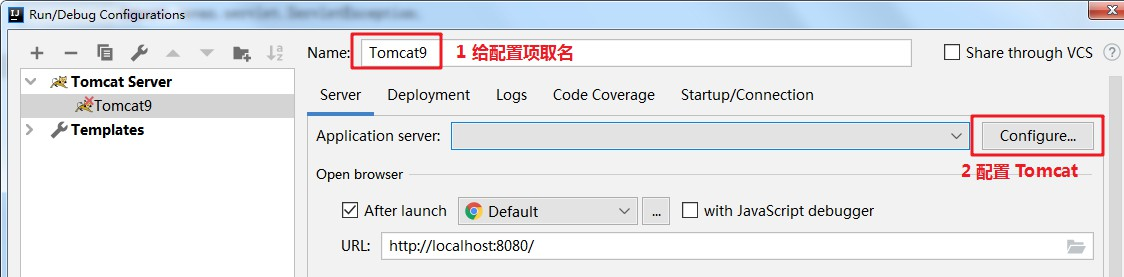
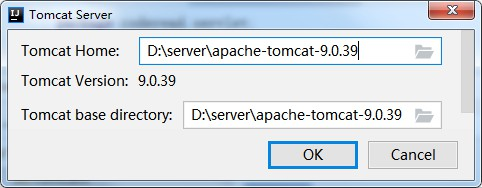
点击 Configure… 打开了 Tomcat Server 窗口,我选择了一下本地 Tomcat 安装目录 D:\server\apache-tomcat-9.0.39,并选择 Ok
此时,在 Run/Debug Configuration 窗口出现一个 Warning: No artifacts configured

点击 Fix ,如果你的 IDEA 版本没有出现这个警告和 Fix 按钮,那也请不要慌张,选择 File -> Project Structure 即可。
6. 配置 Web Module
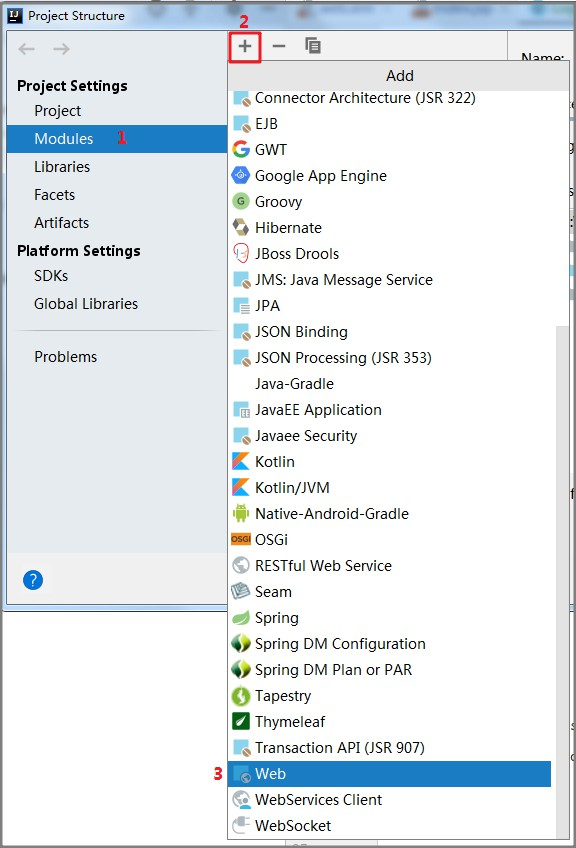
如果你不是用 idea 直接创建的 Web Application(比如是用 git clone 下来的代码,或者你自己手动创建的 webapp 文件夹),那你可以看一下,你的 webapp 文件夹上并没有一些“特殊的记号”。此时我们可以先添加 Web 模块,后创建 Artifact,这样会快很多。

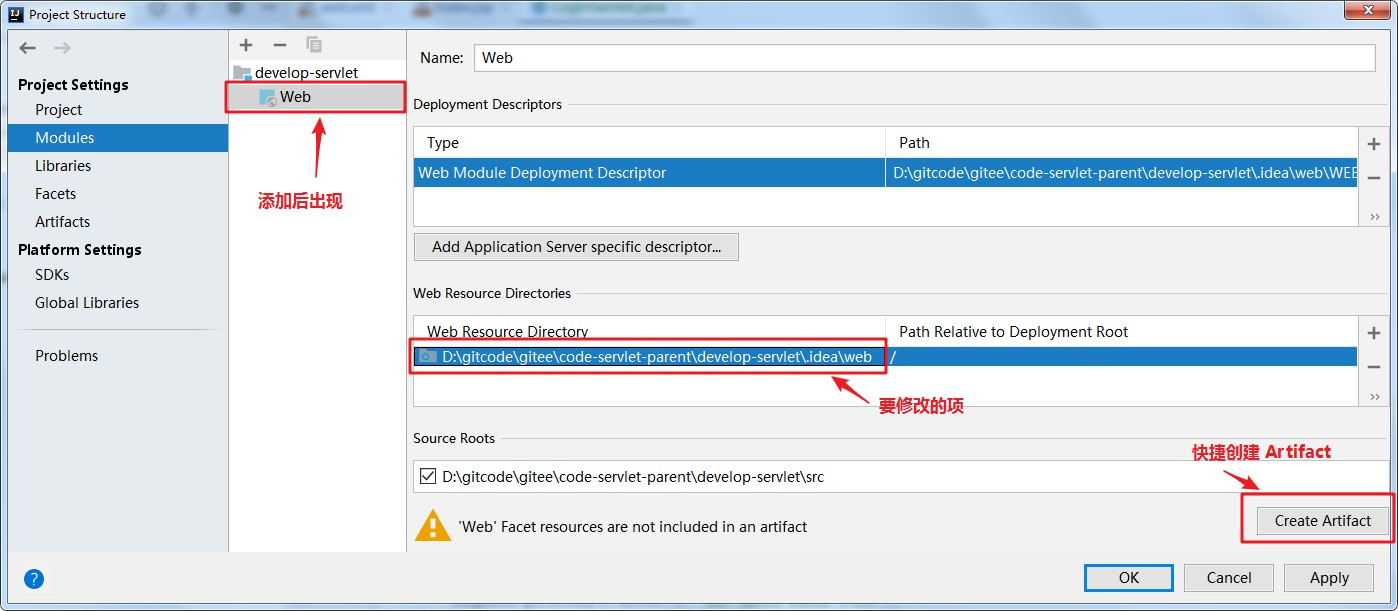
如果你的 webapp 文件夹上已经有一个“小蓝点”,那你可能可以直接跳至第 7 步,前提是你确定你的配置是正确的。在 Project Structure 窗口下,选择 Modules
添加后效果如下图所示,接着我们要修改 Web Module Deployment Descriptor 和 Web Resource Directory。
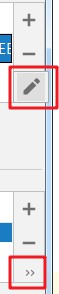
鼠标悬浮至 + 和 - 下方的 >>,会出现编辑按钮:
编辑 Web Module Deployment Descriptor 选择 项目根目录路径\webapp\WEB-INF\web.xml,版本选择 3.1 ,和 web.xml 中的版本一致。

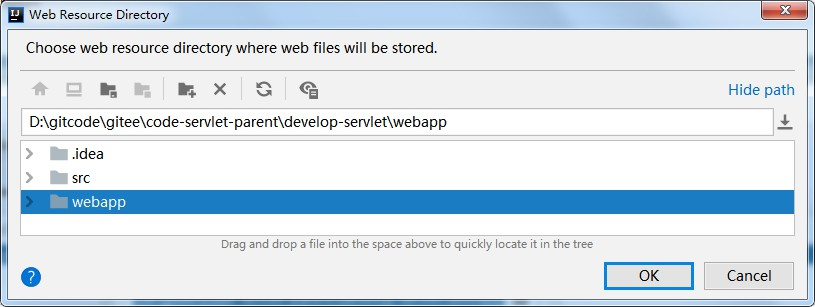
编辑 Web Resource Directory,选择项目根目录下的 webapp 目录
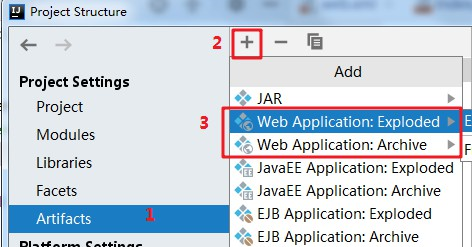
7. 创建 Artifact
如果你做了 6 步,那么你可以直接选择 Create Artifact。
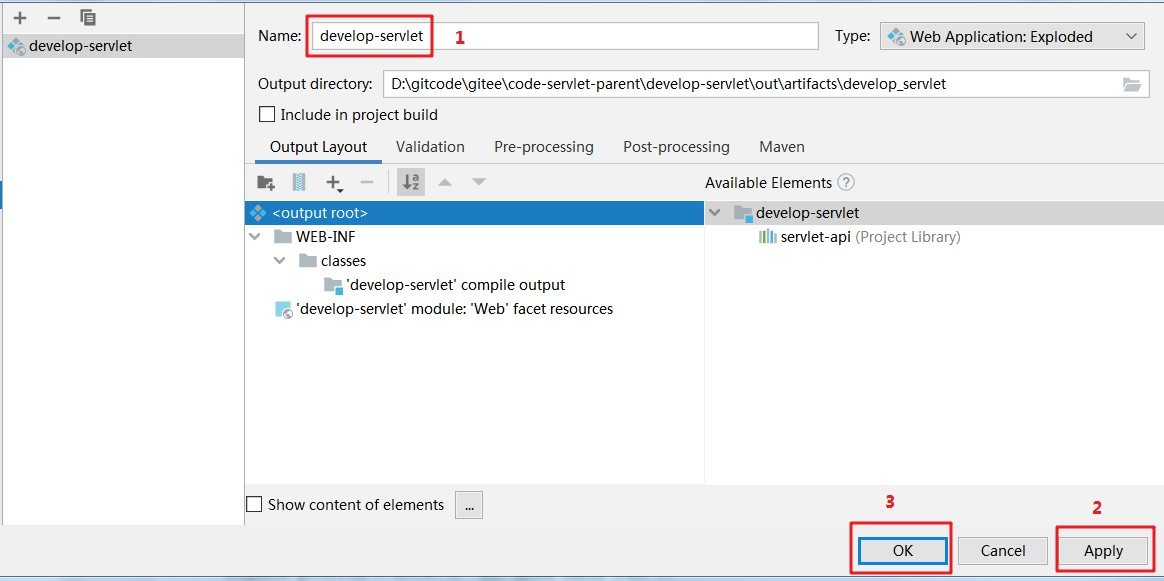
如果你不是用 Create Artifact 方式,那就需要你自己选择 Artifact 的类型:
如果选 Web Application: Exploded,这个是以文件夹形式(War Exploded)发布项目,选择这个,发布项目时就会自动生成文件夹在指定的 output directory;
如果选 Web Application: Archive,就是 war 包形式,每次都会重新打包全部的,将项目打成一个 war 包,放到指定位置;
8. 部署
再次选择 Add Configuration… ,打开 Run/Debug Configurations, + -> Tomcat Server -> Local ,切换到 Deployment,发现已经把 Artifact 自动添加进去了。

这里的 develop-servlet 是由第 7 步上面的图片 Artifact - Name 所决定的,同时也会影响 Web 项目的 ContextPath。第 7 步 Artifact 的 Output Directory 最终目录是 develop_servlet,因此 ContextPath 也是 develop_servlet。
也就是说我们应该在浏览器中通过 http://localhost:8080/develop_servlet/ 访问我们的项目。不加其他配置的情况 http://localhost:8080/ 的访问结果为 <span style="color:#E61A1A"404 Not Found。
* 选择输出目录
还是因为我是 git clone 得到的项目,没有配置输出目录,弹出这个报错:
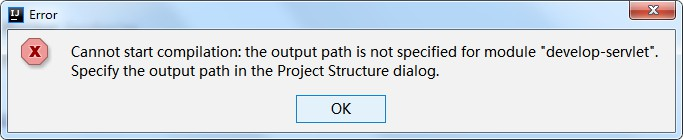
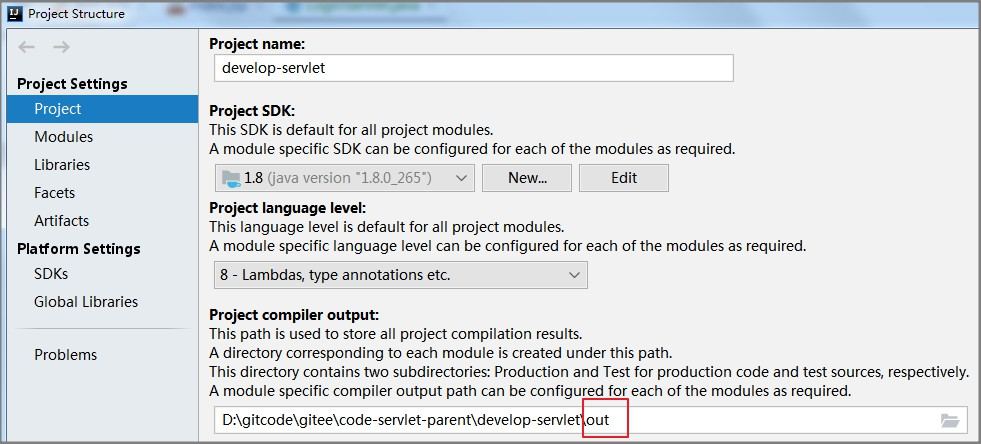
我们可以在 Project Structure 窗口,配置 Project compiler output 为 项目根目录\out
9. jsp 调用 Servlet
首次打开时,会进入 index.jsp,如果没登录,我希望通过 jsp 调用 Servlet。
<%--
  User: kendoziyu
  Date: 2020/10/21
--%>
<%@ page contentType="text/html;charset=UTF-8" language="java" %>
<html>
  <head>
    <title>首页</title>
  </head>
  <body>
  <%
    String loginName = (String) request.getSession().getAttribute("loginName");
  %>
  <%
    if (loginName == null || loginName.isEmpty()) {
  %>
  <a href="/Login">去登录</a>
  <% } else { %>
    Hello, <%=loginName%>
  <% } %>
  </body>
</html>
不过,此时点击“去登录”,直接跳转 http://localhost:8080/Login,结果 404 找不到页面,稍微改造一下:
方法一:可以修改链接地址为相对地址
<a href="Login">去登录</a>
适用场景:当前页面是在 WebRoot 路径下。
方法二:目标 URL 前面加上请求 ContextPath 前缀
<%@ page contentType="text/html;charset=UTF-8" language="java" %>
<html>
  <head>
    <title>首页</title>
  </head>
  <body>
  <%
    String loginName = (String) request.getSession().getAttribute("loginName");
    String prefix = request.getContextPath();
  %>
  <%
    if (loginName == null || loginName.isEmpty()) {
  %>
  <a href="<%=prefix%>/Login">去登录</a>
  <% } else { %>
    Hello, <%=loginName%>
  <% } %>
  </body>
</html>
10. Servlet 跳转 jsp
方法一: sendRedirect 方式
sendRedirect(“/a.jsp”);
可以将页面跳转到任何路径,不局限于web应用中,跳转的过程中url地址变化,无法使用request.setAttribute来传递。
方法二:forward 方式
request.getRequestDispatcher(“/a.jsp”).forward(request.response);
url地址不变,只能跳转到本web应用中的页面上。可以用 request.setAttibute 方法
我们改写一下 LoginServlet
package coderead.servlet;

import javax.servlet.ServletException;
import javax.servlet.http.HttpServlet;
import javax.servlet.http.HttpServletRequest;
import javax.servlet.http.HttpServletResponse;
import java.io.IOException;

/**
 * JSP 页面的 Servlet
 *
 * @author kendoziyu
 * @since 2020/10/21 0021
 */
public class LoginServlet extends HttpServlet {

    @Override
    protected void doGet(HttpServletRequest request, HttpServletResponse response) throws ServletException, IOException {
//        response.getWriter().write("<h1> Hello World </h1>");
        request.getRequestDispatcher("/login.jsp").forward(request, response);
    }

    @Override
    protected void doPost(HttpServletRequest request, HttpServletResponse response) throws ServletException, IOException {
        request.getSession().setAttribute("loginName", request.getParameter("username"));
        response.sendRedirect("index.jsp");
    }
}
login.jsp
<%@ page contentType="text/html;charset=UTF-8" language="java" %>
<html>
<head>
    <title>登录</title>
</head>
<body>
<form action="Login" method="post">

    username: <input type="username" name="username"> <br>
    password: <input type="password" name="password"> <br>

    <input type="submit" value="submit">
    <input type="reset" value="reset"> <br>

</form>
</body>
</html>