本节:写一个全栈博客网站。这一篇 主要是搭建了服务端的项目文件,写了接口,完成了路由中间件的调用,测试了接口可以使用,写了一个token;创建了数据库。
整个项目上传到了gitee,这是链接:VUE3 博客全栈: VUE3 博客全栈

1.创建一个文件夹blog,路径下cmd,安装expres:
npm install express2.新建文件作为入口文件,文件名为app.js,还有文件上传的中间件:
(1)引入模块 (2)使用路由中间件 (3)端口监听 (4) 跨域设置
// 服务的的入口文件
// 需要安装几个模块:multer上传,sqlite3方便服务端的移植,uuid唯一标识  ,直接npm install 模块名

const express = require("express")//引入
const app = express();//实例化注册
const multer = require("multer")//引入上传
const port = 8080


//开放跨域请求,跨域请求放在在中间件的上面
app.use(function (req, res, next) {
  //设置允许跨域的域名,*代表允许任意域名跨域
  res.header("Access-Control-Allow-Origin", "*");
  //允许的header类型
  res.header("Access-Control-Allow-Headers", "*");
  //跨域允许的请求方式
  res.header("Access-Control-Allow-Methods", "DELETE,PUT,POST,GET,OPTIONS");
  if (req.method == "OPTIONS") res.sendStatus(200); //让options尝试请求快速结束
  else next();
});

app.use(express.json())//中间件
const update = multer({//上传的文件地址
  dest :"./public/upload/temp"
})

app.use(update.any())//允许所有上传

app.get("/", (req, res) => {
  res.send("hello world");
})

app.listen(port, () => {
  console.log(`启动成啦: http://localhost:${port}/`);
  // 这里注意是`` 这个,不是单引号
})
3.在项目blog 终端,安装3个模块,multer上传,sqlite3方便服务端的移植,uuid唯一标识 ,直接npm install 模块名 ,就可以了
3.2 创建一个文件夹utils下面创建一个SnowFlake.js文件,创建后端自动生成的id。
/**
 * @description:
 * @author: bubao
 * 生成雪花id,一万年都不重复
 */
 class Genid {
  /**
   *Creates an instance of Genid.
   * @author bubao
   * @param {{
   *     Method: 1, // 雪花计算方法,(1-漂移算法|2-传统算法),默认 1
   *     BaseTime: 1577836800000,  // 基础时间(ms 单位),不能超过当前系统时间
   *     WorkerId: Number, // 机器码,必须由外部设定,最大值 2^WorkerIdBitLength-1
   *     WorkerIdBitLength: 6,   // 机器码位长,默认值 6,取值范围 [1, 15](要求:序列数位长+机器码位长不超过 22)
   *     SeqBitLength: 6,   // 序列数位长,默认值 6,取值范围 [3, 21](要求:序列数位长+机器码位长不超过 22)
   *     MaxSeqNumber: 5, // 最大序列数(含),设置范围 [MinSeqNumber, 2^SeqBitLength-1],默认值 0,表示最大序列数取最大值(2^SeqBitLength-1])
   *     MinSeqNumber: 5, // 最小序列数(含),默认值 5,取值范围 [5, MaxSeqNumber],每毫秒的前 5 个序列数对应编号 0-4 是保留位,其中 1-4 是时间回拨相应预留位,0 是手工新值预留位
   *     TopOverCostCount: 2000// 最大漂移次数(含),默认 2000,推荐范围 500-10000(与计算能力有关)
   * }} options
   * @memberof Genid
   */
  constructor(options) {
      if (options.WorkerId === undefined) {
          throw new Error("lost WorkerId");
      }
      // 1.BaseTime
      const BaseTime = 1577836800000;
      if (!options.BaseTime || options.BaseTime < 0) {
          options.BaseTime = BaseTime;
      }
      // 2.WorkerIdBitLength
      const WorkerIdBitLength = 6;
      if (!options.WorkerIdBitLength || options.WorkerIdBitLength < 0) {
          options.WorkerIdBitLength = WorkerIdBitLength;
      }

      // 4.SeqBitLength
      const SeqBitLength = 6;
      if (!options.SeqBitLength || options.SeqBitLength < 0) {
          options.SeqBitLength = SeqBitLength;
      }
      // 5.MaxSeqNumber
      const MaxSeqNumber = (1 << SeqBitLength) - 1;
      if (options.MaxSeqNumber <= 0 || options.MaxSeqNumber === undefined) {
          options.MaxSeqNumber = MaxSeqNumber;
      }
      // 6.MinSeqNumber
      const MinSeqNumber = 5;
      if (!options.MinSeqNumber || options.MinSeqNumber < 0) {
          options.MinSeqNumber = MinSeqNumber;
      }
      // 7.Others
      const topOverCostCount = 2000;
      if (!options.TopOverCostCount || options.TopOverCostCount < 0) {
          options.TopOverCostCount = topOverCostCount;
      }

      if (options.Method !== 2) {
          options.Method = 1;
      } else {
          options.Method = 2;
      }

      this.Method = BigInt(options.Method);
      this.BaseTime = BigInt(options.BaseTime);
      this.WorkerId = BigInt(options.WorkerId);
      this.WorkerIdBitLength = BigInt(options.WorkerIdBitLength);
      this.SeqBitLength = BigInt(options.SeqBitLength);
      this.MaxSeqNumber = BigInt(options.MaxSeqNumber);
      this.MinSeqNumber = BigInt(options.MinSeqNumber);
      this.TopOverCostCount = BigInt(options.TopOverCostCount);

      const timestampShift = this.WorkerIdBitLength + this.SeqBitLength;
      const currentSeqNumber = this.MinSeqNumber;

      this._TimestampShift = timestampShift;
      this._CurrentSeqNumber = currentSeqNumber;

      this._LastTimeTick = 0;
      this._TurnBackTimeTick = 0;
      this._TurnBackIndex = 0;
      this._IsOverCost = false;
      this._OverCostCountInOneTerm = 0;
  }

  // DoGenIDAction .
  DoGenIdAction(OverCostActionArg) { }

  BeginOverCostAction(useTimeTick) { }

  EndOverCostAction(useTimeTick) {
      // if m1._TermIndex > 10000 {
      //     m1._TermIndex = 0
      // }
  }

  BeginTurnBackAction(useTimeTick) { }

  EndTurnBackAction(useTimeTick) { }

  NextOverCostId() {
      const currentTimeTick = this.GetCurrentTimeTick();
      if (currentTimeTick > this._LastTimeTick) {
          // this.EndOverCostAction(currentTimeTick)
          this._LastTimeTick = currentTimeTick;
          this._CurrentSeqNumber = this.MinSeqNumber;
          this._IsOverCost = false;
          this._OverCostCountInOneTerm = 0;
          // this._GenCountInOneTerm = 0
          return this.CalcId(this._LastTimeTick);
      }
      if (this._OverCostCountInOneTerm >= this.TopOverCostCount) {
          // this.EndOverCostAction(currentTimeTick)
          this._LastTimeTick = this.GetNextTimeTick();
          this._CurrentSeqNumber = this.MinSeqNumber;
          this._IsOverCost = false;
          this._OverCostCountInOneTerm = 0;
          // this._GenCountInOneTerm = 0
          return this.CalcId(this._LastTimeTick);
      }
      if (this._CurrentSeqNumber > this.MaxSeqNumber) {
          this._LastTimeTick++;
          this._CurrentSeqNumber = this.MinSeqNumber;
          this._IsOverCost = true;
          this._OverCostCountInOneTerm++;
          // this._GenCountInOneTerm++

          return this.CalcId(this._LastTimeTick);
      }

      // this._GenCountInOneTerm++
      return this.CalcId(this._LastTimeTick);
  }

  NextNormalId() {
      const currentTimeTick = this.GetCurrentTimeTick();
      if (currentTimeTick < this._LastTimeTick) {
          if (this._TurnBackTimeTick < 1) {
              this._TurnBackTimeTick = this._LastTimeTick - 1;
              this._TurnBackIndex++;
              // 每毫秒序列数的前 5 位是预留位,0 用于手工新值,1-4 是时间回拨次序
              // 支持 4 次回拨次序(避免回拨重叠导致 ID 重复),可无限次回拨(次序循环使用)。
              if (this._TurnBackIndex > 4) {
                  this._TurnBackIndex = 1;
              }
              this.BeginTurnBackAction(this._TurnBackTimeTick);
          }
          return this.CalcTurnBackId(this._TurnBackTimeTick);
      }
      // 时间追平时,_TurnBackTimeTick 清零
      if (this._TurnBackTimeTick > 0) {
          this.EndTurnBackAction(this._TurnBackTimeTick);
          this._TurnBackTimeTick = 0;
      }

      if (currentTimeTick > this._LastTimeTick) {
          this._LastTimeTick = currentTimeTick;
          this._CurrentSeqNumber = this.MinSeqNumber;
          return this.CalcId(this._LastTimeTick);
      }

      if (this._CurrentSeqNumber > this.MaxSeqNumber) {
          this.BeginOverCostAction(currentTimeTick);
          // this._TermIndex++
          this._LastTimeTick++;
          this._CurrentSeqNumber = this.MinSeqNumber;
          this._IsOverCost = true;
          this._OverCostCountInOneTerm = 1;
          // this._GenCountInOneTerm = 1

          return this.CalcId(this._LastTimeTick);
      }

      return this.CalcId(this._LastTimeTick);
  }

  CalcId(useTimeTick) {
      const result = BigInt(useTimeTick << this._TimestampShift) + BigInt(this.WorkerId << this.SeqBitLength) + BigInt(this._CurrentSeqNumber);
      this._CurrentSeqNumber++;
      return result;
  }

  CalcTurnBackId(useTimeTick) {
      const result = BigInt(useTimeTick << this._TimestampShift) + BigInt(this.WorkerId << this.SeqBitLength) + BigInt(this._TurnBackIndex);
      this._TurnBackTimeTick--;
      return result;
  }

  GetCurrentTimeTick() {
      const millis = BigInt((new Date()).valueOf());
      return millis - this.BaseTime;
  }

  GetNextTimeTick() {
      let tempTimeTicker = this.GetCurrentTimeTick();
      while (tempTimeTicker <= this._LastTimeTick) {
          tempTimeTicker = this.GetCurrentTimeTick();
      }
      return tempTimeTicker;
  }

  NextId() {
      if (this._IsOverCost) {
          return parseInt(this.NextOverCostId());
      } else {
          return parseInt(this.NextNormalId());
      }
  }
}

module.exports = Genid;
4.终端输入:就可以运行,看看 hello world 有没有在浏览器渲染出来,在浏览器渲染出来就说明文件可以了。
node app.js暂时的布局如下:

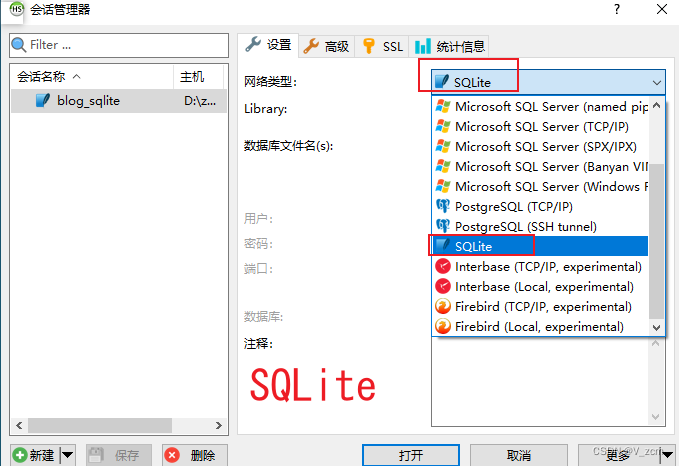
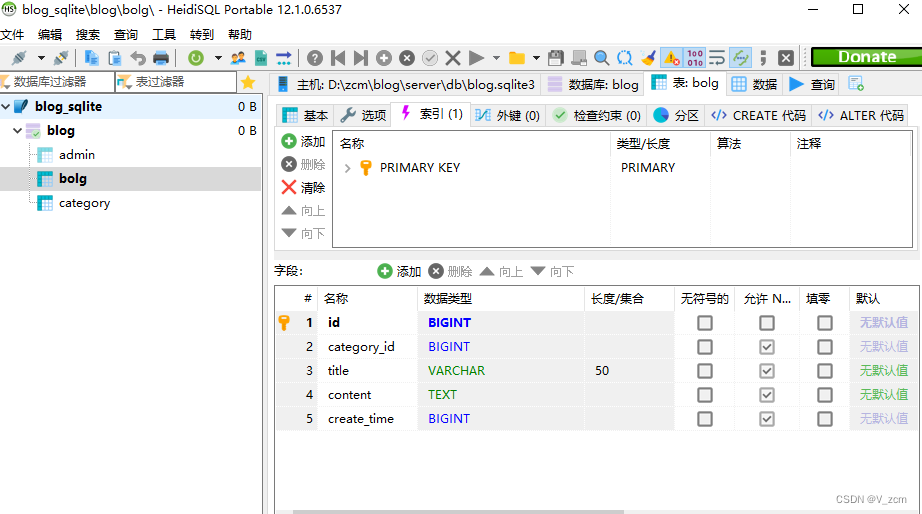
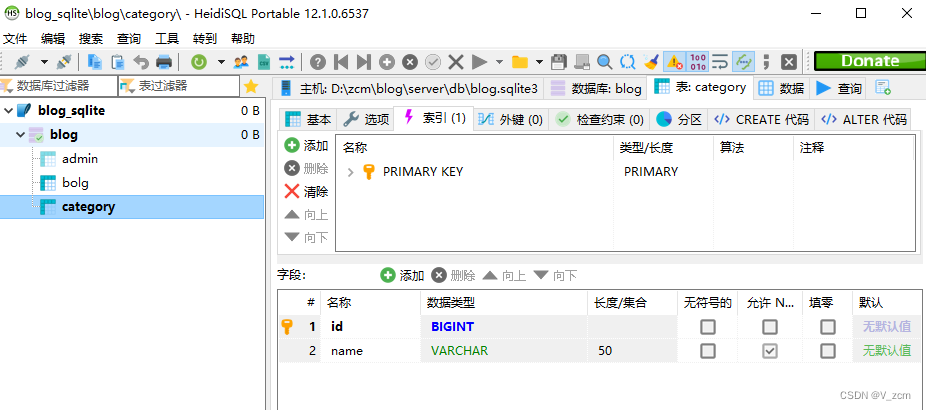
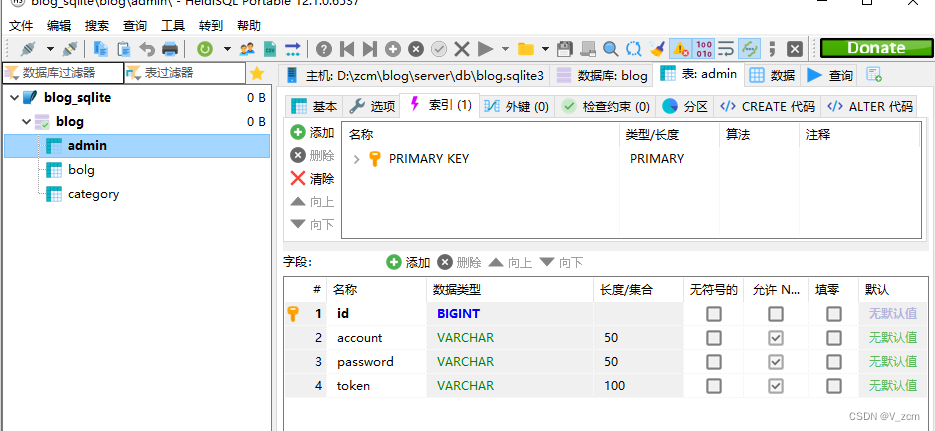
5.在server文件夹创建db文件,然后在数据库创建几个表,用户表,文章表,文章分类表。
数据库选择这种网络类型:
6.创建路由,连接数据库,查数据库的内容,看看有没有连接成功。在app.js引入路由。
(1)在db文件夹下面,创建DbUtils.js文件连接数据库,导出数据库,让别的地方可以用
const sqlite3 = require("sqlite3").verbose() //引入sqlite3
const path = require( "path")//获取地址,引入数据库
const Genid = require("../utils/SnowFlake")//引入雪花id


//  db是暴露出去,给用户作为工具使用的
var db = new sqlite3.Database(path.join(__dirname, "blog.sqlite3"))//地址转换成字符串
 //WorkerId是一个机器码,这样服务器的id就不会重复
const genid = new Genid({ WorkerId: 1 })//现在只有一个所以id先设置为1
module.exports = { db,genid}  //把数据库和雪花id先导出去,就不会别的页面总是要引入了
(2)创建router文件夹,创建TestRouter.js文件
 const express = require("express") //1.引入express
 const router = express.Router() //2.引入路由
 const {db,genid} = require("../db/DbUtils")//引入雪花id和数据库

// // 4.测试接口
 router.get("/test", (req, res) => {
  db.all("select * from `admin`", [], (err, rows) => {
    console.log(rows)
   })
   res.send({
     id:genid.NextId(),
  })
})

// 这里from打错了,导致查出来的内容是undifine

 module.exports = router //3.导出路由
ps:这里from打错了,导致查出来的内容是undifine
(3)在app.js入口文件引入路由:
app.use("/test", require("./routers/TestRouter"))//引入路由
7.直接写sql语句,容易形成回调地狱,所以要用promise封装请求。
进行sql,和parms还有回调函数的一个封装, Promise的构造函数接收回调函数作为参数,resolve()异步回调将promise变为fulfilled(已成功)状态, reject()异步回调将promise变为rejected(已失败)状态,异步的写法,防止回调地狱。reject里面还有then方法可以对数据进行处理
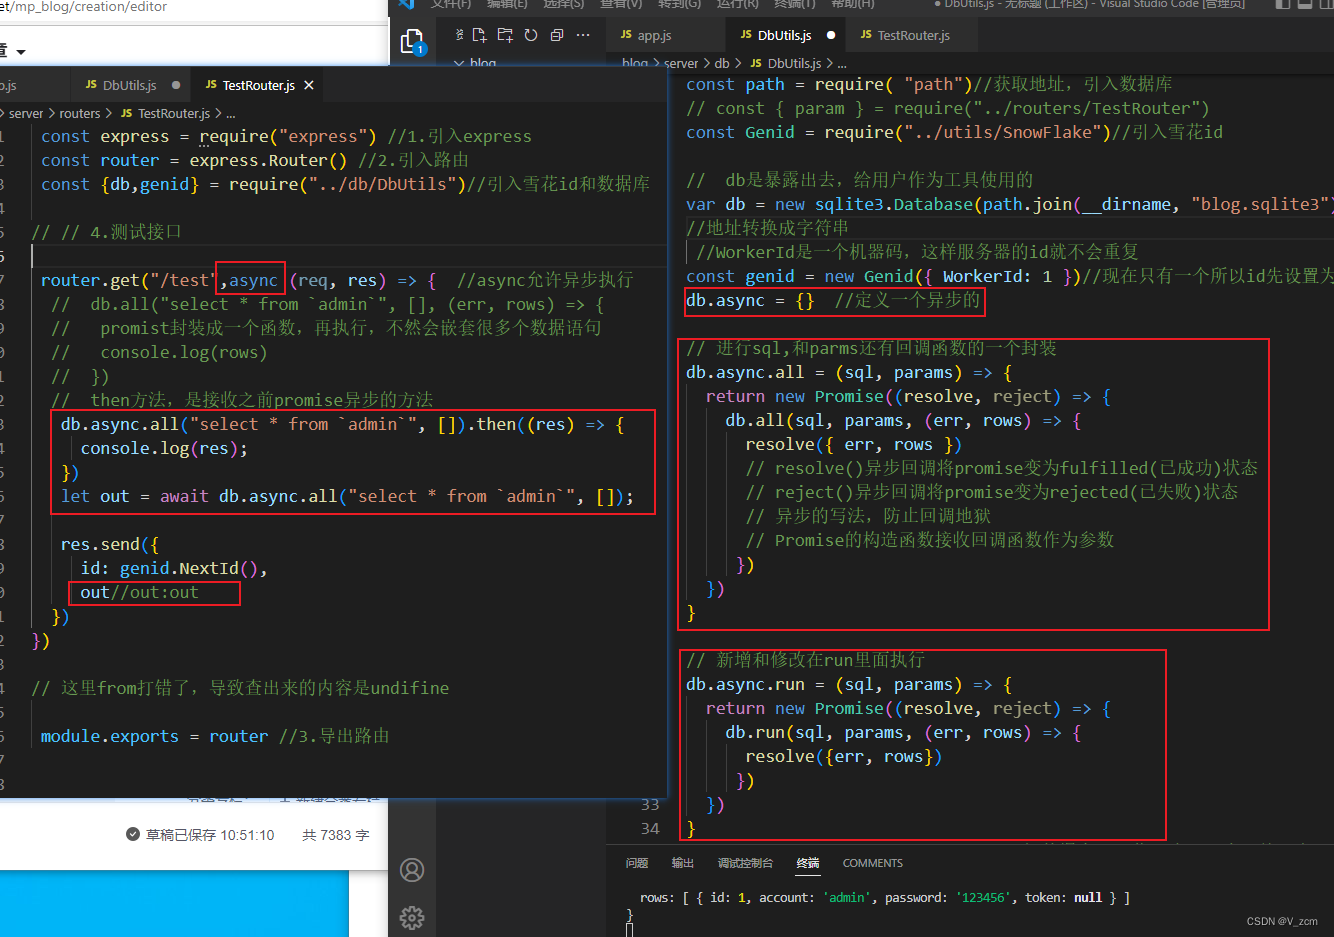
DbUtils文件:引入数据,做一个promise封装请求,防止回调地狱
const sqlite3 = require("sqlite3").verbose() //引入sqlite3
const { resolve } = require("path")
const path = require( "path")//获取地址,引入数据库
// const { param } = require("../routers/TestRouter")
const Genid = require("../utils/SnowFlake")//引入雪花id

//  db是暴露出去,给用户作为工具使用的
var db = new sqlite3.Database(path.join(__dirname, "blog.sqlite3"))
//地址转换成字符串
 //WorkerId是一个机器码,这样服务器的id就不会重复
const genid = new Genid({ WorkerId: 1 })//现在只有一个所以id先设置为1
db.async = {}  //定义一个异步的

// 进行sql,和parms还有回调函数的一个封装
db.async.all = (sql, params) => {
  return new Promise((resolve, reject) => {
    db.all(sql, params, (err, rows) => {
      resolve({ err, rows })
      // resolve()异步回调将promise变为fulfilled(已成功)状态
      // reject()异步回调将promise变为rejected(已失败)状态
      // 异步的写法,防止回调地狱
      // Promise的构造函数接收回调函数作为参数
     })
  })
}

// 新增和修改在run里面执行
db.async.run = (sql, params) => {
  return new Promise((resolve, reject) => {
    db.run(sql, params, (err, rows) => {
      resolve({err, rows})
     })
  })
}
module.exports = { db, genid }  //把数据库和雪花id先导出去,就不会别的页面总是要引入了
TestRouter:写的一个路由中间件,是一个路由中间件的模板
 const express = require("express") //1.引入express
 const router = express.Router() //2.引入路由
 const {db,genid} = require("../db/DbUtils")//引入雪花id和数据库

// // 4.测试接口

 router.get("/test",async (req, res) => {  //async允许异步执行
  //  db.all("select * from `admin`", [], (err, rows) => {
  //   promist封装成一个函数,再执行,不然会嵌套很多个数据语句
  //   console.log(rows)
  //  })
  //  then方法,是接收之前promise异步的方法
   db.async.all("select * from `admin`", []).then((res) => {
     console.log(res);
   })
   let out = await db.async.all("select * from `admin`", []);

   res.send({
     id: genid.NextId(),
     out//out返回数据等于err,rows
  })
})

// 这里from打错了,导致查出来的内容是undifine

 module.exports = router //3.导出路由
7.写一个登录接口,如果登录成功,前端就把token传给后端。
(这个接口测试工具是 apifox)

(1)在routers文件夹下面, 创建AdminRouter.js文件,基础搭建(express,路由,数据库,uuid自动生成toke等模块的引入;登录接口;路由暴露出去,这样app.js 才可以引入这个路由中间件)
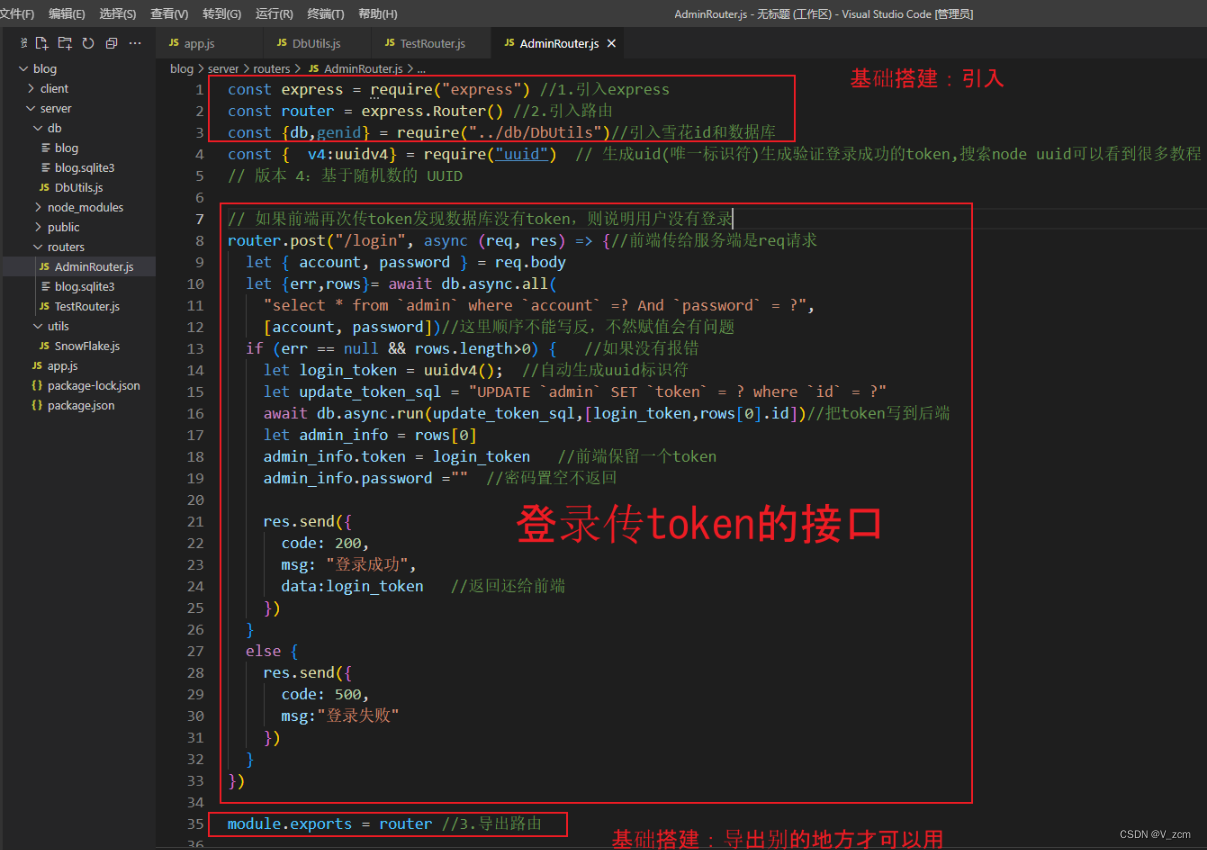
const express = require("express") //1.引入express
const router = express.Router() //2.引入路由
const {db,genid} = require("../db/DbUtils")//引入雪花id和数据库
const {  v4:uuidv4} = require("uuid")  // 生成uid(唯一标识符)生成验证登录成功的token,搜索node uuid可以看到很多教程
// 版本 4:基于随机数的 UUID

// 如果前端再次传token发现数据库没有token,则说明用户没有登录
router.post("/login", async (req, res) => {//前端传给服务端是req请求
  let { account, password } = req.body
  let {err,rows}= await db.async.all(
    "select * from `admin` where `account` =? And `password` = ?",
    [account, password])//这里顺序不能写反,不然赋值会有问题
  if (err == null && rows.length>0) {   //如果没有报错
    let login_token = uuidv4();  //自动生成uuid标识符
    let update_token_sql = "UPDATE `admin` SET `token` = ? where `id` = ?"
    await db.async.run(update_token_sql,[login_token,rows[0].id])//把token写到后端
    let admin_info = rows[0]
    admin_info.token = login_token   //前端保留一个token
    admin_info.password =""  //密码置空不返回

    res.send({
      code: 200,
      msg: "登录成功",
      data:login_token   //返回还给前端
    })
  }
  else {
    res.send({
      code: 500,
      msg:"登录失败"
    })
  }
})

module.exports = router //3.导出路由
(2)在app.js文件,引入路由,才可以使用:
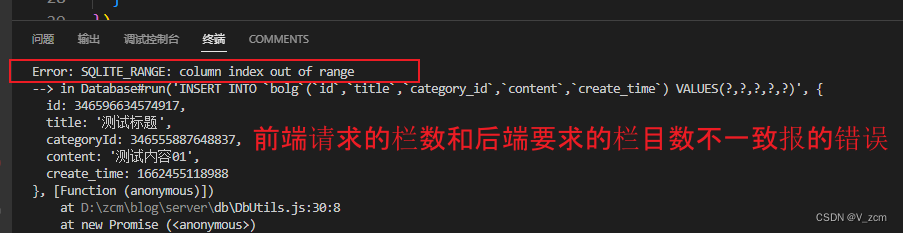
app.use("/admin", require("./routers/AdminRouter"))ps:遇到的问题 :1.column index out of range ,这个问题要看前端请求的栏目和后端有的数据栏目是不是不一致。
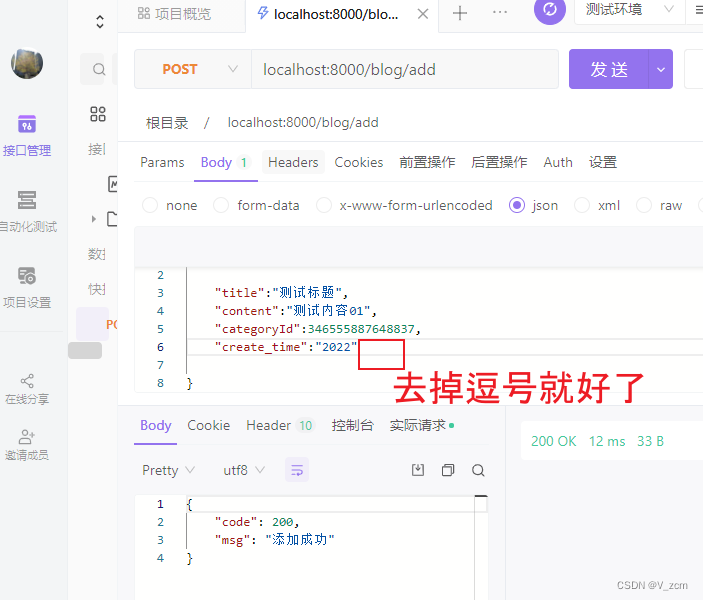
2. Unexpected token } in JSON at position 119 解决方法:json数据结尾不能有逗号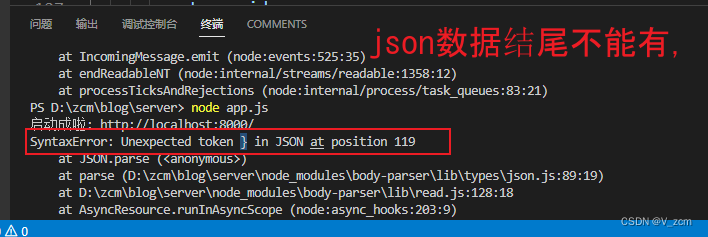
3.数据库表名写错了 4.params赋值的是数组[ ],不是{}
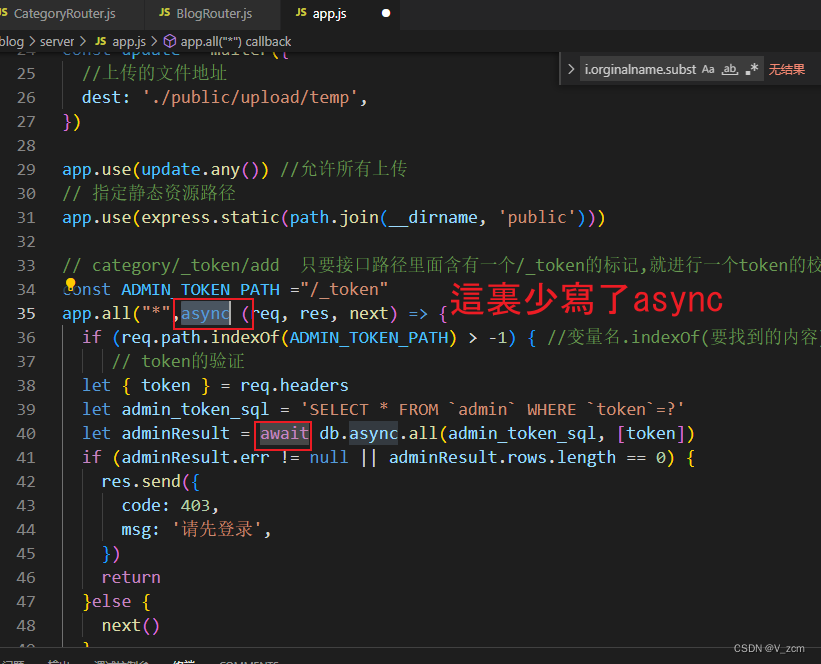
5.await is only valid in async functions and the top level bodies of modules 。
解决方法:async 和await 缺一不可。
token的验证:
// token的验证
  let { token } = req.headers
  let admin_token_sql = 'SELECT * FROM `admin` WHERE `token`=?'
  let adminResult = await db.async.all(admin_token_sql, [token])
  if (adminResult.err != null || adminResult.rows.length == 0) {
    res.send({
      code: 403,
      msg: '请先登录',
    })
    return
  }