目录
7.3 AOP配置(纯java代码配置)定义配置类JavaConfig
1、spring简介
1.1 原生web开发存在的问题:
(1)编程过程中代码的的耦合度过高(各层之间的相互调用,例如:service中需要实例化dao层)。
(2)使用原生的JDBC开发,代码繁琐,效率低。
(3)代码侵入性比较强(一个类中实例化另一个类),移植性低。失去面向接口编程开发的思想。
1.2 sprin框架
而spring框架就可以解决上述的问题,什么是spring框架:
(1)“轻量级控制反转(IOC)和面向切面(AOP)”的一个框架。
(2)spring中组合了多种设计模式(单例模式,适配器模式、工厂模式、代理模式等等)
①轻量级:代码侵入性低
②控制反转(IOC):将对象交给sprig容器来进行统一的管理,创建对象是也可以给属性赋值(DI注入)
③面向切面(AOP):即不改变原来业务代码的逻辑下,实现对业务的一个增强(使用到代理模式)
2、spring架构
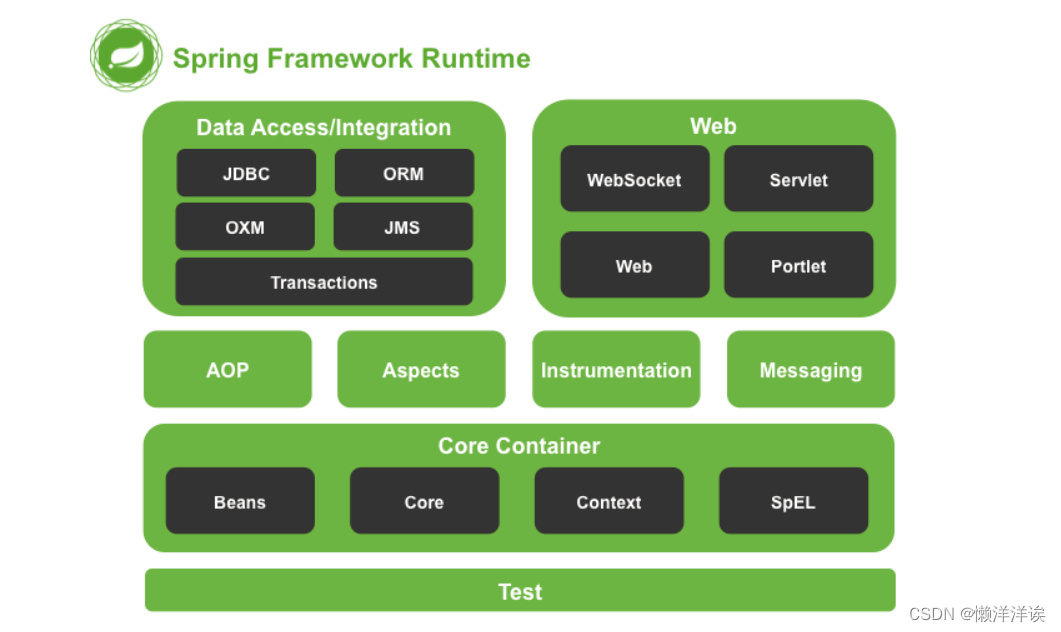
(1)Data Access、Integrationg(数据访问/集成)
3、spring IOC(控制反转)(xml配置文件配置)
spring IOC控制反转即spring创建对象,管理对象,属性赋值。支持xml配置文件配置,也支持纯java代码的配。
xml配置文件的两种配置方式:
(1)基于xml配置文件配置
(2)基于注解配置
基于xml配置文件:
3.1 spring框架的部署
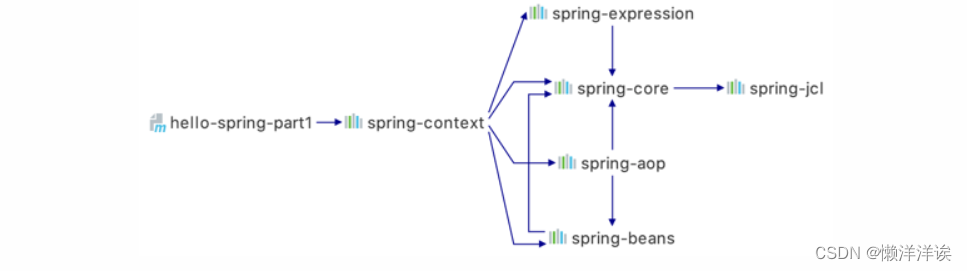
(1)创建Maven工程,添加spring依赖(core,beans,aop,expression,context),context中包含了这些依赖,所以导入context依赖够用。
<!-- https://mvnrepository.com/artifact/org.springframework/spring-context -->
<dependency>
<groupId>org.springframework</groupId>
<artifactId>spring-context</artifactId>
<version>5.2.12.RELEASE</version>
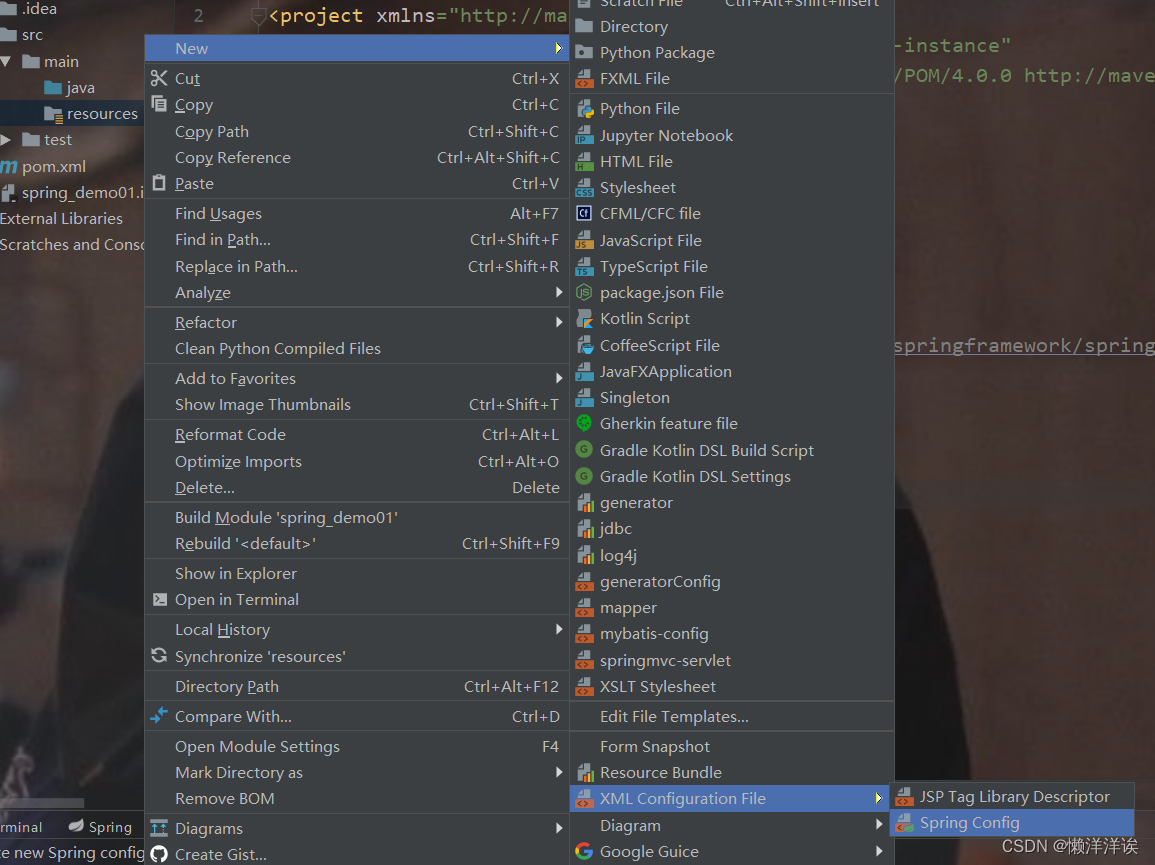
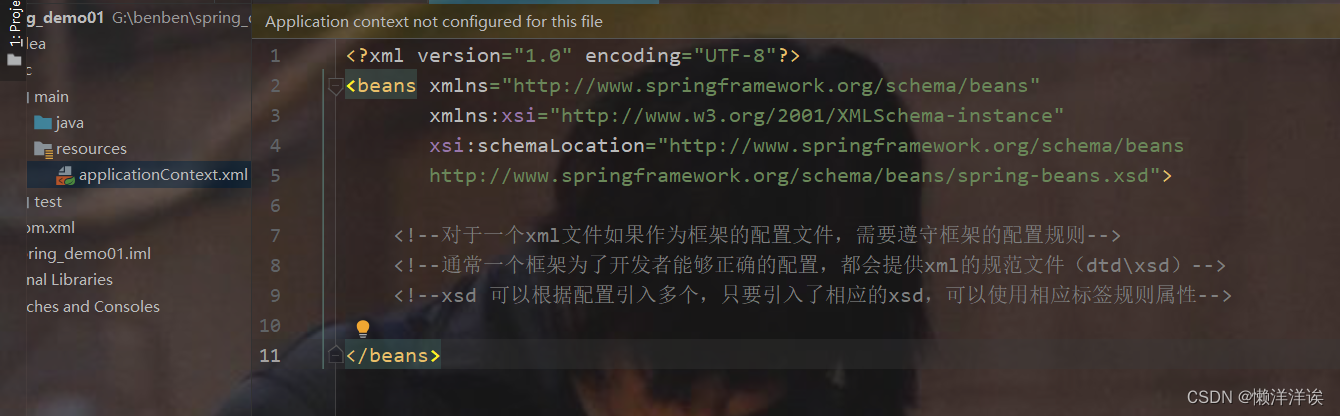
</dependency>(2)创建spring配置文件。作用:通过配置文件,告诉spring容器需要创建管理那些对象。文件的名字可以自定义。这里命名为applicationContext.xml
3.2 spring框架的使用
定义一个实体类:User,三个属性(即目标Bean类)
使用spring工厂编码,在spring配置文件中创建User对象:
<!--    class:需要被配置的目标bean类,id:唯一标识-->
    <bean class="com.benben.pojo.User" id="user"/>
这时候已经创建好了对象,进行测试,获取spring容器中的User对象:
@Test
    public void showInfo01(){
        //初始化spring容器,通过ClassPathXmlApplicationContext;类加载配置文件
        ClassPathXmlApplicationContext context = new ClassPathXmlApplicationContext("applicationContext.xml");
        //通过spring容器,获取User对象
        User user = (User) context.getBean("user");
        System.out.println(user );
    }
3.4 DI注入
上述依赖spring容器创建好了一个user对象(IOC)。使用DI依赖注入可以对类的属性赋值,有三种方式:
创建bean:
User:
package com.benben.pojo;

import lombok.*;

import java.util.*;

/**
 * @BelongsProject: spring_demo01
 * @BelongsPackage: com.benben.pojo
 * @Author: XiaoBenBen
 * @Date: 2022/7/2 15:17
 * @Description: TODO
 */
@NoArgsConstructor
@AllArgsConstructor
@Getter
@Setter
@ToString
public class User {
    private int uid;
    private String uname;
    private String upwd;

    //日期对象
    private Date date;
    private Book book;
    private Book[] books;
    private List<Book> bookList;
    private Map<String,String> map;
    private Set<Book> set;
    private Properties properties;


    //初始化方法,对一些资源的初始化
    public void init(){

    }
    //销毁方法,对一些资源的回收操作
    public void destroy(){

    }

}
Book:
package com.benben.pojo;

import lombok.AllArgsConstructor;
import lombok.NoArgsConstructor;

/**
 * @BelongsProject: spring_demo01
 * @BelongsPackage: com.benben.pojo
 * @Author: XiaoBenBen
 * @Date: 2022/7/3 14:32
 * @Description: TODO
 */
@NoArgsConstructor
@AllArgsConstructor
public class Book {
    private int bid;
    private String bname;

}
(1)set注入
set注入:在bean标签中通过配置property标签给对象属性赋值,本质上是通过反射调用set方法给属性赋值,所以目标bean中需要有set方法。
注意:name属性的名字与set方法名称对应,首字母小写。
a.简单类型以及字符串类型的注入
<!--    class:需要被配置的目标bean类,id:唯一标识-->
    <bean class="com.benben.pojo.User" id="user">
        <property name="uid" value="1"/>
        <property name="uname" value="张三"/>
        <property name="upwd" value="李四"/>
    </bean>
b. 日期对象注入
方式一:先在spring容器中注入一个Date对象,使用ref引入Date对象
方式二:在property中注入一个Date对象
<!--    日期对象-->
    <bean class="java.util.Date" id="date"/>
<!--    方式一-->
    <bean class="com.benben.pojo.User" id="user">
        <property name="date" ref="date"/>
    </bean>
<!--    方式二-->
    <bean class="com.benben.pojo.User" id="user1">
        <property name="date">
            <bean class="java.util.Date"/>
        </property>
    </bean>
c. 自定义类的注入
d.数组注入
e.集合的注入
f.Map的注入
g.Set的注入
h.Properties的注入
每种类别的注入都基本大同小异!
<bean class="com.benben.pojo.Book" id="book"/>
    <bean class="com.benben.pojo.User" id="user3">
        <!--    自定义类注入-->
        <property name="book" ref="book"/>
<!--        数组注入-->
        <property name="books">
            <array>
                <ref bean="book"/>
                <bean class="com.benben.pojo.Book" id="book2"/>
            </array>
        </property>
<!--        集合注入
            list 标签表示数据类型是一个 List
            如果 list 中存放的数据是字符串,那么这里就直接使用 value
            如果 list 中存放的数据库是对象,那么可以使用 ref 去引用外部的 对象,也可以使用 bean 标签现场定义 Bean-->
        <property name="bookList">
            <list>
                <ref bean="book"/>
                <bean class="com.benben.pojo.Book" id="book3"/>
            </list>
        </property>
<!--        map注入-->
        <property name="map">
            <map>
                <entry key="张三" value="18"/>
            </map>
        </property>
<!--        set注入-->
        <property name="set">
            <set>
                <ref bean="book"/>
            </set>
        </property>
<!--        properties注入-->
        <property name="properties">
            <props>
                <prop key="name">千锋</prop>
                <prop key="address">广州</prop>
            </props>
        </property>
     </bean>
(2)构造器注入
<!--    默认使用无参构造-->
    <bean class="com.benben.pojo.Book" id="book"/>
<!--    使用构造方法注入-->
    <bean class="com.benben.pojo.Book" id="book4">
        <constructor-arg index="0" value="1"/>
        <constructor-arg value="三国演义"/>
    </bean>
(3)接口注入(使用较少)
(4)自动注入(自动装配)
<!--自动装配:Spring在实例化当前bean的时候从Spring容器中找到匹配的实例赋值给当前bean的属性-->
<!--  autowire="byName" 根据当前Bean的属性名,在Spring容器中寻找匹配的对象,如果根据Name找到了bean,但是类型不匹配则会抛出异常。 -->
<!--  autowire="byType" 根据当前Bean的属性类型,在spring容器中寻找匹配的对象,如果根据类型找打了多个类型匹配的bean,也会抛出异常-->
<bean id="stu3" class="com.liguoqing.ioc.bean.Student" autowire="byName"></bean>
基于注解配置:
- @Service、@Controller、@Repository这三个注解也可以将类声明给Spring管理,他们主要是语义上的区别
- @Controller注解主要声明将控制器类配置给Spring管理,例如Servlet
- @Service注解主要声明业务处理类配置给Spring管理,Service接口的实现类
- @Repository注解主要声明持久化类配置给Spring管理,DAO接口
- @Component除了控制器,Service,DAO之外的类一律使用此注解声明
在xml配置文件中添加:
<!--    声明使用注解配置-->
    <context:annotation-config/>
<!--    声明Spring工厂注解的扫描范围-->
    <context:component-scan base-package=""/>
基于注解配置即直接在目标bean类中添加注解,声明为spring容器管理。
package com.benben.pojo;

import org.springframework.beans.factory.annotation.Autowired;
import org.springframework.beans.factory.annotation.Value;
import org.springframework.context.annotation.Lazy;
import org.springframework.context.annotation.Scope;
import org.springframework.stereotype.Component;

import javax.annotation.PostConstruct;
import javax.annotation.PreDestroy;
import javax.annotation.Resource;

/**
 * @BelongsProject: spring_demo01
 * @BelongsPackage: com.benben.pojo
 * @Author: XiaoBenBen
 * @Date: 2022/7/2 16:28
 * @Description: TODO
 */

/*
     @Component(value="类的别名") value属性用于制定当前bean的id属性,或者叫别名。
     value属性也可以省略,如果省略,那么当前类的id默认为当前类名首字母改小写
 */
@Component("myClass")   //将类声明给spring容器管理
@Scope("propotype")     //声明类为单例、非单例模式
@Lazy(true)             //声明为懒汉模式,默认为饿汉模式
public class MyClass {


    @Value("张三")      //注入普通属性
    private String name;

    /*
        1.属性注解、方法注解(set)声明当前属性自动装配,默认byType,
        默认必须(如果没有找到类型与属性类型匹配的bean则抛出异常)
        1.@Autowired(required = false)   通过required属性设置当
        前自动装配是否为必须(默认必须——如果没有找到类型与属性类型匹配的bean则抛出异常)
     */
    @Autowired
    private User user;

    /*
    属性注解,也用于声明属性自动装配
    默认装配方式为byName,如果根据byName没有找到相应的bean,则继续根据byType寻找对应的bean,
    根据byType如果没找到bean,或者找到不止一个类型匹配的bean则抛出异常。
     */
    @Resource
    private User user1;


    @PostConstruct      //声明为初始化方法
    public void init(){

    }

    @PreDestroy         //声明为销毁方法
    public void destory(){

    }

}
3.5 工厂bean的注入
这个主要是解决一些第三方的 Bean,一些无法通过构造方法正常初始化、或者无法通过 set 方法正常为属性的赋值的 Bean,可以通过工厂 Bean 的方式将之注册到 Spring 容器中。
3.5.1 静态工厂的注入
静态工厂类:
package com.benben.factory;

import com.benben.dao.UserDaoImpl;

/**
 * @BelongsProject: spring_demo01
 * @BelongsPackage: com.benben.factory
 * @Author: XiaoBenBen
 * @Date: 2022/7/3 0:21
 * @Description: TODO
 */
public class MyStaticFactory {
    public static UserDaoImpl getUserDaoImpl(){
        UserDaoImpl userDaoImpl = new UserDaoImpl( );
        return userDaoImpl;
    }
}
配置xml文件:factory-method属性里面为获取对象的方法。这个 Bean,将来会自动调用 getInstance 方法,并将该方法的返回值注入到 Spring 容器中。
<bean class="com.benben.factory.MyStaticFactory" id="myStaticFactory" factory-method="getUserDaoImpl"/>测试:通过工厂bean可以拿到UserDaoImpl对象。
@Test
    public void showInfo05(){
        ClassPathXmlApplicationContext context = new ClassPathXmlApplicationContext("applicationContext02.xml");
        UserDaoImpl factory = (UserDaoImpl) context.getBean("myStaticFactory");
        factory.selectUser();
    }
3.5.2 实例工厂的注入
对于实例工厂方法,必须得先有一个工厂的实例,将来要通过这个实例才能调用工厂方法。
定义实例工厂:
package com.benben.factory;

import com.benben.dao.UserDaoImpl;

/**
 * @BelongsProject: spring_demo01
 * @BelongsPackage: com.benben.factory
 * @Author: XiaoBenBen
 * @Date: 2022/7/3 0:21
 * @Description: TODO
 */
public class MyFactory {
    public UserDaoImpl getUserDaoImpl(){
        UserDaoImpl userDaoImpl = new UserDaoImpl( );
        return userDaoImpl;
    }
}
xml文件配置bean:factory-method属性里面为获取对象的方法。factory-bean属性中指定前面声明好的工厂bean。
<!--    先声明工厂bean-->
    <bean class="com.benben.factory.MyFactory" id="myFactory"/>
<!--    factory-bean属性中指定前面声明好的工厂bean,-->
    <bean factory-bean="myFactory" factory-method="getUserDaoImpl" id="mf"/>
测试:
@Test
    public void showInfo06(){
        ClassPathXmlApplicationContext context = new ClassPathXmlApplicationContext("applicationContext02.xml");
        UserDaoImpl mf = (UserDaoImpl) context.getBean("mf");
        mf.selectUser();
    }
3.5.3 spring官方方法
public class OkHttpClientFactoryBean implements FactoryBean<OkHttpClient> {
    /**
     * 返回真正的对象
     * @return
     * @throws Exception
     */
    @Override
    public OkHttpClient getObject() throws Exception {
        return new OkHttpClient.Builder()
                //设置服务端的读取超时时间
                .readTimeout(5000, TimeUnit.SECONDS)
                //连接超时
                .connectTimeout(5000, TimeUnit.SECONDS)
                .build();
    }

    /**
     * 返回对象的类型
     * @return
     */
    @Override
    public Class<?> getObjectType() {
        return OkHttpClient.class;
    }

    /**
     * 这个对象是否是单例的
     * @return
     */
    @Override
    public boolean isSingleton() {
        return true;
    }
}
配置xml:
<bean class="com.qfedu.demo.OkHttpClientFactoryBean" id="client03"/>4、spring IOC(控制反转)(纯java代码配置)
创建配置类JavaConfig,添加 @Configuration注解,表示为配置类
@ComponentScan(basePackages = "com.benben.pojo"):表示注解包扫描
/**
 * 这个是 Java 配置类,它的作用类似于 applicationContext.xml

 * @Configuration 表示这是一个配置类
 */
@Configuration
public class JavaConfig {

    /**
     * @Bean 就表示将当前方法的返回值注册到 Spring 容器中
     * 默认情况下,方法名称就是 bean 的名字
     * 如果需要自定义 bean 的名称,那么在注解中配置即可
     * @return
     */
    @Bean("u")
    User user() {
        User user = new User();
        user.setAddress("广州");
        user.setName("zhangsan");
        return user;
    }
}
测试类中加载配置类:
@Test
    public void showInfo02(){
        AnnotationConfigApplicationContext context = new AnnotationConfigApplicationContext(JavaConfig.class);
        User user = (User) context.getBean("user");
        System.out.println(user );
    }
5、Bean的相关细节
5.1 Bean的作用域
通过bean标签中的scope属性设置Bean的作用域。
(1)scope="singleton":单例模式(默认为饿汉模式,即spring容器初始化就创建对象,lazy-init="true":设置为懒汉模式。)
(2)scope="prototype":非单例模式(每次加载spring容器都会创建对象)
<bean class="java.util.Date" id="date" scope="prototype" lazy-init="true"/>scope 有五种取值:
singleton:表示这个 bean 是单例的,从 Spring 容器中多次获取,拿到的是同一个 Bean。
prototype:每一次去 Spring 容器中,都可以获取到一个全新的 Bean。
request:在同一个请求中,如果多次获取同一个 Bean,获取到的是同一个(web 环境下生效)
session:在同一个 session 中,如果多次获取同一个 Bean,获取到的是同一个(web 环境下生效)
application:在同一个 web 应用中,如果多次获取同一个 Bean,获取到的是同一个(web 环境下生效)(web 环境下生效)
5.2 Bean的生命周期
在bean标签中可以通过 init-method 属性指定当前bean的初始化方法,初始化方法在构造器(spring容器默认使用无参构造创建对象)执行之后执行,通过 destroy-method 属性指定当前bean的销毁方法,销毁方法在对象销毁之前执行。属性里面写入方法名。
User类中添加方法:
//初始化方法,对一些资源的初始化
    public void init(){

    }
    //销毁方法,对一些资源的回收操作
    public void destroy(){

    }
配置:
<bean class="com.benben.pojo.User" id="user2" init-method="init" destroy-method="destroy"/>6、动态代理
6.1 JDK动态代理
6.2 CGLib动态代理
7、spring AOP(面向切面)
7.1 简介
spring AOP 面向切面编程,即不改变原有的业务逻辑,对原有的业务逻辑进行拦截,在拦截的横切面上加强业务。(底层为动态代理)
①切点(pointcut):需要增强业务的地方,即此方法的位置
②通知/增强(advice):配置增加的业务的配置方式
③切面(aspect):切点+通知,简单的理解为需要增强业务的类
7.2 AOP配置(基于xml配置文件,CGLib代理)
添加spring-aspects依赖
<!-- https://mvnrepository.com/artifact/org.springframework/spring-context -->
        <dependency>
            <groupId>org.springframework</groupId>
            <artifactId>spring-aspects</artifactId>
            <version>5.2.12.RELEASE</version>
        </dependency>
定义一个增强业务类(切面类):TxManger
package com.benben.utils;
import org.aspectj.lang.ProceedingJoinPoint;
import org.aspectj.lang.annotation.Aspect;
import org.aspectj.lang.annotation.Before;
import org.aspectj.lang.annotation.Pointcut;
import javax.sound.midi.Soundbank;
/**
* @BelongsProject: spring_demo01
* @BelongsPackage: com.benben.utils
* @Author: XiaoBenBen
* @Date: 2022/7/2 17:31
* @Description: TODO
*/
public class TxManger {
public void pc(){
}
public void begin(){
System.out.println("开启事务" );
}
public void end(){
System.out.println("关闭事务" );
}
public void myThrow(Exception e){
System.out.println(e.getMessage());
}
public int run(){
System.out.println("返回了" );
return 1;
}
//环绕通知的方法,必须遵守如下的定义规则
//1:必须带有一个ProceedingJoinPoint类型的参数,
//2:必须有Object类型的返回值
//3:在前后增强的业务逻辑之间执行Object v = point.proceed();
//4: 方法最后返回 return v;
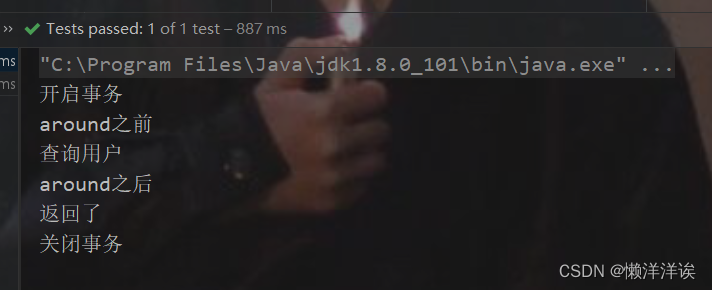
public Object around(ProceedingJoinPoint point) throws Throwable {
System.out.println("around之前" );
Object proceed = point.proceed( );
System.out.println("around之后");
return proceed;
}
}
UserDaoImpl类中的selectUser()方法作为一个切点
package com.benben.dao;

/**
 * @BelongsProject: spring_demo01
 * @BelongsPackage: com.benben.dao
 * @Author: XiaoBenBen
 * @Date: 2022/7/2 17:34
 * @Description: TODO
 */
public class UserDaoImpl {
    public void selectUser(){
//        int a = 1/0;        //异常
        System.out.println("查询用户" );
    }
}
配置xml文件:
<bean class="com.benben.dao.UserDaoImpl" id="userDaoImpl"/>
    <bean class="com.benben.utils.TxManger" id="txManger"/>
<!--    配置aop-->
    <aop:config>
        <!--
        id 表示切点的名称
        expression:表示切点的定义,第一个 * 表示方法返回值任意(这个位置也可以给定一个具体的返回类型)
        第二个 * 表示 service 下的所有类
        第三个 * 表示 任意方法
        .. 表示参数任意(参数可有可无,如果有,参数类型也是任意的)
        -->
        <aop:pointcut id="userDao" expression="execution(* com.benben.dao.*.*(..))"/>
<!--        声明TxManger为切面类-->
        <aop:aspect ref="txManger">
<!--            前置通知-->
            <aop:before method="begin" pointcut-ref="userDao"/>
<!--            后置通知-->
            <aop:after method="end" pointcut-ref="userDao"/>
<!--            异常通知
                切点方法抛出异常之后-->
            <aop:after-throwing method="myThrow" pointcut-ref="userDao" throwing="e"/>
            <!--   aop:after-returning 方法返回值返回之后,对于一个java方法而言return返回值也是方法的一部分
                因此”方法返回值返回之后“和”方法执行结束“是同一个时间点,所以after和after-returning根据配置的顺序决定执行的顺序-->
            <aop:after-returning method="run" pointcut-ref="userDao"/>
<!--            环绕通知
                包括了所有,可以在之前,之后,异常,返回值-->
            <aop:around method="around" pointcut-ref="userDao"/>

        </aop:aspect>
    </aop:config>
测试:
@Test
    public void showInfo03(){
        ClassPathXmlApplicationContext context = new ClassPathXmlApplicationContext("applicationContext01.xml");
        UserDaoImpl userDao = (UserDaoImpl) context.getBean("userDaoImpl");
        userDao.selectUser();
    }
7.2 AOP配置(注解配置,xml配置包扫描)
<!--基于注解配置-->
    <context:annotation-config/>
<!--    配置包扫描-->
    <context:component-scan base-package="com.benben"/>
    <!--基于注解配置的AOP代理-->
    <aop:aspectj-autoproxy/>
7.3 AOP配置(纯java代码配置)
定义配置类JavaConfig
@Configuration //表示这个一个配置类
@ComponentScan(basePackages = "com.benben") //配置包扫描
package com.benben.utils;

import org.springframework.context.annotation.*;

/**
 * @BelongsProject: spring_demo01
 * @BelongsPackage: com.benben.utils
 * @Author: XiaoBenBen
 * @Date: 2022/7/2 16:48
 * @Description: TODO
 */
@Configuration     //表示这个一个配置类
@ComponentScan(basePackages = "com.benben")   //配置包扫描
public class JavaConfig {

}
切点所在类添加注解 @Repository //声明给spring容器管理
package com.benben.dao;

import org.springframework.stereotype.Component;
import org.springframework.stereotype.Repository;

/**
 * @BelongsProject: spring_demo01
 * @BelongsPackage: com.benben.dao
 * @Author: XiaoBenBen
 * @Date: 2022/7/2 17:34
 * @Description: TODO
 */
@Repository    //声明给spring容器管理
public class UserDaoImpl {
    public void selectUser(){
//        int a = 1/0;        //异常
        System.out.println("查询用户" );
    }
}
定义切面类:添加注解
@Component //声明给spring容器管理
@Aspect //声明为切面类
@EnableAspectJAutoProxy //开启自动代理
package com.benben.utils;

import org.aspectj.lang.ProceedingJoinPoint;
import org.aspectj.lang.annotation.*;
import org.springframework.context.annotation.EnableAspectJAutoProxy;
import org.springframework.stereotype.Component;


/**
 * @BelongsProject: spring_demo01
 * @BelongsPackage: com.benben.utils
 * @Author: XiaoBenBen
 * @Date: 2022/7/2 17:31
 * @Description: TODO
 */
@Component  //声明给spring容器管理
@Aspect     //声明为切面类
@EnableAspectJAutoProxy    //开启自动代理
public class TxManger {
    //声明切点
    @Pointcut("execution(* com.benben.dao.*.*(..))")
    public void pc(){
    }

    @Before("pc()")     //前置通知
    public void begin(){
        System.out.println("开启事务" );
    }
    @After("pc()")
    public void end(){
        System.out.println("关闭事务" );
    }
    @AfterThrowing(value = "pc()",throwing = "e")
    public void myThrow(Exception e){
        System.out.println(e.getMessage());
    }
    @AfterReturning(value = "pc()")
    public int run(){
        System.out.println("返回了" );
        return 1;
    }

    //环绕通知的方法,必须遵守如下的定义规则
    //1:必须带有一个ProceedingJoinPoint类型的参数,
    //2:必须有Object类型的返回值
    //3:在前后增强的业务逻辑之间执行Object v = point.proceed();
    //4: 方法最后返回 return v;
    @Around("pc()")
    public Object around(ProceedingJoinPoint point) throws Throwable {
        System.out.println("around之前" );
        Object proceed = point.proceed( );
        System.out.println("around之后");
        return proceed;
    }

}
测试:
@Test
    public void showInfo04(){
        AnnotationConfigApplicationContext context = new AnnotationConfigApplicationContext(JavaConfig.class);
        UserDaoImpl userDaoImpl = (UserDaoImpl) context.getBean("userDaoImpl");
        userDaoImpl.selectUser();
    }
7.4 AOP配置中的JDK代理和GBLib代理
其中JDK代理,切点所在类需要实现Calculator接口,从spring容器中拿到的对象为spring容器自动生成的这个接口的实现类对象。
CGLib代理,本质从spring容器中拿到的为其子类的对象
@Test
    public void showInfo03(){
        ClassPathXmlApplicationContext context = new ClassPathXmlApplicationContext("applicationContext01.xml");
        /*
        JDK代理:userDao对象本质为spring容器自动生成的Calculator实现类的对象
        CGLib代理:userDao对象本质为spring容器生成的子类对象
         */
        UserDaoImpl userDao = (UserDaoImpl) context.getBean("userDaoImpl");
        userDao.selectUser();
    }
8、补充笔记
8.1 条件注入
条件注解是多环境配置的核心,思路就是提前准备好环境,所谓的环境,实际上就是 Condition 接口的实现类,然后在注册 Bean 的时候,通过 @Conditional 注解去指定环境,当满足某种条件的时候,bean 才会注入到 Spring 容器中。
两个非常经典的使用场景:
项目中的多环境配置。
SpringBoot 中的自动化配置。
主要是使用 @Profile 注解,这个注解的本质就是 @Conditional 条件注解,用到的条件实际上就是 ProfileCondition。
@Target({ElementType.TYPE, ElementType.METHOD})
@Retention(RetentionPolicy.RUNTIME)
@Documented
@Conditional(ProfileCondition.class)
public @interface Profile {
/**
* The set of profiles for which the annotated component should be registered.
*/
String[] value();
}条件注解:
class ProfileCondition implements Condition {
@Override
public boolean matches(ConditionContext context, AnnotatedTypeMetadata metadata) {
//获取 Profile 注解的所有属性,其实这个注解只有一个 value 属性,属性的值是一个数组
MultiValueMap<String, Object> attrs = metadata.getAllAnnotationAttributes(Profile.class.getName());
if (attrs != null) {
//将属性中的 value 读取出来,这个 value 的值实际上是一个 String 数组,遍历 String 数组
for (Object value : attrs.get("value")) {
//判断当前环境中,有没有 value 中的值
if (context.getEnvironment().acceptsProfiles(Profiles.of((String[]) value))) {
return true;
}
}
return false;
}
return true;
}
}具体配置:
@Configuration
public class JavaConfig {
/**
* 开发环境的数据源
*
* 通过 @Profile("dev") 注解可以指定当前的环境是开发环境
* @return
*/
@Profile("dev")
@Bean("ds")
DataSource devDataSource() {
DataSource ds = new DataSource();
ds.setUsername("root");
ds.setPassword("123");
ds.setUrl("jdbc:mysql:///test01");
return ds;
}
/**
* 配置生产环境的数据源
* @return
*/
@Profile("prod")
@Bean("ds")
DataSource prodDataSource() {
DataSource ds = new DataSource();
ds.setUsername("zhangsan");
ds.setPassword("jdfkslajfl890324");
ds.setUrl("jdbc:mysql://114.132.43.22/prod01");
return ds;
}
}注册 Bean 的时候,通过 @Profile("prod") 注解来指定当前 Bean 在哪个环境下生效。
当启动 Spring 容器的时候,要为 Spring 容器指定当前的环境信息:
public class Demo01 {
    public static void main(String[] args) {
        //注意先不要写配置类,要先设置环境信息
        AnnotationConfigApplicationContext ctx = new AnnotationConfigApplicationContext();
        //设置当前的环境信息
        ctx.getEnvironment().addActiveProfile("prod");
        ctx.register(JavaConfig.class);
        ctx.refresh();
        DataSource ds = ctx.getBean(DataSource.class);
        System.out.println("ds = " + ds);
    }
}
通过 XML 配置实现
首先在 xml 文件中,通过 beans 标签来指定环境:
<?xml version="1.0" encoding="UTF-8"?>
<beans xmlns="http://www.springframework.org/schema/beans"
xmlns:xsi="http://www.w3.org/2001/XMLSchema-instance"
xsi:schemaLocation="http://www.springframework.org/schema/beans http://www.springframework.org/schema/beans/spring-beans.xsd">
<beans profile="dev">
<!--将来写在这个标签中的 Bean,都是在 dev 环境下才会生效的 Bean-->
<bean class="com.qfedu.demo.p1.model.DataSource" id="dataSource">
<property name="username" value="root"/>
<property name="password" value="123"/>
<property name="url" value="jdbc:mysql:///test01"/>
</bean>
</beans>
<beans profile="prod">
<!--将来写在这个标签中的 Bean,都是在 prod 环境下才会生效的 Bean-->
<bean class="com.qfedu.demo.p1.model.DataSource" id="dataSource">
<property name="username" value="root"/>
<property name="password" value="jkld3u$%^"/>
<property name="url" value="jdbc:mysql://11.22.11.22/test01"/>
</bean>
</beans>
</beans>将来 Spring 容器启动的时候,会根据当前的环境信息去注册不同的 beans 标签中的 Bean。
启动容器的时候,设置一下当前环境即可:
public class Demo02 {
    public static void main(String[] args) {
        //先不要加载配置文件
        ClassPathXmlApplicationContext ctx = new ClassPathXmlApplicationContext();
        ctx.getEnvironment().addActiveProfile("dev");
        //设置好当前环境之后,再去设置配置文件的位置
        ctx.setConfigLocation("applicationContext.xml");
        ctx.refresh();
        DataSource ds = ctx.getBean(DataSource.class);
        System.out.println("ds = " + ds);
    }
}
8.2 p名称空间注入
本质上为set方法注入:
<bean class="com.benben.pojo.User" id="user" p:uid="1" p:uname="张洼" p:upwd="1221"/>测试:
@Test
    public void showInfo07(){
        ClassPathXmlApplicationContext context = new ClassPathXmlApplicationContext("applicationContext02.xml");
        User user = (User) context.getBean("user");
        System.out.println(user );
    }
8.3 配置文件的注入
主要是指 properties 配置文件的注入。
主要就是两个配置:
@PropertySource:项目启动的时候,将配置文件中的内容注册到 Spring 容器中。
@Value:从 Spring 容器要一个字符串回来。
java代码配置:
@Configuration
@PropertySource("classpath:db.properties")
public class DsConfig {

    //跟 Spring 容器要一个字符串回来
    @Value("${db.username}")
    String username;
    @Value("${db.password}")
    String password;
    @Value("${db.url}")
    String url;

    @Bean
    DataSource dataSource() {
        DataSource ds = new DataSource();
        ds.setPassword(password);
        ds.setUsername(username);
        ds.setUrl(url);
        return ds;
    }
}
xml配置:
 <!--
    这个配置的作用类似于 @PropertySource,就是将配置文件注册到 Spring 容器中
    -->
    <context:property-placeholder location="classpath:db.properties"/>

    <!--
    ${db.url} 表示引用 Spring 容器中,key 为 db.url 的变量
    -->
    <bean class="com.qfedu.demo.p1.model.DataSource" id="dataSource">
        <property name="url" value="${db.url}"/>
        <property name="password" value="${db.password}"/>
        <property name="username" value="${db.username}"/>
    </bean>
8.4 配置类
@Configuration:这个注解表示当前类是一个配置类,那么当前类中,所有添加了 @Bean 注解的方法都会被注册到 Spring 容器中,如果有其他方法调用到一个添加了 @Bean 注解的方法,那么不会立马执行对应的方法,而是先去 Spring 容器中查看是否有对应的对象,如果有,则直接从容器中获取即可,如果容器中没有的话,才回去执行对应的方法。
@Component 虽然也可以加在配置类上,但是,如果有其他方法调用到一个添加了 @Bean 注解的方法,那么不会先去 Spring 容器中查看是否有对应的对象,而是直接执行对应的方法。所以一般在配置类中不使用 @Component 注解。如果一定要使用 @Component 注解,可以通过依赖注入来代替方法调用,类似下面这样:
/**
 * 向 Spring 容器注册一个 Author 对象
 *
 * @return
 */
@Bean
Author author() {
    Author author = new Author();
    author.setName("鲁迅");
    author.setAge(55);
    return author;
}
/**
 * 向 Spring 容器中注册一个 Book 对象
 *
 * book 中有一个 author 对象,book 中的 author 和 spring 容器中的 author 是否是同一个对象?
 * @return
 */
@Bean
Book book2(Author author) {
    Book book = new Book();
    book.setName("故事新编");
    book.setAuthor(author);
    book.setPrice(18.0);
    return book;
}
在这里,所有的方法都是 Spring 容器调用的,当 Spring 容器调用 book2 这个方法的时候,就会发现这个方法的执行需要一个 Author 类型的参数,那么此时 Spring 容器就会去查找是否有一个 Author,如果有,则直接作为参数传进来,如果 Spring 容器中没有这个对象,那么直接抛出异常。