2022年8月14日01:30:44更新
【Unity3D】unity-mono编译libmono.so成功_两水先木示的博客-CSDN博客
2022年8月13日更新(目前看起来好像最接近可行的方案)
https://www.jianshu.com/p/b801a9b7cff8
博主使用的是编译环境 centos7.2_CHS_64
我使用uBuntu64位,进行
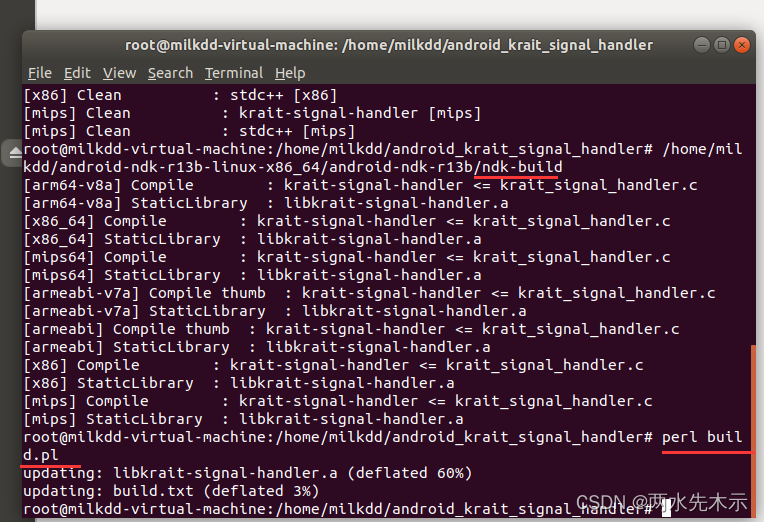
/root/tmp/mono-android/android_ndk/android-ndk-r13b/ndk-build clean
/root/tmp/mono-android/android_ndk/android-ndk-r13b/ndk-build
这2行结果显示都还可以,直到进行
perl build.pl发生报错,ndk问题?目前尚不清楚是否是64位系统执行32位的linux ndk问题,可以尝试换32位ubuntu系统测试。(记录与2022年8月13日)
测试环境uBuntu64、mono 2017.4、ndk-r13b_x86_64编译mono库、ndk-r10e_x86单独编译android_krait_signal_handler库
最终卡死(看起来像是执行到一半就终止了,原因未知)
失败总结:
失败原因基本是我不会git的克隆,仅仅因为这个unity-mono库存在submodule(子库)导致卡进度,如果能成功完整克隆unity-mono库,按道理是挺简单就能完成编译libmono.so文件了。(谁能的话可以告诉我,这git它一个个去克隆子库可以,执行了autogen.sh时它又会去克隆一遍全部,这时候就会出现无法正常克隆情况,和我使用git submodule update的效果基本一致,卡死在cloning into xxx 或 fail connect github.com 或各种奇怪的bug 均是克隆submodule问题,可能有人说你手动自己一个个克隆完整不就行了吗?我试了但它这autogen.sh就是会有代码可能是内部的主动去调起了重新克隆子库的代码(目前不想找了 要改起来头皮发麻)。
观察发现,仅有后来出现的Unity版本是存在子库的,Unity4.x或5.x 甚至Unity2017好像都没有submodule(子库)所以试手推荐选用没有submodule库的,网上基本上都是4.x或5.x都有成果,后面再试试4.x或5.x,测试下编译出来的libmono.so能不能给高版本的unity使用。总之,真的是绝了~
目前还剩下一种方案就是直接使用镜像路径替换github.com(改gitconfig可以做到),就是不知道能不能克隆子库的时候也会生效了,目前进展是能够正常克隆子库了,但是速度是2KB/s龟速,而且我没有那种加速的小东西,等后续有条件可以尝试弄下。
本人环境介绍:
unity-mono分支:2019.4-branch-updates
ubuntu64位:ubuntu-18.04.1-desktop-amd64.iso
vmware:VMware® Workstation 15 Pro (15.5.0 build-14665864)
ndk: android-ndk-r16b (下载)git clone --recursive -b 2019.4-branch-updates https://github.com/Unity-Technologies/mono.git
window虚拟机:VMware Workstation (下载)
linux环境:Ubuntu 18.04.4 LTS (网易镜像下载)
Mono版本:mono-unity-2019.4-mbe(下载)
ndk版本:android-ndk-r16b-linux-x86_64(下载)
编译:
1、卸载旧版本mono编译环境
sudo apt-get --purge remove mono-runtime
sudo apt-get autoremove
2、安装新版本mono编译环境 (国内镜像安装)
sudo apt install gnupg ca-certificates
sudo apt-key adv --keyserver hkp://keyserver.ubuntu.com:80 --recv-keys 3FA7E0328081BFF6A14DA29AA6A19B38D3D831EF
echo "deb https://download.mono-project.com/repo/ubuntu stable-bionic main" | sudo tee /etc/apt/sources.list.d/mono-official-stable.list

sudo apt update
sudo apt install mono-devel -y这里我卡了很久,原因是镜像没有使用。镜像文章:https://blog.csdn.net/Piconjo/article/details/104660915
用root权限打开这个sources.list文件添加如下镜像(网易)之后执行【如果这些镜像不行了你得找到一个可以加速的,注意不能全部都放进去,只能选一个】
sudo apt clean
sudo apt updatedeb http://mirrors.163.com/ubuntu/ trusty main restricted universe multiverse deb http://mirrors.163.com/ubuntu/ trusty-security main restricted universe multiverse deb http://mirrors.163.com/ubuntu/ trusty-updates main restricted universe multiverse deb http://mirrors.163.com/ubuntu/ trusty-proposed main restricted universe multiverse deb http://mirrors.163.com/ubuntu/ trusty-backports main restricted universe multiverse deb-src http://mirrors.163.com/ubuntu/ trusty main restricted universe multiverse deb-src http://mirrors.163.com/ubuntu/ trusty-security main restricted universe multiverse deb-src http://mirrors.163.com/ubuntu/ trusty-updates main restricted universe multiverse deb-src http://mirrors.163.com/ubuntu/ trusty-proposed main restricted universe multiverse deb-src http://mirrors.163.com/ubuntu/ trusty-backports main restricted universe multiverse完成后再去执行上方的代码,基本就是sudo apt install mono-devel -y 这行命令下载的东西比较多(我发现还是慢,但不至于完全卡死,也有个100~300KB左右的速度,总之慢慢等吧 几个小时?)
3、安装必要的工具
sudo apt-get install autoconf automake libtool libtool-bin git cmake python4、cd到mono根目录(mono-unity-2019.4-mbe解压出来的所在目录)
sudo ./autogen.sh
sudo ./make
可能会遇到报错信息:
configure.ac:434: error: installing './compile'; error while making link: Operation not supported
configure.ac:16: error: installing './missing'; error while making link: Operation not supported
ikvm-native/Makefile.am: error: installing './depcomp'; error while making link: Operation not supported
**Error**: automake failed.
需要将mono工程移出共享文件夹,比如放到根目录/lib下,Move To完成后再执行上方命令。
失败!失败!又TM的失败了!
无论是windows还是ubuntu系统,执行到关键的./autogen.sh代码时,均会进行一次git克隆子库,也就是.gitmodules文件的内容,大概有十几个子库,而且子库内部也有子库,这些克隆子库的地方在windows系统是fail connect github.com(改镜像路径好像也是一样的),ubuntu系统就是另一个报错(但不是所有都无法clone只有部分会)就是fatal: The remote end hung up unexpectedly我从网上了解到的方法统统都不行,后面搞了那些后还报错了一个新的libtoolize: error: copying '/usr/share/libtool/build-aux/ltmain.sh' to './' failed
总之基本上可以告别安卓加密了,网上的所有安卓加密目前均已尝试,后面有心情再玩玩了,感觉用途不大li2cpp打包就是一层加密了。
如果上面的你都成功了,没有任何报错,那恭喜继续下面的步骤 这些都是网上的 按道理是目前我能搜到比较高级版本的,很多编译libmono.so都是unity5.x版本的东西,太老了。
5、到mono/external/buildscripts目录下
1)修改build.pl 中 my $existingMonoRootPath='/usr/lib/mono'
2)将ndk解压到下面的路径:artifacts/Stevedore/android-ndk-linux-x86_64/android-ndk-r16b
3)检查extrnal目录下的bgwgc、boringssl、roslyn-binaries是否是空的,如果是就到主干上单独下载,然后放到对应的目录内
4)./build_runtime_android.sh
6、编译出来的 libmonobdwgc-2.0.so 是debug版本 (PS:我是把编译处理的android文件夹拷贝到桌面 /home/admin/Desktop )
1) 处理armv7 release版 cd 到ndk目录
artifacts/Stevedore/android-ndk-linux-x86_64/android-ndk-r16b/arm-linux-androideabi-clang/bin
./arm-linux-androideabi-strip /home/admin/Desktop/android/armv7a/libmonobdwgc-2.0.so
2) 1) 处理x86 release版 cd 到ndk目录
artifacts/Stevedore/android-ndk-linux-x86_64/android-ndk-r16b/i686-linux-androideabi-clang/bin
./i686-linux-androideabi-strip /home/admin/Desktop/android/x86/libmonobdwgc-2.0.so