对于嵌入式Linux而言有以下三种驱动方式:
1.字符设备驱动
2.块设备驱动
3.网络设备驱动
本文将介绍的是字符设备驱动的框架
首先字设备驱动需要的是搭建模块初始化的框架
static int __init chrdev_init(void)/*这里是入口参数*/
{
    return 0;
}

static void __exit chrdev_exit(void)/*这里是出口参数*/
{

}

module_init(chrdev_init);
module_exit(chrdev_exit);
MODULUE_LISENCE("GPL");
在敲定完入口和出口参数之后就是向里面添加注册设备的函数
使用的函数如下
register_chrdev_region(dev_t, unsigned, const char *);//用于在有主设备号的时候注册字符设备
alloc_chrdev_region(dev_t *, unsigned, unsigned, const char *);//用于在没有设备号的时候进行自动注册字符设备
 unregister_chrdev_region(dev_t, unsigned);//用于注销字符设备
在注册完设备的时候就要准备好注册cdev:
在cdev中进行设备的具体操作如open,write,release等对应的是应用程序中的open,write,close函数,就相当于在应用程序里面使用了open函数就调用驱动程序中的open操作。
首先就是用到cdev_init();然后进行cdev_add();
但是也要记得用完之后在出口函数中使用cdev_del()删除cdev。
void cdev_init(struct cdev *, const struct file_operations *);
int cdev_add(struct cdev *, dev_t, unsigned);

void cdev_del(struct cdev *);
再往下写就需要搭建自动注册设备的函数
1.class_create()//创建类
2.device_create()//创建设备
3.class_destroy()//销毁类
4.device_destroy()//销毁设备
如果你要使用到设备树的话就需要使用of函数进行读取出来我在这里就不再做展开了
那么说了那么多我们还是来看看点亮LED灯的代码吧
#include <linux/types.h>
#include <linux/kernel.h>
#include <linux/delay.h>
#include <linux/ide.h>
#include <linux/init.h>
#include <linux/module.h>
#include <linux/errno.h>
#include <linux/gpio.h>
#include <linux/cdev.h>
#include <linux/device.h>
#include <linux/of.h>
#include <linux/of_address.h>
#include <asm/mach/map.h>
#include <asm/uaccess.h>
#include <asm/io.h>


#define LEDOFF 					0			/* 关灯 */
#define LEDON 					1			/* 开灯 */

/* 映射后的寄存器虚拟地址指针 */
static void __iomem *IMX6U_CCM_CCGR1;
static void __iomem *SW_MUX_GPIO1_IO03;
static void __iomem *SW_PAD_GPIO1_IO03;
static void __iomem *GPIO1_DR;
static void __iomem *GPIO1_GDIR;

#define DFSLED_CNT 1
#define DFSLED_NAME "dfsled"

struct dfsled_info
{
dev_t devd;
int major;
int minor;
struct cdev ledcdev;
struct class *class;
struct device *device;
 struct device_node * device_node;

};
struct dfsled_info dfsled;

void led_switch(u8 sta)
{
	u32 val = 0;
	if(sta == LEDON) {
		val = readl(GPIO1_DR);
		val &= ~(1 << 3);
		writel(val, GPIO1_DR);
	}else if(sta == LEDOFF) {
		val = readl(GPIO1_DR);
		val|= (1 << 3);
		writel(val, GPIO1_DR);
	}
}
static int dfsled_open(struct inode *inode, struct file *filp)
{
	filp->private_data=&dfsled;

	return 0;
}
static int dfsled_release(struct inode *inode, struct file *filp)
{
	struct dfsled_info *dev=filp->private_data;
	return 0;
}

static ssize_t dfsled_write(struct file *filp, const char __user *buf,size_t count, loff_t *f_pos)
{
	unsigned char databuf[1];
struct dfsled_info *dev=filp->private_data;
 copy_from_user(databuf,buf ,sizeof(databuf));
 led_switch(databuf[0]);
	return 0;
 }

static const struct file_operations dfsled_operter = {
	.write   = dfsled_write,
	.open    = dfsled_open,
	.release = dfsled_release,

};


static int __init dfsled_init(void)
{
	int ret=0;
	u32 regdata[10];
	u8 i=0;
	u32 val=0;
	struct property *property;
	const char *str;
	if(dfsled.major )
	{
		dfsled.devd=MKDEV(dfsled.major,0);
		ret=register_chrdev_region(dfsled.devd, DFSLED_CNT, DFSLED_NAME);
	}
	else
	{
		ret=alloc_chrdev_region(&dfsled.devd, 0, DFSLED_CNT,DFSLED_NAME);
		dfsled.major=MAJOR(dfsled.devd);
		dfsled.minor=MINOR(dfsled.devd);
	}
	if(ret<0)
	{
		ret=-EINVAL;
		goto fail_register;
	}
	printk("major is %d,minor is %d",dfsled.major,dfsled.minor);
	/*cdev的初始化*/
	dfsled.ledcdev.owner=THIS_MODULE;
	cdev_init(&dfsled.ledcdev, &dfsled_operter);
	ret=cdev_add(&dfsled.ledcdev, dfsled.devd, DFSLED_CNT);
	if(ret<0)
	{
		goto fail_cdev_add;
	}
	dfsled.class=class_create(THIS_MODULE,DFSLED_NAME);
	if (IS_ERR(dfsled.class))
	{
		return PTR_ERR(dfsled.class);
		goto fail_class;
	}
	dfsled.device=	device_create(dfsled.class, NULL,
			dfsled.devd, NULL,DFSLED_NAME);
			if (IS_ERR(dfsled.device)) {
				return PTR_ERR(dfsled.device);
				goto fail_device;
	}
    dfsled.device_node= of_find_node_opts_by_path("/dfsled",NULL);
	if(dfsled.device_node==NULL)
	{
		return -EINVAL;
		goto fail_device_node;
	}
	else
	{
		printk("find device\r\n");
	}
   property=  of_find_property(dfsled.device_node, "compatible",NULL);
if(property==NULL)
{
	return -ENAVAIL;
	goto fail_property;
}
else{
	printk("compatible is %s\r\n",(char *)property->value);
}
ret=of_property_read_string(dfsled.device_node,"status",&str);
if(ret<0)
{
	printk("status read failed!\r\n");
	goto fail_status;
}
else{
	printk("status is %s\r\n",str);
}
ret=of_property_read_u32_array(dfsled.device_node,
				      "reg",regdata,10);
					  if(ret<0)
					  {
						printk("eerror read failed!");
						goto fail_regdata;
					  }
					  else{
						for(i=0;i<10;i++)
						{
								printk(" %#x",regdata[i]);
						}
						printk("\r\n");
					  }

	IMX6U_CCM_CCGR1 = ioremap(regdata[0], regdata[1]);
	SW_MUX_GPIO1_IO03 = ioremap(regdata[2], regdata[3]);
  	SW_PAD_GPIO1_IO03 = ioremap(regdata[4], regdata[5]);
	GPIO1_DR = ioremap(regdata[6], regdata[7]);
	GPIO1_GDIR = ioremap(regdata[8], regdata[9]);


		/* 2、使能GPIO1时钟 */
	val = readl(IMX6U_CCM_CCGR1);
	val &= ~(3 << 26);	/* 清楚以前的设置 */
	val |= (3 << 26);	/* 设置新值 */
	writel(val, IMX6U_CCM_CCGR1);

	/* 3、设置GPIO1_IO03的复用功能,将其复用为
	 *    GPIO1_IO03,最后设置IO属性。
	 */
	writel(5, SW_MUX_GPIO1_IO03);

	/*寄存器SW_PAD_GPIO1_IO03设置IO属性
	 *bit 16:0 HYS关闭
	 *bit [15:14]: 00 默认下拉
     *bit [13]: 0 kepper功能
     *bit [12]: 1 pull/keeper使能
     *bit [11]: 0 关闭开路输出
     *bit [7:6]: 10 速度100Mhz
     *bit [5:3]: 110 R0/6驱动能力
     *bit [0]: 0 低转换率
	 */
	writel(0x10B0, SW_PAD_GPIO1_IO03);

	/* 4、设置GPIO1_IO03为输出功能 */
	val = readl(GPIO1_GDIR);
	val &= ~(1 << 3);	/* 清除以前的设置 */
	val |= (1 << 3);	/* 设置为输出 */
	writel(val, GPIO1_GDIR);

	/* 5、默认关闭LED */
	val = readl(GPIO1_DR);
	val |= (1 << 3);
	writel(val, GPIO1_DR);

return 0;
fail_regdata:
fail_status:
fail_property:
fail_device_node:
device_destroy(dfsled.class,dfsled.devd);
fail_device:
class_destroy(dfsled.class);
fail_class:
	 cdev_del(&dfsled.ledcdev);
fail_cdev_add:
unregister_chrdev_region(dfsled.devd,DFSLED_CNT );
fail_register:
return ret;
}
static void __exit dfsled_exit(void)
{

	iounmap(IMX6U_CCM_CCGR1);
	iounmap(SW_MUX_GPIO1_IO03);
	iounmap(SW_PAD_GPIO1_IO03);
	iounmap(GPIO1_DR);
	iounmap(GPIO1_GDIR);

		/*注销cdev*/
		 cdev_del(&dfsled.ledcdev);
	/*注销字符设备*/
	unregister_chrdev_region(dfsled.devd,DFSLED_CNT );
	/*销毁设备*/
	device_destroy(dfsled.class,dfsled.devd);
	/*销毁类*/
	class_destroy(dfsled.class);


}
module_init(dfsled_init);
module_exit(dfsled_exit);
MODULE_LICENSE("GPL");
MODULE_AUTHOR("hengzhenghao");
我们再看看应用程序的对应代码:
#include<stdio.h>
#include <sys/types.h>
#include <sys/stat.h>
#include <fcntl.h>
#include<stdlib.h>
#include <unistd.h>
#include<string.h>
#define PATH "/dev/dfsled"
int main(int argc,char *argv[])
{
    int fd;
    int ret;
    unsigned char databuf[1];
    fd=open(PATH,O_RDWR);
    if(argc!=2)
    {
      printf("error");
      return -1;
    }
    if(fd<0)
    {
      perror("open");
      exit(-1);
    }
 databuf[0]=atoi(argv[1]);
 ret=write(fd,databuf,sizeof(databuf));
 if(ret<0)
 {
  perror("write");
  exit(-1);
 }
    ret=close(fd);
    if(ret<0)
    {
      perror("close");
      exit(-1);
    }
    exit(0);
    return 0;
}
ok那么我们来看一下运行的效果吧!!
首先加载模块我们可以看到打印了设备树的信息
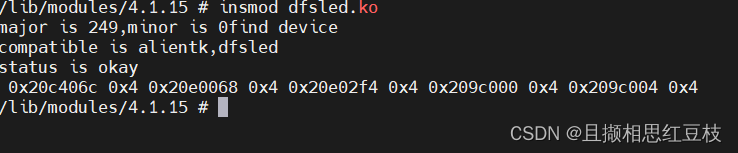
查看/proc/devices不难看到和上面创建的设备号一致
查看设备节点不难发现是创教好了这个节点的

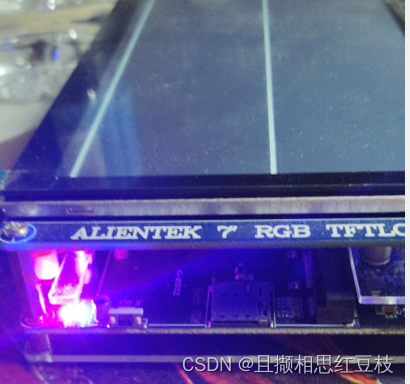
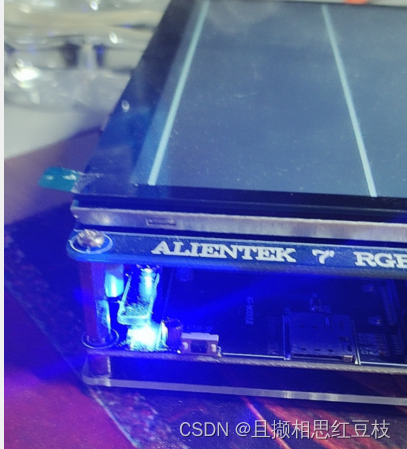
首先进行LED灯的启动然后开发板的红灯亮起
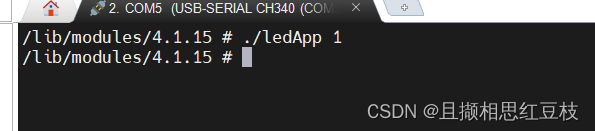
参数为0的时候LED灯灭

本文含有隐藏内容,请 开通VIP 后查看