目录
- 前言
- 一、Activity的视图加载过程
- 二、AppCompatActivity的视图加载过程
-
- 2.1 视图结构
- 2.2 流程分析
-
- 2.2.1 AppCompatActivity.java --setContentView(int layoutResID)
- 2.2.2 AppCompatDelegate.java --> create(Activity activity, AppCompatCallback callback)
- 2.2.3 AppCompatDelegateImpl.java -->setContentView(int resId)
- 2.2.4 AppCompatDelegateImpl.java -->ensureSubDecor()
- 2.2.5 AppCompatDelegateImpl.java --> createSubDecor()
- 2.2.6 退出createSubDecor(),退出ensureSubDecor(),关于布局加载的代码已经完毕
- 三、总结
前言
常用的Activity有Activity和AppCompatActivity,分别梳理一下这两个类的setContentView()流程
一、Activity的视图加载过程
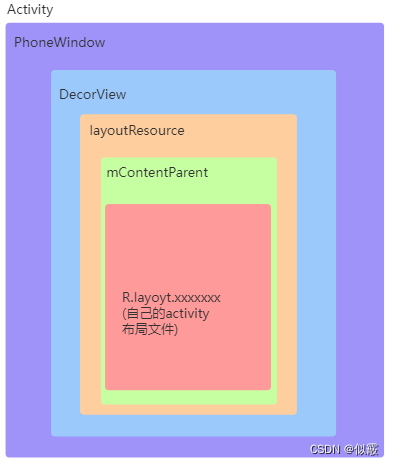
1.1 视图结构
先放视图结构:
1.2 流程分析
接下来看一下流程
1.2.1 Activity.java -->setContentView()
public void setContentView(@LayoutRes int layoutResID) {
        getWindow().setContentView(layoutResID);
        initWindowDecorActionBar();
    }
1.2.2 Activity.java -->getWindow()
返回mWindow对象,此处的mWindow对象实例化为PhoneWindow,实例化过程涉及Activity的启动流程:
PhoneWindow的实例化过程:
在Activity中attach方法内,PhoneWindow以New的方式被实例化成mWindow对象
    final void attach(Context context, ActivityThread aThread,
            Instrumentation instr, IBinder token, int ident,
            Application application, Intent intent, ActivityInfo info,
            CharSequence title, Activity parent, String id,
            NonConfigurationInstances lastNonConfigurationInstances,
            Configuration config, String referrer, IVoiceInteractor voiceInteractor,
            Window window, ActivityConfigCallback activityConfigCallback) {
        attachBaseContext(context);

        mFragments.attachHost(null /*parent*/);
		//PhoneWindow 在这里被实例化出来了
        mWindow = new PhoneWindow(this, window, activityConfigCallback);
        mWindow.setWindowControllerCallback(this);
        mWindow.setCallback(this);
        mWindow.setOnWindowDismissedCallback(this);
        mWindow.getLayoutInflater().setPrivateFactory(this);
        ......
        /*并且在以下代码中,我们可以发现到Activity的相关生命周期的调用*/
        activity.mCalled = false;
        if (r.isPersistable()) {
            mInstrumentation.callActivityOnCreate(activity, r.state, r.persistentState);
        } else {
            mInstrumentation.callActivityOnCreate(activity, r.state);
        }
        if (!activity.mCalled) {
            throw new SuperNotCalledException(
                "Activity " + r.intent.getComponent().toShortString() +
                " did not call through to super.onCreate()");
        }
        r.activity = activity;
        r.stopped = true;
        if (!r.activity.mFinished) {
            activity.performStart();
            r.stopped = false;
        }
        if (!r.activity.mFinished) {
            if (r.isPersistable()) {
                if (r.state != null || r.persistentState != null) {
                    mInstrumentation.callActivityOnRestoreInstanceState(activity, r.state,
                            r.persistentState);
                }
            } else if (r.state != null) {
                mInstrumentation.callActivityOnRestoreInstanceState(activity, r.state);
            }
        }
        if (!r.activity.mFinished) {
            activity.mCalled = false;
            if (r.isPersistable()) {
                mInstrumentation.callActivityOnPostCreate(activity, r.state,
                        r.persistentState);
            } else {
                mInstrumentation.callActivityOnPostCreate(activity, r.state);
            }
            if (!activity.mCalled) {
                throw new SuperNotCalledException(
                    "Activity " + r.intent.getComponent().toShortString() +
                    " did not call through to super.onPostCreate()");
            }
        }
    }
而attach则是在ActivityThread类中的performLaunchActivity被调用:
    private Activity performLaunchActivity(ActivityClientRecord r, Intent customIntent) {
        // System.out.println("##### [" + System.currentTimeMillis() + "] ActivityThread.performLaunchActivity(" + r + ")");

        ......
        Activity activity = null;
        ......

        try {
            Application app = r.packageInfo.makeApplication(false, mInstrumentation);

            ......

            if (activity != null) {
                ......
                appContext.setOuterContext(activity);
                //这里调用了Activity的attach方法,实现了PhoneWindow的初始化
                activity.attach(appContext, this, getInstrumentation(), r.token,
                        r.ident, app, r.intent, r.activityInfo, title, r.parent,
                        r.embeddedID, r.lastNonConfigurationInstances, config,
                        r.referrer, r.voiceInteractor, window, r.configCallback);

                ......
            }
            r.paused = true;

            mActivities.put(r.token, r);

        } catch (SuperNotCalledException e) {
            throw e;

        } catch (Exception e) {
            if (!mInstrumentation.onException(activity, e)) {
                throw new RuntimeException(
                    "Unable to start activity " + component
                    + ": " + e.toString(), e);
            }
        }

        return activity;
    }
So,第1个视图为PhoneWindow对象。
1.2.3 PhoneWindow.java -->setContentView()
重点关注installDecor()方法,对mContentParent进行判断如果为空使用 installDecor()方法安装Decor。
// This is the view in which the window contents are placed. It is either
// mDecor itself, or a child of mDecor where the contents go.
/*
这是放置窗口内容的视图。要么mDecor本身,或者内容所在的mDecor的子级。
*/
ViewGroup mContentParent;
// Whether the client has explicitly set the content view. If false and mContentParent is not null, then the content parent was set due to window preservation.
/*
客户端是否已显式设置内容视图。如果false且mContentParent不为null,则由于窗口保留而设置了内容父级。
*/
private boolean mContentParentExplicitlySet = false;
public void setContentView(int layoutResID) {
// Note: FEATURE_CONTENT_TRANSITIONS may be set in the process of installing the window
// decor, when theme attributes and the like are crystalized. Do not check the feature
// before this happens.
if (mContentParent == null) {
installDecor();
} else if (!hasFeature(FEATURE_CONTENT_TRANSITIONS)) {
mContentParent.removeAllViews();
}
if (hasFeature(FEATURE_CONTENT_TRANSITIONS)) {
final Scene newScene = Scene.getSceneForLayout(mContentParent, layoutResID,
getContext());
transitionTo(newScene);
} else {
mLayoutInflater.inflate(layoutResID, mContentParent);
}
mContentParent.requestApplyInsets();
final Callback cb = getCallback();
if (cb != null && !isDestroyed()) {
cb.onContentChanged();
}
mContentParentExplicitlySet = true;
}
1.2.4 PhoneWindow.java —>installDecor()
installDecor:主要干了两件事:1.创建DecorView 2.拿到ContentParent
mDecor.setWindow(this); :在创建DecorView之后与PhoneWindow关联起来,DecorView为第2个视图
private DecorView mDecor;
private void installDecor() {
mForceDecorInstall = false;
if (mDecor == null) {
mDecor = generateDecor(-1);
mDecor.setDescendantFocusability(ViewGroup.FOCUS_AFTER_DESCENDANTS);
mDecor.setIsRootNamespace(true);
if (!mInvalidatePanelMenuPosted && mInvalidatePanelMenuFeatures != 0) {
mDecor.postOnAnimation(mInvalidatePanelMenuRunnable);
}
} else {
mDecor.setWindow(this);
}
if (mContentParent == null) {
mContentParent = generateLayout(mDecor);
// Set up decor part of UI to ignore fitsSystemWindows if appropriate.
mDecor.makeFrameworkOptionalFitsSystemWindows();
final DecorContentParent decorContentParent = (DecorContentParent) mDecor.findViewById(
R.id.decor_content_parent);
if (decorContentParent != null) {
mDecorContentParent = decorContentParent;
mDecorContentParent.setWindowCallback(getCallback());
if (mDecorContentParent.getTitle() == null) {
mDecorContentParent.setWindowTitle(mTitle);
}
final int localFeatures = getLocalFeatures();
for (int i = 0; i < FEATURE_MAX; i++) {
if ((localFeatures & (1 << i)) != 0) {
mDecorContentParent.initFeature(i);
}
}
mDecorContentParent.setUiOptions(mUiOptions);
if ((mResourcesSetFlags & FLAG_RESOURCE_SET_ICON) != 0 ||
(mIconRes != 0 && !mDecorContentParent.hasIcon())) {
mDecorContentParent.setIcon(mIconRes);
} else if ((mResourcesSetFlags & FLAG_RESOURCE_SET_ICON) == 0 &&
mIconRes == 0 && !mDecorContentParent.hasIcon()) {
mDecorContentParent.setIcon(
getContext().getPackageManager().getDefaultActivityIcon());
mResourcesSetFlags |= FLAG_RESOURCE_SET_ICON_FALLBACK;
}
if ((mResourcesSetFlags & FLAG_RESOURCE_SET_LOGO) != 0 ||
(mLogoRes != 0 && !mDecorContentParent.hasLogo())) {
mDecorContentParent.setLogo(mLogoRes);
}
// Invalidate if the panel menu hasn't been created before this.
// Panel menu invalidation is deferred avoiding application onCreateOptionsMenu
// being called in the middle of onCreate or similar.
// A pending invalidation will typically be resolved before the posted message
// would run normally in order to satisfy instance state restoration.
PanelFeatureState st = getPanelState(FEATURE_OPTIONS_PANEL, false);
if (!isDestroyed() && (st == null || st.menu == null) && !mIsStartingWindow) {
invalidatePanelMenu(FEATURE_ACTION_BAR);
}
} else {
mTitleView = findViewById(R.id.title);
if (mTitleView != null) {
if ((getLocalFeatures() & (1 << FEATURE_NO_TITLE)) != 0) {
final View titleContainer = findViewById(R.id.title_container);
if (titleContainer != null) {
titleContainer.setVisibility(View.GONE);
} else {
mTitleView.setVisibility(View.GONE);
}
mContentParent.setForeground(null);
} else {
mTitleView.setText(mTitle);
}
}
}
if (mDecor.getBackground() == null && mBackgroundFallbackDrawable != null) {
mDecor.setBackgroundFallback(mBackgroundFallbackDrawable);
}
// Only inflate or create a new TransitionManager if the caller hasn't
// already set a custom one.
if (hasFeature(FEATURE_ACTIVITY_TRANSITIONS)) {
if (mTransitionManager == null) {
final int transitionRes = getWindowStyle().getResourceId(
R.styleable.Window_windowContentTransitionManager,
0);
if (transitionRes != 0) {
final TransitionInflater inflater = TransitionInflater.from(getContext());
mTransitionManager = inflater.inflateTransitionManager(transitionRes,
mContentParent);
} else {
mTransitionManager = new TransitionManager();
}
}
mEnterTransition = getTransition(mEnterTransition, null,
R.styleable.Window_windowEnterTransition);
mReturnTransition = getTransition(mReturnTransition, USE_DEFAULT_TRANSITION,
R.styleable.Window_windowReturnTransition);
mExitTransition = getTransition(mExitTransition, null,
R.styleable.Window_windowExitTransition);
mReenterTransition = getTransition(mReenterTransition, USE_DEFAULT_TRANSITION,
R.styleable.Window_windowReenterTransition);
mSharedElementEnterTransition = getTransition(mSharedElementEnterTransition, null,
R.styleable.Window_windowSharedElementEnterTransition);
mSharedElementReturnTransition = getTransition(mSharedElementReturnTransition,
USE_DEFAULT_TRANSITION,
R.styleable.Window_windowSharedElementReturnTransition);
mSharedElementExitTransition = getTransition(mSharedElementExitTransition, null,
R.styleable.Window_windowSharedElementExitTransition);
mSharedElementReenterTransition = getTransition(mSharedElementReenterTransition,
USE_DEFAULT_TRANSITION,
R.styleable.Window_windowSharedElementReenterTransition);
if (mAllowEnterTransitionOverlap == null) {
mAllowEnterTransitionOverlap = getWindowStyle().getBoolean(
R.styleable.Window_windowAllowEnterTransitionOverlap, true);
}
if (mAllowReturnTransitionOverlap == null) {
mAllowReturnTransitionOverlap = getWindowStyle().getBoolean(
R.styleable.Window_windowAllowReturnTransitionOverlap, true);
}
if (mBackgroundFadeDurationMillis < 0) {
mBackgroundFadeDurationMillis = getWindowStyle().getInteger(
R.styleable.Window_windowTransitionBackgroundFadeDuration,
DEFAULT_BACKGROUND_FADE_DURATION_MS);
}
if (mSharedElementsUseOverlay == null) {
mSharedElementsUseOverlay = getWindowStyle().getBoolean(
R.styleable.Window_windowSharedElementsUseOverlay, true);
}
}
}
}
1.2.4.1 PhoneWindow.java —>installDecor() --> mDecor = generateDecor(-1);
主要是上下文的选择以及最后对DecorView的创建,完成目标1创建DecorView
 protected DecorView generateDecor(int featureId) {
        // System process doesn't have application context and in that case we need to directly use
        // the context we have. Otherwise we want the application context, so we don't cling to the
        // activity.
        Context context;
        if (mUseDecorContext) {
            Context applicationContext = getContext().getApplicationContext();
            if (applicationContext == null) {
                context = getContext();
            } else {
                context = new DecorContext(applicationContext, this);
                if (mTheme != -1) {
                    context.setTheme(mTheme);
                }
            }
        } else {
            context = getContext();
        }
        return new DecorView(context, featureId, this, getAttributes());
    }
1.2.4.2 installDecor() --> mContentParent = generateLayout(mDecor);
通过对窗口特征的判断对layoutResource赋值xml ID,其中窗口特征默认的情况下的话会赋值到最后R.layout.screen_simple(这里举例)
随后使用关键方法
mDecor.onResourcesLoaded(mLayoutInflater, layoutResource);
ViewGroup contentParent = (ViewGroup)findViewById(ID_ANDROID_CONTENT);
protected ViewGroup generateLayout(DecorView decor) {
        // Apply data from current theme.

        TypedArray a = getWindowStyle(); //拿到窗口属性 随后在接下来根据窗口属性设置窗口特征

        if (false) {
            System.out.println("From style:");
            String s = "Attrs:";
            for (int i = 0; i < R.styleable.Window.length; i++) {
                s = s + " " + Integer.toHexString(R.styleable.Window[i]) + "="
                        + a.getString(i);
            }
            System.out.println(s);
        }
        ..................     //省略窗口特征的相关部分
        // Inflate the window decor.

        int layoutResource;
        int features = getLocalFeatures();
        // System.out.println("Features: 0x" + Integer.toHexString(features));
        if ((features & ((1 << FEATURE_LEFT_ICON) | (1 << FEATURE_RIGHT_ICON))) != 0) {
            if (mIsFloating) {
                TypedValue res = new TypedValue();
                getContext().getTheme().resolveAttribute(
                        R.attr.dialogTitleIconsDecorLayout, res, true);
                layoutResource = res.resourceId;
            } else {
                layoutResource = R.layout.screen_title_icons;
            }
            // XXX Remove this once action bar supports these features.
            removeFeature(FEATURE_ACTION_BAR);
            // System.out.println("Title Icons!");
        } else if ((features & ((1 << FEATURE_PROGRESS) | (1 << FEATURE_INDETERMINATE_PROGRESS))) != 0
                && (features & (1 << FEATURE_ACTION_BAR)) == 0) {
            // Special case for a window with only a progress bar (and title).
            // XXX Need to have a no-title version of embedded windows.
            layoutResource = R.layout.screen_progress;
            // System.out.println("Progress!");
        } else if ((features & (1 << FEATURE_CUSTOM_TITLE)) != 0) {
            // Special case for a window with a custom title.
            // If the window is floating, we need a dialog layout
            if (mIsFloating) {
                TypedValue res = new TypedValue();
                getContext().getTheme().resolveAttribute(
                        R.attr.dialogCustomTitleDecorLayout, res, true);
                layoutResource = res.resourceId;
            } else {
                layoutResource = R.layout.screen_custom_title;
            }
            // XXX Remove this once action bar supports these features.
            removeFeature(FEATURE_ACTION_BAR);
        } else if ((features & (1 << FEATURE_NO_TITLE)) == 0) {
            // If no other features and not embedded, only need a title.
            // If the window is floating, we need a dialog layout
            if (mIsFloating) {
                TypedValue res = new TypedValue();
                getContext().getTheme().resolveAttribute(
                        R.attr.dialogTitleDecorLayout, res, true);
                layoutResource = res.resourceId;
            } else if ((features & (1 << FEATURE_ACTION_BAR)) != 0) {
                layoutResource = a.getResourceId(
                        R.styleable.Window_windowActionBarFullscreenDecorLayout,
                        R.layout.screen_action_bar);
            } else {
                layoutResource = R.layout.screen_title;
            }
            // System.out.println("Title!");
        } else if ((features & (1 << FEATURE_ACTION_MODE_OVERLAY)) != 0) {
            layoutResource = R.layout.screen_simple_overlay_action_mode;
        } else {
            // Embedded, so no decoration is needed.
            layoutResource = R.layout.screen_simple;
            // System.out.println("Simple!");
        }

        mDecor.startChanging();
        mDecor.onResourcesLoaded(mLayoutInflater, layoutResource);

        ViewGroup contentParent = (ViewGroup)findViewById(ID_ANDROID_CONTENT);
        if (contentParent == null) {
            throw new RuntimeException("Window couldn't find content container view");
        }

        if ((features & (1 << FEATURE_INDETERMINATE_PROGRESS)) != 0) {
            ProgressBar progress = getCircularProgressBar(false);
            if (progress != null) {
                progress.setIndeterminate(true);
            }
        }

        // Remaining setup -- of background and title -- that only applies
        // to top-level windows.
        if (getContainer() == null) {
            mDecor.setWindowBackground(mBackgroundDrawable);

            final Drawable frame;
            if (mFrameResource != 0) {
                frame = getContext().getDrawable(mFrameResource);
            } else {
                frame = null;
            }
            mDecor.setWindowFrame(frame);

            mDecor.setElevation(mElevation);
            mDecor.setClipToOutline(mClipToOutline);

            if (mTitle != null) {
                setTitle(mTitle);
            }

            if (mTitleColor == 0) {
                mTitleColor = mTextColor;
            }
            setTitleColor(mTitleColor);
        }

        mDecor.finishChanging();

        return contentParent;
    }
1.2.4.3 DecorView.java 将R.layout.screen_simple添加到DecorView(FrameLayout)里
这里说DecorView是FrameLayout是因为DecorView继承自FrameLayout
mdecor已经在之前的1.4.1generateDecor()实例化,通过onResourcesLoaded()方法将R.layout.screen_simple加载为root,并通过addview方法加载到mdecor的子布局下。
R.layout.screen_simple为第3个视图
void onResourcesLoaded(LayoutInflater inflater, int layoutResource) {
if (mBackdropFrameRenderer != null) {
loadBackgroundDrawablesIfNeeded();
mBackdropFrameRenderer.onResourcesLoaded(
this, mResizingBackgroundDrawable, mCaptionBackgroundDrawable,
mUserCaptionBackgroundDrawable, getCurrentColor(mStatusColorViewState),
getCurrentColor(mNavigationColorViewState));
}
mDecorCaptionView = createDecorCaptionView(inflater);
final View root = inflater.inflate(layoutResource, null);
if (mDecorCaptionView != null) {
if (mDecorCaptionView.getParent() == null) {
addView(mDecorCaptionView,
new ViewGroup.LayoutParams(MATCH_PARENT, MATCH_PARENT));
}
mDecorCaptionView.addView(root,
new ViewGroup.MarginLayoutParams(MATCH_PARENT, MATCH_PARENT));
} else {
// Put it below the color views.
addView(root, 0, new ViewGroup.LayoutParams(MATCH_PARENT, MATCH_PARENT));
}
mContentRoot = (ViewGroup) root;
initializeElevation();
}
1.2.4.4 随后又将screen_simple(这里举例此布局)里的id为content的framelayout拿到
在 generateLayout()方法末尾将contentParent返回,此ViewGroup对象的实例就是R.layout.screen_simple里id为content的Framelayout。id为content的Framelayout为第4个视图。
ViewGroup contentParent = (ViewGroup)findViewById(ID_ANDROID_CONTENT);
    /**
     * The ID that the main layout in the XML layout file should have.
     */
    public static final int ID_ANDROID_CONTENT = com.android.internal.R.id.content;

1.2.5 PhoneWindow.java -->setContentView(int layoutResID)
installDecor()方法结束之后,setContentView(int layoutResID)继续执行,在下述代码中将自己的layout布局文件填充到mContentParent中。自己的layout布局文件为第5个视图
 if (hasFeature(FEATURE_CONTENT_TRANSITIONS)) {
            final Scene newScene = Scene.getSceneForLayout(mContentParent, layoutResID,
                    getContext());
            transitionTo(newScene);
        } else {
            mLayoutInflater.inflate(layoutResID, mContentParent);
        }
二、AppCompatActivity的视图加载过程
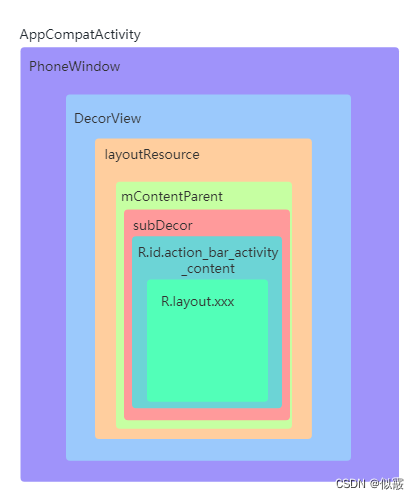
2.1 视图结构
直接上图
2.2 流程分析
2.2.1 AppCompatActivity.java --setContentView(int layoutResID)
 @Override
    public void setContentView(@LayoutRes int layoutResID) {
        initViewTreeOwners();
        getDelegate().setContentView(layoutResID);
    }
initViewTreeOwners()是初始化view树的所有者,这里不多介绍。
getDelegate()方法:
 @NonNull
    public AppCompatDelegate getDelegate() {
        if (mDelegate == null) {
            mDelegate = AppCompatDelegate.create(this, this);
        }
        return mDelegate;
    }
2.2.2 AppCompatDelegate.java --> create(Activity activity, AppCompatCallback callback)
 public static AppCompatDelegate create(@NonNull Activity activity,
            @Nullable AppCompatCallback callback) {
        return new AppCompatDelegateImpl(activity, callback);
    }
2.2.3 AppCompatDelegateImpl.java -->setContentView(int resId)
@Override
    public void setContentView(int resId) {
        ensureSubDecor();
        ViewGroup contentParent = mSubDecor.findViewById(android.R.id.content);
        contentParent.removeAllViews();
        LayoutInflater.from(mContext).inflate(resId, contentParent);
        mAppCompatWindowCallback.getWrapped().onContentChanged();
    }
2.2.4 AppCompatDelegateImpl.java -->ensureSubDecor()
private void ensureSubDecor() {
        if (!mSubDecorInstalled) {
            mSubDecor = createSubDecor();

            // If a title was set before we installed the decor, propagate it now
            CharSequence title = getTitle();
            if (!TextUtils.isEmpty(title)) {
                if (mDecorContentParent != null) {
                    mDecorContentParent.setWindowTitle(title);
                } else if (peekSupportActionBar() != null) {
                    peekSupportActionBar().setWindowTitle(title);
                } else if (mTitleView != null) {
                    mTitleView.setText(title);
                }
            }

            applyFixedSizeWindow();

            onSubDecorInstalled(mSubDecor);

            mSubDecorInstalled = true;

            // Invalidate if the panel menu hasn't been created before this.
            // Panel menu invalidation is deferred avoiding application onCreateOptionsMenu
            // being called in the middle of onCreate or similar.
            // A pending invalidation will typically be resolved before the posted message
            // would run normally in order to satisfy instance state restoration.
            PanelFeatureState st = getPanelState(FEATURE_OPTIONS_PANEL, false);
            if (!mIsDestroyed && (st == null || st.menu == null)) {
                invalidatePanelMenu(FEATURE_SUPPORT_ACTION_BAR);
            }
        }
    }
2.2.5 AppCompatDelegateImpl.java --> createSubDecor()
 private ViewGroup createSubDecor() {
        TypedArray a = mContext.obtainStyledAttributes(R.styleable.AppCompatTheme);
  ................//根据窗口属性设置窗口特征
        ensureWindow();
        mWindow.getDecorView();

        final LayoutInflater inflater = LayoutInflater.from(mContext);
        ViewGroup subDecor = null;
        if (!mWindowNoTitle) {
            if (mIsFloating) {
                // If we're floating, inflate the dialog title decor
                subDecor = (ViewGroup) inflater.inflate(
                        R.layout.abc_dialog_title_material, null);

                // Floating windows can never have an action bar, reset the flags
                mHasActionBar = mOverlayActionBar = false;
            } else if (mHasActionBar) {
                /**
                 * This needs some explanation. As we can not use the android:theme attribute
                 * pre-L, we emulate it by manually creating a LayoutInflater using a
                 * ContextThemeWrapper pointing to actionBarTheme.
                 */
                TypedValue outValue = new TypedValue();
                mContext.getTheme().resolveAttribute(R.attr.actionBarTheme, outValue, true);

                Context themedContext;
                if (outValue.resourceId != 0) {
                    themedContext = new ContextThemeWrapper(mContext, outValue.resourceId);
                } else {
                    themedContext = mContext;
                }

                // Now inflate the view using the themed context and set it as the content view
                subDecor = (ViewGroup) LayoutInflater.from(themedContext)
                        .inflate(R.layout.abc_screen_toolbar, null);

                mDecorContentParent = (DecorContentParent) subDecor
                        .findViewById(R.id.decor_content_parent);
                mDecorContentParent.setWindowCallback(getWindowCallback());

                /**
                 * Propagate features to DecorContentParent
                 */
                if (mOverlayActionBar) {
                    mDecorContentParent.initFeature(FEATURE_SUPPORT_ACTION_BAR_OVERLAY);
                }
                if (mFeatureProgress) {
                    mDecorContentParent.initFeature(Window.FEATURE_PROGRESS);
                }
                if (mFeatureIndeterminateProgress) {
                    mDecorContentParent.initFeature(Window.FEATURE_INDETERMINATE_PROGRESS);
                }
            }
        } else {
            if (mOverlayActionMode) {
                subDecor = (ViewGroup) inflater.inflate(
                        R.layout.abc_screen_simple_overlay_action_mode, null);
            } else {
                subDecor = (ViewGroup) inflater.inflate(R.layout.abc_screen_simple, null);
            }
        }

        if (subDecor == null) {
            throw new IllegalArgumentException(
                    "AppCompat does not support the current theme features: { "
                            + "windowActionBar: " + mHasActionBar
                            + ", windowActionBarOverlay: "+ mOverlayActionBar
                            + ", android:windowIsFloating: " + mIsFloating
                            + ", windowActionModeOverlay: " + mOverlayActionMode
                            + ", windowNoTitle: " + mWindowNoTitle
                            + " }");
        }

        if (Build.VERSION.SDK_INT >= 21) {
            // If we're running on L or above, we can rely on ViewCompat's
            // setOnApplyWindowInsetsListener
            ViewCompat.setOnApplyWindowInsetsListener(subDecor, new OnApplyWindowInsetsListener() {
                        @Override
                        public WindowInsetsCompat onApplyWindowInsets(View v,
                                WindowInsetsCompat insets) {
                            final int top = insets.getSystemWindowInsetTop();
                            final int newTop = updateStatusGuard(insets, null);

                            if (top != newTop) {
                                insets = insets.replaceSystemWindowInsets(
                                        insets.getSystemWindowInsetLeft(),
                                        newTop,
                                        insets.getSystemWindowInsetRight(),
                                        insets.getSystemWindowInsetBottom());
                            }

                            // Now apply the insets on our view
                            return ViewCompat.onApplyWindowInsets(v, insets);
                        }
                    });
        } else if (subDecor instanceof FitWindowsViewGroup) {
            // Else, we need to use our own FitWindowsViewGroup handling
            ((FitWindowsViewGroup) subDecor).setOnFitSystemWindowsListener(
                    new FitWindowsViewGroup.OnFitSystemWindowsListener() {
                        @Override
                        public void onFitSystemWindows(Rect insets) {
                            insets.top = updateStatusGuard(null, insets);
                        }
                    });
        }

        if (mDecorContentParent == null) {
            mTitleView = (TextView) subDecor.findViewById(R.id.title);
        }

        // Make the decor optionally fit system windows, like the window's decor
        ViewUtils.makeOptionalFitsSystemWindows(subDecor);

        final ContentFrameLayout contentView = (ContentFrameLayout) subDecor.findViewById(
                R.id.action_bar_activity_content);

        final ViewGroup windowContentView = (ViewGroup) mWindow.findViewById(android.R.id.content);
        if (windowContentView != null) {
            // There might be Views already added to the Window's content view so we need to
            // migrate them to our content view
            while (windowContentView.getChildCount() > 0) {
                final View child = windowContentView.getChildAt(0);
                windowContentView.removeViewAt(0);
                contentView.addView(child);
            }

            // Change our content FrameLayout to use the android.R.id.content id.
            // Useful for fragments.
            windowContentView.setId(View.NO_ID);
            contentView.setId(android.R.id.content);

            // The decorContent may have a foreground drawable set (windowContentOverlay).
            // Remove this as we handle it ourselves
            if (windowContentView instanceof FrameLayout) {
                ((FrameLayout) windowContentView).setForeground(null);
            }
        }

        // Now set the Window's content view with the decor
        mWindow.setContentView(subDecor);

        contentView.setAttachListener(new ContentFrameLayout.OnAttachListener() {
            @Override
            public void onAttachedFromWindow() {}

            @Override
            public void onDetachedFromWindow() {
                dismissPopups();
            }
        });

        return subDecor;
    }
2.2.5.1 AppCompatDelegateImpl.java -->ensureWindow()
主要还是获取Window的实例对象PhoneWindow,涉及Activity的启动流程,在此不作过多介绍。
第1个视图:PhoneWindow
private void ensureWindow() {
        // We lazily fetch the Window for Activities, to allow DayNight to apply in
        // attachBaseContext
        if (mWindow == null && mHost instanceof Activity) {
            attachToWindow(((Activity) mHost).getWindow());
        }
        if (mWindow == null) {
            throw new IllegalStateException("We have not been given a Window");
        }
    }
 private void attachToWindow(@NonNull Window window) {
        if (mWindow != null) {
            throw new IllegalStateException(
                    "AppCompat has already installed itself into the Window");
        }

        final Window.Callback callback = window.getCallback();
        if (callback instanceof AppCompatWindowCallback) {
            throw new IllegalStateException(
                    "AppCompat has already installed itself into the Window");
        }
        mAppCompatWindowCallback = new AppCompatWindowCallback(callback);
        // Now install the new callback
        window.setCallback(mAppCompatWindowCallback);

        final TintTypedArray a = TintTypedArray.obtainStyledAttributes(
                mContext, null, sWindowBackgroundStyleable);
        final Drawable winBg = a.getDrawableIfKnown(0);
        if (winBg != null) {
            // Now set the background drawable
            window.setBackgroundDrawable(winBg);
        }
        a.recycle();

        mWindow = window;
    }
public Window getWindow() {
        return mWindow;
    }
2.2.5.2 AppCompatDelegateImpl.java -->mWindow.getDecorView()
–>PhoneWindow.java -->getDecorView()
DecorView关联到Window上,第2个视图:DecorView
R.layout.screen_simple为第3个视图:DecorView
id为content的Framelayout为第4个视图:DecorView
和Activity的setContentView()流程类似
@Override
    public final @NonNull View getDecorView() {
        if (mDecor == null || mForceDecorInstall) {
            installDecor();
        }
        return mDecor;
    }
 private void installDecor() {
        ....................

此处代码在Activity的视图加载过程已有分析

 //1.创建DecorView  和window关联  2.拿到ContentParent

}
2.2.5.3 继续看createSubDecor()方法,在执行完mWindow.getDecorView()方法后,对subDecor的操作。
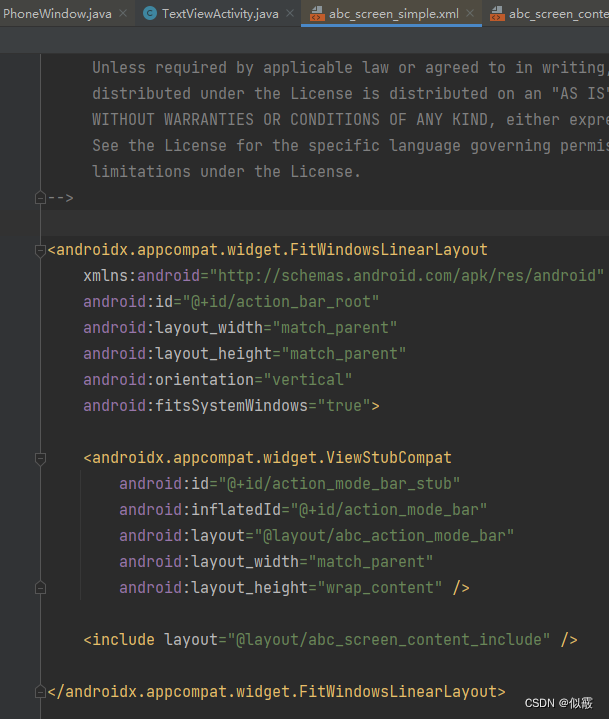
通过对窗口特征的判断,使用布局加载器加载相应的xml文件实例化subDecor,这里举例加载文件为R.layout.abc_screen_simple。
final LayoutInflater inflater = LayoutInflater.from(mContext);
        ViewGroup subDecor = null;


        if (!mWindowNoTitle) {
            if (mIsFloating) {
                // If we're floating, inflate the dialog title decor
                subDecor = (ViewGroup) inflater.inflate(
                        R.layout.abc_dialog_title_material, null);

                // Floating windows can never have an action bar, reset the flags
                mHasActionBar = mOverlayActionBar = false;
            } else if (mHasActionBar) {
                /**
                 * This needs some explanation. As we can not use the android:theme attribute
                 * pre-L, we emulate it by manually creating a LayoutInflater using a
                 * ContextThemeWrapper pointing to actionBarTheme.
                 */
                TypedValue outValue = new TypedValue();
                mContext.getTheme().resolveAttribute(R.attr.actionBarTheme, outValue, true);

                Context themedContext;
                if (outValue.resourceId != 0) {
                    themedContext = new ContextThemeWrapper(mContext, outValue.resourceId);
                } else {
                    themedContext = mContext;
                }

                // Now inflate the view using the themed context and set it as the content view
                subDecor = (ViewGroup) LayoutInflater.from(themedContext)
                        .inflate(R.layout.abc_screen_toolbar, null);

                mDecorContentParent = (DecorContentParent) subDecor
                        .findViewById(R.id.decor_content_parent);
                mDecorContentParent.setWindowCallback(getWindowCallback());

                /**
                 * Propagate features to DecorContentParent
                 */
                if (mOverlayActionBar) {
                    mDecorContentParent.initFeature(FEATURE_SUPPORT_ACTION_BAR_OVERLAY);
                }
                if (mFeatureProgress) {
                    mDecorContentParent.initFeature(Window.FEATURE_PROGRESS);
                }
                if (mFeatureIndeterminateProgress) {
                    mDecorContentParent.initFeature(Window.FEATURE_INDETERMINATE_PROGRESS);
                }
            }
        } else {
            if (mOverlayActionMode) {
                subDecor = (ViewGroup) inflater.inflate(
                        R.layout.abc_screen_simple_overlay_action_mode, null);
            } else {
                subDecor = (ViewGroup) inflater.inflate(R.layout.abc_screen_simple, null);
            }
        }

        if (subDecor == null) {
            throw new IllegalArgumentException(
                    "AppCompat does not support the current theme features: { "
                            + "windowActionBar: " + mHasActionBar
                            + ", windowActionBarOverlay: "+ mOverlayActionBar
                            + ", android:windowIsFloating: " + mIsFloating
                            + ", windowActionModeOverlay: " + mOverlayActionMode
                            + ", windowNoTitle: " + mWindowNoTitle
                            + " }");
        }

        if (Build.VERSION.SDK_INT >= 21) {
            // If we're running on L or above, we can rely on ViewCompat's
            // setOnApplyWindowInsetsListener
            ViewCompat.setOnApplyWindowInsetsListener(subDecor, new OnApplyWindowInsetsListener() {
                        @Override
                        public WindowInsetsCompat onApplyWindowInsets(View v,
                                WindowInsetsCompat insets) {
                            final int top = insets.getSystemWindowInsetTop();
                            final int newTop = updateStatusGuard(insets, null);

                            if (top != newTop) {
                                insets = insets.replaceSystemWindowInsets(
                                        insets.getSystemWindowInsetLeft(),
                                        newTop,
                                        insets.getSystemWindowInsetRight(),
                                        insets.getSystemWindowInsetBottom());
                            }

                            // Now apply the insets on our view
                            return ViewCompat.onApplyWindowInsets(v, insets);
                        }
                    });
        } else if (subDecor instanceof FitWindowsViewGroup) {
            // Else, we need to use our own FitWindowsViewGroup handling
            ((FitWindowsViewGroup) subDecor).setOnFitSystemWindowsListener(
                    new FitWindowsViewGroup.OnFitSystemWindowsListener() {
                        @Override
                        public void onFitSystemWindows(Rect insets) {
                            insets.top = updateStatusGuard(null, insets);
                        }
                    });
        }

        if (mDecorContentParent == null) {
            mTitleView = (TextView) subDecor.findViewById(R.id.title);
        }

        // Make the decor optionally fit system windows, like the window's decor
        ViewUtils.makeOptionalFitsSystemWindows(subDecor);
2.2.5.4 ID替换
contentView拿到R.layout.abc_screen_simple的action_bar_activity_content子布局
windowContentView拿到id为content的Framelayout,即当前视图结构的第4个视图
随后将第4个视图的子视图逐一移除并添加到contentView里
windowContentView的id设为NO_ID
contentView的id设为content
随后执行mWindow.setContentView(subDecor);并将subdecor返回。
        final ContentFrameLayout contentView = (ContentFrameLayout) subDecor.findViewById(
                R.id.action_bar_activity_content);

        final ViewGroup windowContentView = (ViewGroup) mWindow.findViewById(android.R.id.content);
        if (windowContentView != null) {
            // There might be Views already added to the Window's content view so we need to
            // migrate them to our content view
            while (windowContentView.getChildCount() > 0) {
                final View child = windowContentView.getChildAt(0);
                windowContentView.removeViewAt(0);
                contentView.addView(child);
            }

            // Change our content FrameLayout to use the android.R.id.content id.
            // Useful for fragments.
            windowContentView.setId(View.NO_ID);
            contentView.setId(android.R.id.content);

            // The decorContent may have a foreground drawable set (windowContentOverlay).
            // Remove this as we handle it ourselves
            if (windowContentView instanceof FrameLayout) {
                ((FrameLayout) windowContentView).setForeground(null);
            }
        }

        // Now set the Window's content view with the decor
        mWindow.setContentView(subDecor);

        contentView.setAttachListener(new ContentFrameLayout.OnAttachListener() {
            @Override
            public void onAttachedFromWindow() {}

            @Override
            public void onDetachedFromWindow() {
                dismissPopups();
            }
        });

        return subDecor;
    }

2.2.5.5 mWindow.setContentView(subDecor)
执行了如下的方法,可以看到此时mContentParent 已经不为空,还是xml文件(这里举例)R.layout.screen_simple里id为Content的子布局,并且将subdecor加载到Content自己的子布局下。
subdecor为第5个视图
改名前id名为action_bar_activity_content的布局为第6个视图
2.2.6 退出createSubDecor(),退出ensureSubDecor(),关于布局加载的代码已经完毕
此时回到了setContentView()方法,
ViewGroup contentParent = mSubDecor.findViewById(android.R.id.content);
此时id为content的布局为R.layout.abc_screen_simple的子布局action_bar_activity_content,当然了,在上一个步骤里,他已经被改名content了。
contentParent.removeAllViews();//移除自身的所有子布局
LayoutInflater.from(mContext).inflate(resId, contentParent); //将自己的R.layout.xxx添加进来
自己的R.layout.xxx为第7个视图
   public void setContentView(int resId) {
        ensureSubDecor();
        ViewGroup contentParent = mSubDecor.findViewById(android.R.id.content);
        contentParent.removeAllViews();
        LayoutInflater.from(mContext).inflate(resId, contentParent);
        mAppCompatWindowCallback.getWrapped().onContentChanged();
    }
三、总结
每个Activity都会获得一个窗口,那就是Window,它用于绘制用户的UI界面
Window是一个抽象类,提供了绘制窗口的一组通用API,PhoneWindow是它的唯一实现类
DecorView是所有应用窗口的根节点。是FrameLayout的子类
PhoneWindow内部实现xml布局文件的加载,容器为根据feature进行加载的对应的layout布局中android:id="@android:id/content"的ViewGroup类型的容器(AppCompatActivity)