最近在做一个类似博客之类的页面,所以就打算借助wangEditor这一富文本编辑器来实现项目的需求。主要使用SpringBoot+JSP+LayUi来完成。
一.导入wangEditor.js
我自己使用的是wangEditor.min.js,通过手工导入的方式放在项目的静态文件下来引用。
- 下载地址:wangEditor.min.js
- 也可以自己去官网下载,直接搜wangEditor就可以
二.新建一个jsp页面
我这个项目使用的是jsp,见笑了,这都老掉牙的东西了。不过对后端程序员来说有时候是真的好用,还有一个thymeleaf可以替代jsp的使用,功能也更加的强大。
新建页面article_publish.jsp
主要代码如下:
<html>
<head>
    <meta charset="UTF-8">
    <title>文章编辑-blog</title>
</head>
<body>
<form class="layui-form layui-col-space5">
<%--    <input type="hidden" name="blogId" value="">--%>
    <div class="layui-inline layui-show-xs-block">
        <input type="text" name="title" placeholder="*输入文章标题(必填)" autocomplete="off"
               class="layui-input" lay-verify="required">
    </div>
    <div class="layui-inline layui-show-xs-block">
        <button class="layui-btn" lay-submit="" lay-filter="submit">
            提交
        </button>
    </div>
    <div class="layui-inline layui-show-xs-block">
        <button  type="button" class="layui-btn layui-btn-normal" id="preview">
            预览
        </button>
    </div>
    <div class="layui-inline layui-show-xs-block">
        <button  type="button" class="layui-btn layui-btn-danger" id="clear">
            清除
        </button>
    </div>
    <!-- 添加一个div用来显示富文本编辑器 -->
    <div id="editor" class="layui-inline layui-show-xs-block" ></div>
    <div class="layui-inline layui-show-xs-block">
        <textarea name="content" id="text1" style="display: none"></textarea>
    </div>
</form>

<!-- 注意, 只需要引用 JS,无需引用任何 CSS !!!-->
<script src="${pageContext.request.contextPath}/resources/js/jquery-1.9.1.min.js"></script>
<script src="${pageContext.request.contextPath}/resources/js/wangEditor.js"></script>
<script type="text/javascript">
    var E = window.wangEditor	/* 创建一个对象 */
    var editor = new E('#editor')
    // 上传图片到服务器,后面加上图片地址
    editor.config.uploadImgServer = '${pageContext.request.contextPath}/gen/article/upload.do'

    editor.config.withCredentials = true
    editor.config.uploadImgShowBase64 = true;   // 使用 base64 保存图片
    // 3M
    editor.config.uploadImgMaxSize = 3 * 1024 * 1024;
    // 限制一次最多上传 5 张图片
    editor.config.uploadImgMaxLength = 5;
    //自定义文件名
    editor.config.uploadFileName = 'myFileName'

    // 将 timeout 时间改为 5s
    editor.config.uploadImgTimeout = 50000;
    var $text1 = $("#text1");
    /* 添加onchange事件实现textarea提交 */
    editor.config.onchange = function (html) {
        // 监控变化,同步更新到 textarea
        $text1.val(html)
    }

    // 隐藏"网络图片"tab
    editor.config.showLinkImg = false;

    editor.config.uploadImgHooks = {
        before: function (xhr, editor, files) {
            // 图片上传之前触发
            // xhr 是 XMLHttpRequst 对象,editor 是编辑器对象,files 是选择的图片文件

            // 如果返回的结果是 {prevent: true, msg: 'xxxx'} 则表示用户放弃上传
            // return {
            //     prevent: true,
            //     msg: '放弃上传'
            // }
            // alert("前奏");
        },
        success: function (xhr, editor, result) {
           // 图片上传并返回结果,图片插入成功之后触发
            // xhr 是 XMLHttpRequst 对象,editor 是编辑器对象,result 是服务器端返回的结果
            var url = result.data;
            alert(JSON.stringify(url));
            editor.txt.append(url);
            alert("成功");
        },
        fail: function (xhr, editor, result) {
            // 图片上传并返回结果,但图片插入错误时触发
            // xhr 是 XMLHttpRequst 对象,editor 是编辑器对象,result 是服务器端返回的结果
            alert("图片插入失败");
        },
        error: function (xhr, editor) {
            // 图片上传出错时触发
            // xhr 是 XMLHttpRequst 对象,editor 是编辑器对象
            alert("图片上传错误");
        },
        // 如果服务器端返回的不是 {errno:0, data: [...]} 这种格式,可使用该配置
        // (但是,服务器端返回的必须是一个 JSON 格式字符串!!!否则会报错)
        customInsert: function (insertImg, result, editor) {
            var url =result.data;//获取后台返回的url
            console.log(result.data)
            insertImg(url);
        }
    }

    //上传视频
    editor.config.uploadVideoServer = 'uploadVideo'

    editor.config.uploadVideoHooks = {
        customInsert: function (insertImg, result, editor) {
            var url =result.data;//获取后台返回的url
            console.log("video url = " + url)
            insertImg(url);
        }
    };
    editor.create()
    $(".w-e-text-container").css("height", "700px")

    layui.use(['form'], function(){
        var form = layui.form
            ,layer = layui.layer
            ,$ = layui.$;

        $('#clear').on('click',function () {
            editor.txt.clear()
        })

        //预览
        $('#preview').on('click',function () {
             var w = ($(window).width() * 0.8);
             var h = ($(window).height() - 20);

            layer.open({
                resize: true,
                title: '文章预览',
                shadeClose: true,
                area: [w + 'px', h + 'px'],
                type: 2,
                content: '${pageContext.request.contextPath}/gen/article/preview.do',
                success: function (layero, index) {
                    var body = layer.getChildFrame('body', index);
                    body.find('#content').append(editor.txt.html());
                }
            });
        });

        //提交
        form.on("submit(submit)", function (data) {
            var datas = data.field;
            console.log(datas);
            // 提交信息
            $.post("${pageContext.request.contextPath}/gen/article/save.do", datas, function (res) {
                if (res.success) {
                    layer.msg("数据保存成功。", {time: 3000});
                    var index = parent.layer.getFrameIndex(window.name);
                    parent.layer.close(index);
                }else{
                    if(res.loseSession=='loseSession'){
                        loseSession(res.msg,res.url)
                    }else{
                        layer.msg(res.msg, {time: 2000});
                    }
                }
            },'json');
            return false;
        });


    });
</script>
</body>
</html>
三.后端接口实现
这里富文本编辑器的图片先上传到本地,下一篇会讲上传到七牛云上。
- 上传到本地的接口
/**
     * 图片上传到本地
     * @param file
     * @param request
     * @return
     */
    @RequestMapping("/upload")
    @ResponseBody
    public Map<String, String> upload(@RequestParam(value="myFileName") MultipartFile file, HttpServletRequest request) {
        String separator = System.getProperty("file.separator");
        separator=separator.replaceAll("\\\\","/");
        //获取项目路径+端口号 比如:http://localhost:8080/
        String basePath = request.getScheme() + "://" + request.getServerName() + ":"
                + request.getServerPort() +request.getContextPath()+ separator;
        try {
            String filePath="";
            //获取源文件
            filePath="D:/imgUploads/" ;//存储地址,此处也可以在application.yml中配置对象用@Value("${*.**}")注解注入内容
            String filename = file.getOriginalFilename();//获取图片名
            String[] names=filename.split("\\.");//获取后缀格式
            String uploadFileName=UUID.randomUUID().toString()+"."+names[names.length-1];//生成新图片
            File targetFile = new File (filePath,uploadFileName);//目标文件
            if (!targetFile.getParentFile().exists()){
                targetFile.getParentFile().mkdirs();
            }
            //传图片一步到位
            file.transferTo(targetFile);
            Map<String, String> map = new HashMap<String, String>();
            map.put("data",basePath+"imgUploads/"+uploadFileName);//这里应该是项目路径,返回前台url
            return map;
        } catch (Exception e) {
            // TODO Auto-generated catch block
            e.printStackTrace();
            return  null;
        }
    }
- 图片上传到本地,WebMvcConfigurerAdapter拦截器应该要有如下配置来解析资源:
import org.springframework.context.annotation.Bean;
import org.springframework.context.annotation.Configuration;
import org.springframework.web.servlet.HandlerInterceptor;
import org.springframework.web.servlet.config.annotation.InterceptorRegistry;
import org.springframework.web.servlet.config.annotation.ResourceHandlerRegistry;
import org.springframework.web.servlet.config.annotation.WebMvcConfigurerAdapter;


@Configuration
public class WebMvcConfigurer extends WebMvcConfigurerAdapter {
    @Override
    public void addInterceptors(InterceptorRegistry registry) {
        //注册拦截器 拦截规则
        //多个拦截器时 以此添加 执行顺序按添加顺序
        //指向外部目录
    }

    @Override
    public void addResourceHandlers(ResourceHandlerRegistry registry){
        //指向外部目录
        //注:param1是指定的要上传的文件夹位置(去掉盘符,在最后添加“/**” 例如:“imgUploads/**”)
        // param2是指定的文件夹位置(带盘符,在前面要加上“file” 例如:“file:D:/imgUploads/”)
        registry.addResourceHandler("imgUploads/**").addResourceLocations("file:D:/imgUploads/");
        super.addResourceHandlers(registry);
    }
}
四.实现效果
将富文本编辑器中的文本提交到数据库中。
我这里使用了一个 标签来获取编辑器中的文本内容,在通过form表单提交。实现效果
上传文本和图片
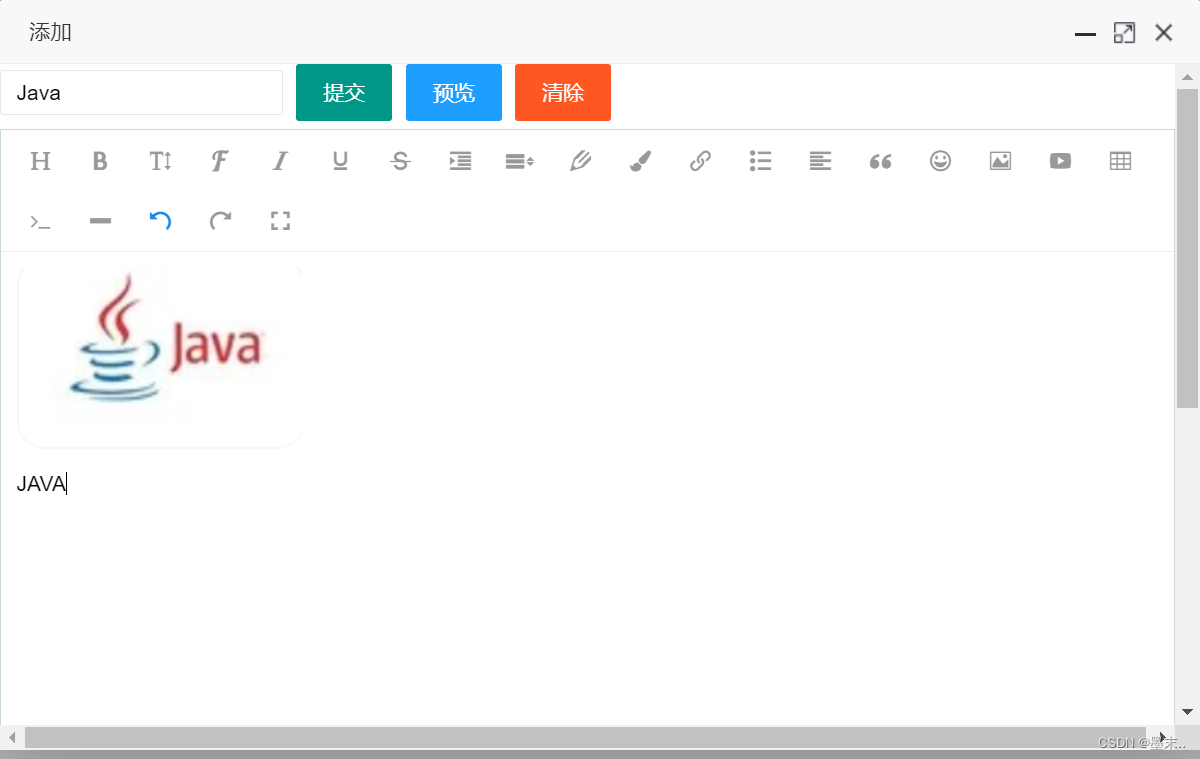
可以看到图片已经成功上传并且回显到富文本编辑器中了。
本文含有隐藏内容,请 开通VIP 后查看