题目:

服务器IP地址规划:client:12.0.0.12/24,网关服务器:ens36:12.0.0.1/24、ens33:192.168.10.1/24,Web1:192.168.10.10/24,Web2:192.168.10.20/24,Nginx:192.168.10.101/24。
1)在Nginx服务器上搭建LNMP服务,并且能够对外提供Discuz论坛服务。
在Web1、Web2服务器上搭建Tomcat 服务。
2)为nginx服务配置虚拟主机,新增两个域名 www.kgc.com 和 www.benet.com,使用http://www.kgc.com/index.php可访问上一题的Discuz论坛页面。
使用http://www.benet.com则访问/var/www/html目录中的index.html文件的内容,内容自定义。
3)对基于www.benet.com域名的虚拟机主机的nginx服务调优:隐藏nginx版本号,缓存静态图片网页时间为1天,设置防盗链功能。
4)网关服务器搭建NFS服务,提供的文件系统使用LVM类型,共享目录名称为/opt/nfs;要求根据日期对Discuz论坛服务的访问日志进行日志分割,要求每天生成一份日志文件,保存到NFS服务共享的目录内
5)要求配置location匹配请求地址http://www.kgc.com/test/XXXX,使用户访问该路径下的文件时返回/var/share/nginx/html/目录下的文件内容。
要求使用rewrite将使用域名www.benet.com 请求以 .php 结尾的访问都跳转到域名www.kgc.com上,而且后面的参数保持不变,比如访问http://www.benet.com/bbs/index.php跳转到http://www.kgc.com/bbs/index.php。
6)在Nginx服务器上对基于www.benet.com域名的虚拟机主机设置动静分离由nginx提供静态页面服务,将对 .jsp文件的动态页面请求转发到Tomcat 服务器处理,并实现负载均衡
7)在网关服务器上设置SNAT/DNAT,使client使用网关服务器的ens36接口的IP地址访问也可实现上一题的效果。
实验:

7-1为Nginx;7-2和7-3为Web服务器;7-4为网关服务器;7-5为客户机Client
配置网关7-4


1.在Nginx服务器上搭建LNMP服务,并且能够对外提供Discuz论坛服务。在Web1、Web2服务器上搭建Tomcat 服务。
7-1为Nginx服务器
1.安装Nginx
cd /opt
tar zxvf nginx-1.22.0.tar.gz -C /opt/


cd nginx-1.22.0/
./configure \
--prefix=/usr/local/nginx \				            #指定nginx的安装路径
--user=nginx \										#指定用户名
--group=nginx \										#指定组名
--with-http_stub_status_module						#启用 http_stub_status_module 模块以支持状态统计

cd nginx-1.22.0/
./configure \
--prefix=/usr/local/nginx \
--user=nginx \
--group=nginx \
--with-http_stub_status_module

make && make install

ln -s /usr/local/nginx/sbin/nginx /usr/local/sbin/
#让系统识别nginx的操作命令可以自动补全   nginx     $PATH

添加Nginx系统服务   systemctl  start   nginx
tee /lib/systemd/system/nginx.service   <<eof
[Unit]
Description=nginx
After=network.target
[Service]
Type=forking
PIDFile=/usr/local/nginx/logs/nginx.pid
ExecStart=/usr/local/nginx/sbin/nginx
ExecReload=/bin/kill -1 $MAINPID
ExecStop=/bin/kill -3 $MAINPID
PrivateTmp=true
[Install]
WantedBy=multi-user.target
eof


systemctl   daemon-reload
chmod 777 /lib/systemd/system/nginx.service

systemctl enable --now nginx.service
2.安装数据库
准备好本次的安装包 :mysql-boost-5.7.20.tar.gz

1、安装Mysql环境依赖包
yum -y install \
ncurses \
ncurses-devel \
bison \
cmake


yum -y install gcc gcc-c++ cmake bison bison-devel zlib-devel libcurl-devel libarchive-devel boost-devel   ncurses-devel gnutls-devel libxml2-devel openssl-devel libevent-devel libaio-devel


2、创建运行用户
useradd -M -s /sbin/nologin  mysql

3、编译安装
cd /opt
tar zxvf mysql-boost-5.7.20.tar.gz

cd /opt/mysql-5.7.20/
cmake \
-DCMAKE_INSTALL_PREFIX=/usr/local/mysql \
-DMYSQL_UNIX_ADDR=/usr/local/mysql/mysql.sock \
-DSYSCONFDIR=/etc \
-DSYSTEMD_PID_DIR=/usr/local/mysql \
-DDEFAULT_CHARSET=utf8  \
-DDEFAULT_COLLATION=utf8_general_ci \
-DWITH_EXTRA_CHARSETS=all \
-DWITH_INNOBASE_STORAGE_ENGINE=1 \
-DWITH_ARCHIVE_STORAGE_ENGINE=1 \
-DWITH_BLACKHOLE_STORAGE_ENGINE=1 \
-DWITH_PERFSCHEMA_STORAGE_ENGINE=1 \
-DMYSQL_DATADIR=/usr/local/mysql/data \
-DWITH_BOOST=boost \
-DWITH_SYSTEMD=1

make && make install

4、修改mysql 配置文件
vim /etc/my.cnf
[client]
port = 3306
socket=/usr/local/mysql/mysql.sock

[mysqld]
user = mysql
basedir=/usr/local/mysql
datadir=/usr/local/mysql/data
port = 3306
character-set-server=utf8
pid-file = /usr/local/mysql/mysqld.pid
socket=/usr/local/mysql/mysql.sock
bind-address = 0.0.0.0
skip-name-resolve
max_connections=2048
default-storage-engine=INNODB
max_allowed_packet=16M
server-id = 1

sql_mode=NO_ENGINE_SUBSTITUTION,STRICT_TRANS_TABLES,NO_AUTO_CREATE_USER,NO_AUTO_VALUE_ON_ZERO,NO_ZERO_IN_DATE,NO_ZERO_DATE,ERROR_FOR_DIVISION_BY_ZERO,PIPES_AS_CONCAT,ANSI_QUOTES


5、更改mysql安装目录和配置文件的属主属组
chown -R mysql:mysql /usr/local/mysql/
chown mysql:mysql /etc/my.cnf

6、设置路径环境变量
echo 'export PATH=/usr/local/mysql/bin:/usr/local/mysql/lib:$PATH' >> /etc/profile
source /etc/profile


7、初始化数据库
cd /usr/local/mysql/bin/
./mysqld \
--initialize-insecure \
--user=mysql \
--basedir=/usr/local/mysql \
--datadir=/usr/local/mysql/data


8、添加mysqld系统服务
cp /usr/local/mysql/usr/lib/systemd/system/mysqld.service /usr/lib/systemd/system/
systemctl daemon-reload
systemctl start mysqld.service
systemctl enable mysqld

9、修改mysql 的登录密码
mysqladmin -u root -p password "abc123"
给root账号设置密码为abc123,提示输入的是原始密码(为空)要求输入的是原密码直接回车即可


10、授权远程登录
mysql -u root -p
3.安装php软件
php的编译安装

本次使用的php软件包为:php-7.1.10.tar.bz2

1、安装环境依赖包
yum -y install gd \
libjpeg libjpeg-devel \
libpng libpng-devel \
freetype freetype-devel \
libxml2 libxml2-devel \
zlib zlib-devel \
curl curl-devel \
openssl openssl-devel

2、编译安装
cd /opt
tar jxvf php-7.1.10.tar.bz2

cd php-7.1.10
./configure \
--prefix=/usr/local/php \
--with-mysql-sock=/usr/local/mysql/mysql.sock \
--with-mysqli \
--with-zlib \
--with-curl \
--with-gd \
--with-jpeg-dir \
--with-png-dir \
--with-freetype-dir \
--with-openssl \
--enable-fpm \
--enable-mbstring \
--enable-xml \
--enable-session \
--enable-ftp \
--enable-pdo \
--enable-tokenizer \
--enable-zip

make && make install


3、路径优化
ln -s /usr/local/php/bin/* /usr/local/bin/
ln -s /usr/local/php/sbin/* /usr/local/sbin/


4、调整PHP配置文件
php有三个配置文件:
php.ini			主配置文件
php-fpm.conf	进程服务配置文件
www.conf		扩展配置文件


#调整主配置文件:
cp /opt/php-7.1.10/php.ini-development /usr/local/php/lib/php.ini
vim /usr/local/php/lib/php.ini
--1170行--修改
mysqli.default_socket = /usr/local/mysql/mysql.sock
--939行--取消注释,修改
date.timezone = Asia/Shanghai

php -m 					#验证安装的模块


#调整进程服务配置文件:
cd /usr/local/php/etc/
cp  php-fpm.conf.default php-fpm.conf
vim php-fpm.conf
--17行--去掉";"注释
pid = run/php-fpm.pid

#调整扩展配置文件:
cd /usr/local/php/etc/php-fpm.d/
cp www.conf.default www.conf

5、启动php-fpm
/usr/local/php/sbin/php-fpm -c /usr/local/php/lib/php.ini
netstat -anpt | grep 9000

#PHP-FPM(FastCGI Process Manager:FastCGI 进程管理器)是一个 PHPFastCGI 管理器, 由于Nginx服务器不能处理动态页面,需要由 Nginx 把动态请求交给 php-fpm 进程进行解析。

cd /opt/php-7.1.10/sapi/fpm
cp php-fpm.service /usr/lib/systemd/system/php-fpm.service
systemctl restart php-fpm.service
4.配置nginx支持php
vim /usr/local/nginx/conf/nginx.conf
--65行--取消注释,修改
location ~ \.php$ {
	root           html;   $document_root
	fastcgi_pass   127.0.0.1:9000;
	fastcgi_index  index.php;
	fastcgi_param  SCRIPT_FILENAME  /usr/local/nginx/html$fastcgi_script_name;	#将 /scripts 修改为nginx的工作目录
   #fastcgi_param  SCRIPT_FILENAME $document_root$fastcgi_script_name;  #$document_root 代表当前请求在root指令中指定的值
	include        fastcgi_params;
}

systemctl restart nginx.service

验证PHP 测试页
vim /usr/local/nginx/html/index.php
<?php
phpinfo();
?>

验证lnmp的是否搭建成功:
192.168.44.40/index.php


验证数据库工作是否正常
mysql -u root -pabc123
CREATE DATABASE bbs;
GRANT all ON bbs.* TO 'bbsuser'@'%' IDENTIFIED BY 'admin123';
GRANT all ON bbs.* TO 'bbsuser'@'localhost' IDENTIFIED BY 'admin123';
flush privileges;

vim /usr/local/nginx/html/index.php      		#替换原来的测试页内容
<?php
$link=mysqli_connect('192.168.233.21','bbsuser','admin123');
if($link) echo "<h1>Success!!</h1>";
else echo "Fail!!";
?>

浏览器访问
http://192.168.91.100/index.php
5.安装论坛
【部署 Discuz!社区论坛 Web 应用】
cd /opt
unzip Discuz_X3.4_SC_UTF8.zip
cd /opt/dir_SC_UTF8/
cp -r upload/ /usr/local/nginx/html/bbs/

调整论坛目录的权限:
cd /usr/local/nginx/html/bbs/
chown -R nginx ./config/
chown -R nginx ./data/
chown -R nginx ./uc_client/
chown -R nginx ./uc_server/
都要处理
chmod -R 777 ./config/
chmod -R 777 ./data/
chmod -R 777 ./uc_client/
chmod -R 777 ./uc_server/

论坛页面访问
http://192.168.91.100/bbs/install/index.php
----------------------------------------------------------------------------------------------------------
数据库服务器:localhost     ###本地架设就用localhost,如何不是在在本机上就要填写IP地址和端口号
数据库名字:bbs
数据库用户名:bbsuser
数据库密码:admin123
管理员账号:admin
管理员密码:admin123

安装完后访问论坛页面:
http://192.168.44.40/bbs/index.php

http://192.168.44.40/bbs/admin.php
6.浏览器访问页面

7.Web服务器7-2和7-3安装tomcat
1.安装jdk
[root@localhost data]# yum install jdk-8u291-linux-x64.rpm

[root@localhost data]# vim /etc/profile.d/jdk.sh

[root@localhost data]#cat /etc/profile.d/jdk.sh
export JAVA_HOME=/usr/local/jdk
export PATH=$JAVA_HOME/bin:$PATH
export JRE_HOME=$JAVA_HOME/jre
export CLASSPATH=$JAVA_HOME/lib/:$JRE_HOME/lib/


[root@localhost data]# . /etc/profile.d/jdk.sh
[root@localhost data]# java -version
2.安装tomcat
[root@localhost data]# ls
apache-tomcat-9.0.16.tar.gz  jdk-8u291-linux-x64.rpm
[root@localhost data]# tar xf apache-tomcat-9.0.16.tar.gz
[root@localhost data]# ls
apache-tomcat-9.0.16         jdk-8u291-linux-x64.rpm
apache-tomcat-9.0.16.tar.gz
[root@localhost data]#
[root@localhost data]# cp -r apache-tomcat-9.0.16 /usr/local/
[root@localhost data]# cd /usr/local
[root@localhost local]# ln -s apache-tomcat-9.0.16/ tomcat
[root@localhost local]# cd tomcat/bin
[root@localhost bin]# useradd -s /sbin/nologin tomcat
[root@localhost bin]# cd /usr/local
[root@localhost local]#
[root@localhost local]# chown tomcat:tomcat tomcat/ -R
[root@localhost local]#
[root@localhost local]# vim /usr/lib/systemd/system/tomcat.service
[Unit]
Description=Tomcat
After=syslog.target network.target

[Service]
Type=forking
ExecStart=/usr/local/tomcat/bin/startup.sh
ExecStop=/usr/local/tomcat/bin/shutdown.sh
RestartSec=3
PrivateTmp=true
User=tomcat
Group=tomcat

[Install]
WantedBy=multi-user.target


[root@localhost local]# systemctl daemon-reload
[root@localhost local]# systemctl start tomcat
[root@localhost local]# systemctl status tomcat
2.为nginx服务配置虚拟主机,新增两个域名 www.kgc.com 和 www.benet.com,使用http://www.kgc.com/index.php可访问上一题的Discuz论坛页面。
使用http://www.benet.com则访问/var/www/html目录中的index.html文件的内容,内容自定义。
1.配置7-1
[root@localhost ~]# vim /usr/local/nginx/conf/nginx.conf


 35     server {
 36         listen       80;
 37         server_name  www.kgc.com;
 38         root /usr/local/nginx/html;
 66         location ~ \.php$ {
 67             root           html;
 68             fastcgi_pass   127.0.0.1:9000;
 69             fastcgi_index  index.php;
 70             fastcgi_param  SCRIPT_FILENAME  /usr/local/nginx/html$fastc    gi_script_name;
 71             include        fastcgi_params;
 72         }

 81         server {
 82                 listen 80;
 83                 server_name www.benet.com;
 84                 root /usr/local/nginx/html;
 85 }
2.客户端7-5配置
C:\Windows\System32\drivers\etc

3.客户机7-5测试结果


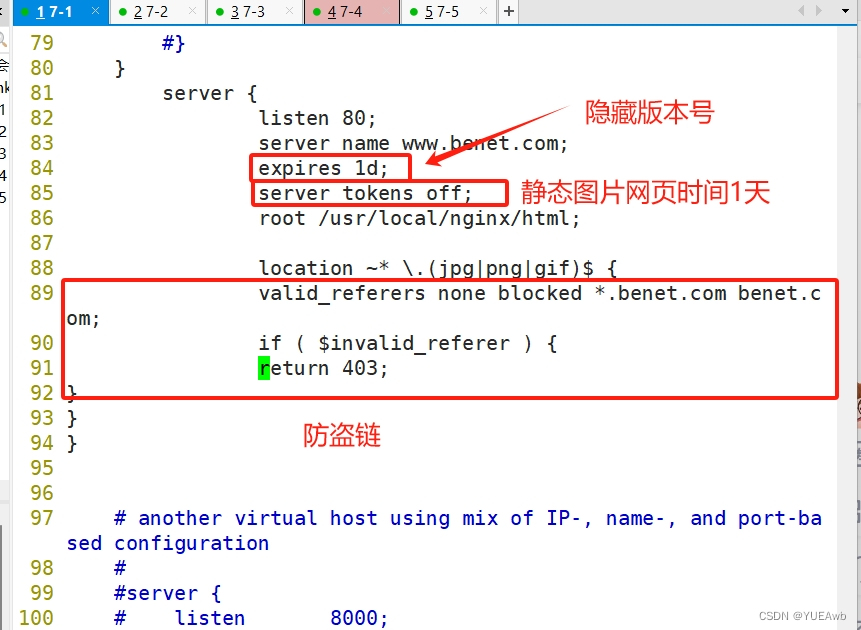
3.对基于www.benet.com域名的虚拟机主机的nginx服务调优:隐藏nginx版本号,缓存静态图片网页时间为1天,设置防盗链功能。
1.配置7-1
 81         server {
 82                 listen 80;
 83                 server_name www.benet.com;
 84                 expires 1d;
 85                 server_tokens off;
 86                 root /usr/local/nginx/html;
 87
 88                 location ~* \.(jpg|png|gif)$ {
 89                 valid_referers none blocked *.benet.com benet.c    om;
 90                 if ( $invalid_referer ) {
 91                 return 403;
 92 }
 93 }
 94 }

2.去7-5客户机测试

4.网关服务器搭建NFS服务,提供的文件系统使用LVM类型,共享目录名称为/opt/nfs;要求根据日期对Discuz论坛服务的访问日志进行日志分割,要求每天生成一份日志文件,保存到NFS服务共享的目录内
1.配置网关服务器7-4
给7-4加硬盘

[root@localhost ~]# echo "- - -" > /sys/class/scsi_host/host0
-bash: /sys/class/scsi_host/host0: 是一个目录
[root@localhost ~]# echo "- - -" > /sys/class/scsi_host/host0/scan
[root@localhost ~]# echo "- - -" > /sys/class/scsi_host/host1/scan
[root@localhost ~]# echo "- - -" > /sys/class/scsi_host/host2/scan
[root@localhost ~]#
[root@localhost ~]# lsblk
NAME            MAJ:MIN RM  SIZE RO TYPE MOUNTPOINT
sda               8:0    0   60G  0 disk
├─sda1            8:1    0    1G  0 part /boot
└─sda2            8:2    0   54G  0 part
  ├─centos-root 253:0    0   50G  0 lvm  /
  └─centos-swap 253:1    0    4G  0 lvm  [SWAP]
sdb               8:16   0   20G  0 disk
sdc               8:32   0   20G  0 disk
sr0              11:0    1 1024M  0 rom
[root@localhost ~]#

[root@localhost ~]# pvcreate /dev/sdb /dev/sdc
  Physical volume "/dev/sdb" successfully created.
  Physical volume "/dev/sdc" successfully created.
[root@localhost ~]#
[root@localhost ~]# vgcreate vg /dev/sdb /dev/sdc
  Volume group "vg" successfully created
[root@localhost ~]#
[root@localhost ~]# lvcreate -n lvm -L 30G /dev/vg
  Logical volume "lvm" created.
[root@localhost ~]#
[root@localhost ~]# mkfs.xfs /dev/vg/lvm
meta-data=/dev/vg/lvm            isize=512    agcount=4, agsize=1966080 blks
         =                       sectsz=512   attr=2, projid32bit=1
         =                       crc=1        finobt=0, sparse=0
data     =                       bsize=4096   blocks=7864320, imaxpct=25
         =                       sunit=0      swidth=0 blks
naming   =version 2              bsize=4096   ascii-ci=0 ftype=1
log      =internal log           bsize=4096   blocks=3840, version=2
         =                       sectsz=512   sunit=0 blks, lazy-count=1
realtime =none                   extsz=4096   blocks=0, rtextents=0
[root@localhost ~]# mount /dev/vg/lvm /mnt
[root@localhost ~]#
[root@localhost ~]# mkdir /mnt/nfs
[root@localhost ~]# vim /etc/exports
[root@localhost ~]# cat /etc/exports
/mnt/nfs *
[root@localhost ~]# systemctl start nfs
[root@localhost ~]# exportfs -v
/mnt/nfs      	<world>(ro,sync,wdelay,hide,no_subtree_check,sec=sys,secure,root_squash,no_all_squash)
[root@localhost ~]#

2.配置Nginx服务器7-1-------共享目录
[root@localhost html]# showmount -e 192.168.91.104
Export list for 192.168.91.104:
/mnt/nfs *
[root@localhost html]# mount 192.168.91.104:/mnt/nfs /mnt/
[root@localhost html]#
[root@localhost html]# df
文件系统                   1K-块     已用     可用 已用% 挂载点
/dev/mapper/centos-root 52403200 13761760 38641440   27% /
devtmpfs                  917588        0   917588    0% /dev
tmpfs                     933512        0   933512    0% /dev/shm
tmpfs                     933512     9192   924320    1% /run
tmpfs                     933512        0   933512    0% /sys/fs/cgroup
/dev/sda1                1038336   182400   855936   18% /boot
tmpfs                     186704       36   186668    1% /run/user/0
/dev/sr0                 4414592  4414592        0  100% /run/media/root/CentOS 7 x86_64
192.168.91.104:/mnt/nfs 31441920    32768 31409152    1% /mnt
[root@localhost html]#

3.日志分割7-1
[root@localhost ~]# vim xzq.sh
[root@localhost ~]# cat xzq.sh
#!/bin/bash
day=`date "+%Y-%m-%d"`
log="/usr/local/nginx/logs"
pid=`cat /usr/local/nginx/nginx/logs/nginx.pid`

mv /${log}/access.log /opt/${day}
kill -USR1 ${pid}
sed -i '/.*bbs.*/!p' /opt/${day}
[root@localhost ~]# crontab -e
no crontab for root - using an empty one
crontab: installing new crontab
[root@localhost ~]# crontab -l
59 23 * * * bash ~/xzq.sh
[root@localhost ~]#

5.要求配置location匹配请求地址http://www.kgc.com/test/XXXX,使用户访问该路径下的文件时返回/var/share/nginx/html/目录下的文件内容。要求使用rewrite将使用域名www.benet.com 请求以 .php 结尾的访问都跳转到域名www.kgc.com上,而且后面的参数保持不变,比如访问http://www.benet.com/bbs/index.php跳转到http://www.kgc.com/bbs/index.php。
1.配置7-1Nginx服务器
74         location /test {
75         alias /var/share/nginx/html;
76 } 
 92                 location ~* \.php$ {
 93                 rewrite (.*) http://www.kgc.com/$1;
94 } 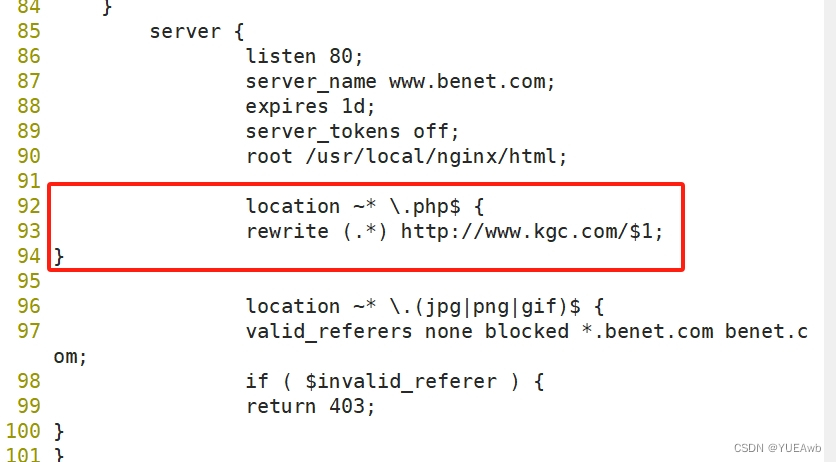
[root@localhost ~]# vim /usr/local/nginx/conf/nginx.conf
[root@localhost ~]# nginx -t
nginx: the configuration file /usr/local/nginx/conf/nginx.conf syntax is ok
nginx: configuration file /usr/local/nginx/conf/nginx.conf test is successful
[root@localhost ~]#
[root@localhost ~]# mkdir /var/share/nginx/html -p
[root@localhost ~]# nginx -s reload
[root@localhost ~]# cd /var/share/nginx/html
[root@localhost html]# ls
[root@localhost html]# echo share > index.html
[root@localhost html]# nginx -s reload

2.浏览器访问测试结果

6.在Nginx服务器上对基于www.benet.com域名的虚拟机主机设置动静分离由nginx提供静态页面服务,将对 .jsp文件的动态页面请求转发到Tomcat 服务器处理,并实现负载均衡
1.配置Nginx服务器7-1
[root@localhost html]# vim /usr/local/nginx/conf/nginx.conf
[root@localhost html]# nginx -t
nginx: the configuration file /usr/local/nginx/conf/nginx.conf syntax is ok
nginx: configuration file /usr/local/nginx/conf/nginx.conf test is successful
[root@localhost html]# vim /usr/local/nginx/conf/nginx.conf
[root@localhost html]# nginx -s reload

 17 http {
 18     include       mime.types;
 19     default_type  application/octet-stream;
 20     upstream web {
 21         server 192.168.91.102:8080;
 22         server 192.168.91.103:8080;
23 } 
100                 location ~* \.(jpg|png|gif|html)$ {
101                 root html;
102                 index index.html index.htm;
103 }
104
105                 location ~* \.jsp$ {
106                 proxy_pass http://web;
107 }

[root@localhost nginx]# cd /var/share/nginx/html
[root@localhost html]# ls
index.html
[root@localhost html]# cat index.html
share
[root@localhost html]# rm -rf index.html
[root@localhost html]# ls
[root@localhost html]# echo jingtai > index.html
[root@localhost html]# cat index.html
jingtai
[root@localhost html]#

2.配置Tomcat服务器7-2
[root@localhost ~]# cd /usr/local/tomcat/webapps
[root@localhost webapps]# echo 7-2 > index.jsp
[root@localhost webapps]# cat index.jsp
7-2
[root@localhost webapps]# systemctl restart tomcat
[root@localhost webapps]#

3.配置Tomcat服务器7-3
[root@localhost ~]# cd /usr/local/tomcat/webapps
[root@localhost webapps]# echo 7-3 > index.html
[root@localhost webapps]# cat index.html
7-3
[root@localhost webapps]# systemctl restart tomcat
[root@localhost webapps]#

4.客户机7-5访问测试

7.在网关服务器上设置SNAT/DNAT,使client使用网关服务器的ens36接口的IP地址访问也可实现上一题的效果。
1.配置Client7-5

[root@centos5 network-scripts]# systemctl restart network

2.配置Nginx服务器7-1
[root@localhost network-scripts]# vim ifcfg-ens33
[root@localhost network-scripts]# cat ifcfg-ens33
TYPE=Ethernet
PROXY_METHOD=none
BROWSER_ONLY=no
BOOTPROTO=static
DEFROUTE=yes
IPV4_FAILURE_FATAL=no
IPV6INIT=yes
IPV6_AUTOCONF=yes
IPV6_DEFROUTE=yes
IPV6_FAILURE_FATAL=no
IPV6_ADDR_GEN_MODE=stable-privacy
NAME=ens33
UUID=c1d6be33-1c8f-4836-a6ae-4e14aeca1923
DEVICE=ens33
ONBOOT=yes
IPADDR=192.168.91.100
NETMASK=255.255.255.0
GATEWAY=192.168.91.104
DNS1=8.8.8.8
[root@localhost network-scripts]# systemctl restart network
3.配置网关服务器7-4
[root@localhost ~]# sysctl -a | grep ip_forward
sysctl: reading key "net.ipv6.conf.all.stable_secret"
sysctl: reading key "net.ipv6.conf.default.stable_secret"
net.ipv4.ip_forward = 0
net.ipv4.ip_forward_use_pmtu = 0
sysctl: reading key "net.ipv6.conf.ens33.stable_secret"
sysctl: reading key "net.ipv6.conf.ens36.stable_secret"
sysctl: reading key "net.ipv6.conf.lo.stable_secret"
sysctl: reading key "net.ipv6.conf.virbr0.stable_secret"
sysctl: reading key "net.ipv6.conf.virbr0-nic.stable_secret"
[root@localhost ~]# vim /etc/sysctl.conf
[root@localhost ~]# cat /etc/sysctl.conf
# sysctl settings are defined through files in
# /usr/lib/sysctl.d/, /run/sysctl.d/, and /etc/sysctl.d/.
#
# Vendors settings live in /usr/lib/sysctl.d/.
# To override a whole file, create a new file with the same in
# /etc/sysctl.d/ and put new settings there. To override
# only specific settings, add a file with a lexically later
# name in /etc/sysctl.d/ and put new settings there.
#
# For more information, see sysctl.conf(5) and sysctl.d(5).
net.ipv4.ip_forward = 1
[root@localhost ~]# sysctl -p
net.ipv4.ip_forward = 1
[root@localhost ~]#

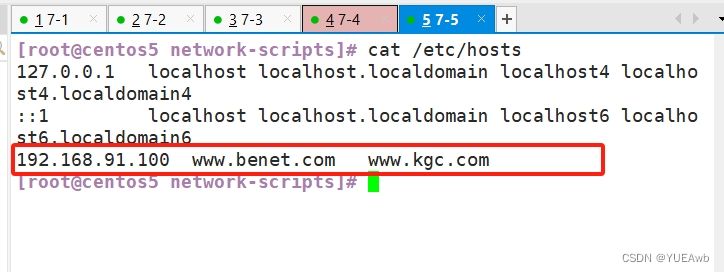
添加域名解析
[root@localhost ~]# vim /etc/hosts
[root@localhost ~]# cat /etc/hosts
127.0.0.1   localhost localhost.localdomain localhost4 localhost4.localdomain4
::1         localhost localhost.localdomain localhost6 localhost6.localdomain6
192.168.91.100	www.kgc.com	www.benet.com
[root@localhost ~]#

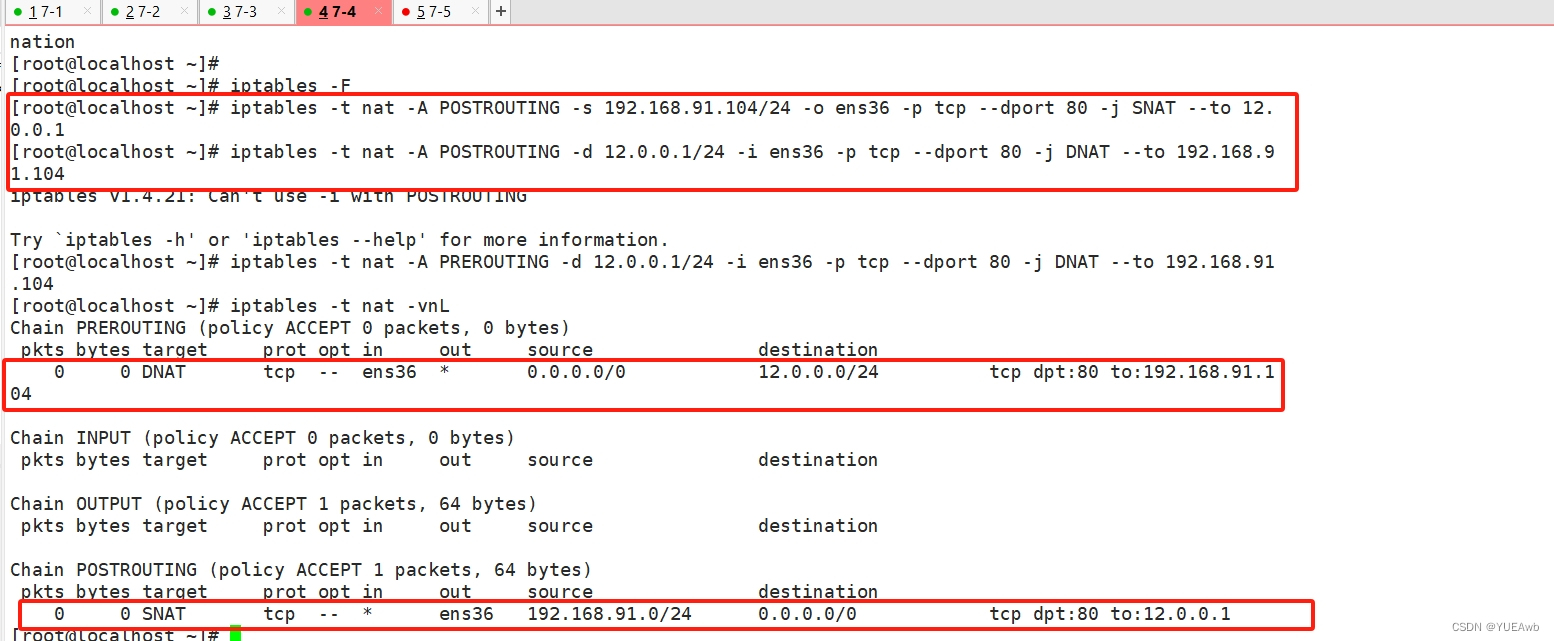
添加iptables防火墙
[root@localhost ~]# iptables -F
[root@localhost ~]# iptables -t nat -A POSTROUTING -s 192.168.91.104/24 -o ens36 -p tcp --dport 80 -j SNAT --to 12.0.0.1
[root@localhost ~]# iptables -t nat -A POSTROUTING -d 12.0.0.1/24 -i ens36 -p tcp --dport 80 -j DNAT --to 192.168.91.104
iptables v1.4.21: Can't use -i with POSTROUTING

Try `iptables -h' or 'iptables --help' for more information.
[root@localhost ~]# iptables -t nat -A PREROUTING -d 12.0.0.1/24 -i ens36 -p tcp --dport 80 -j DNAT --to 192.168.91.104
[root@localhost ~]# iptables -t nat -vnL
Chain PREROUTING (policy ACCEPT 0 packets, 0 bytes)
 pkts bytes target     prot opt in     out     source               destination
    0     0 DNAT       tcp  --  ens36  *       0.0.0.0/0            12.0.0.0/24          tcp dpt:80 to:192.168.91.104

Chain INPUT (policy ACCEPT 0 packets, 0 bytes)
 pkts bytes target     prot opt in     out     source               destination

Chain OUTPUT (policy ACCEPT 1 packets, 64 bytes)
 pkts bytes target     prot opt in     out     source               destination

Chain POSTROUTING (policy ACCEPT 1 packets, 64 bytes)
 pkts bytes target     prot opt in     out     source               destination
    0     0 SNAT       tcp  --  *      ens36   192.168.91.0/24      0.0.0.0/0            tcp dpt:80 to:12.0.0.1
[root@localhost ~]#